Book Image

Data Acquisition using LabVIEW

By : Behzad Ehsani
Book Image

Data Acquisition using LabVIEW

By: Behzad Ehsani

Overview of this book

NI LabVIEW's intuitive graphical interface eliminates the steep learning curve associated with text-based languages such as C or C++. LabVIEW is a proven and powerful integrated development environment to interact with measurement and control hardware, analyze data, publish results, and distribute systems. This hands-on tutorial guide helps you harness the power of LabVIEW for data acquisition. This book begins with a quick introduction to LabVIEW, running through the fundamentals of communication and data collection. Then get to grips with the auto-code generation feature of LabVIEW using its GUI interface. You will learn how to use NI-DAQmax Data acquisition VIs, showing how LabVIEW can be used to appropriate a true physical phenomenon (such as temperature, light, and so on) and convert it to an appropriate data type that can be manipulated and analyzed with a computer. You will also learn how to create Distribution Kit for LabVIEW, acquainting yourself with various debugging techniques offered by LabVIEW to help you in situations where bugs are not letting you run your programs as intended. By the end of the book, you will have a clear idea how to build your own data acquisition system independently and much more.
Table of Contents (18 chapters)
Data Acquisition Using LabVIEW
Credits
About the Author
Acknowledgments
About the Reviewer
www.PacktPub.com
Preface
9
Alternate Software for DAQ

Debugging - Set Breakpoint


As the title suggests, a programmer may set one or several breakpoints on various wires on different locations of a given VI. As expected, once the execution of the VI reaches the given stop point, LabVIEW stops the execution of the VI and waits for the user input.

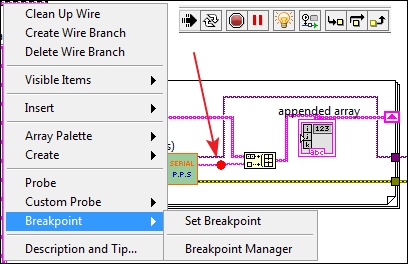
As indicated in the preceding figure, to create a Breakpoint in a given location, right-click on the exact spot where you want to have a breakpoint, and from the sub menu belonging to the Breakpoint select Set Breakpoint. Note that the preceding screenshot is a composite diagram that shows the tool bar section of the Block Diagram window of the same example we have been using in this chapter. We have placed a breakpoint right after the SUB-VI and just before a value is added to the array. Note also that in this particular case, we have also enabled Highlight Execution. Currently, all tools are simultaneously available to us. From left to right:

  1. Of course the Run button is pressed and the VI is running...