This game will be no fun without something to shoot at and blow up. So, we are going to create some targets for the cannonball to hit. We will first draw a new sprite. Then, we are going to use a very cool new feature of Scratch 2.0: the ability to create copies of a base object. This can save a lot of time when you want to have multiple objects that work the same way. This is often the case in games. Think of all the enemies you've squashed or all the coins you've picked up in various action games.
We will first draw a traditional archery style target, with a circular disk of red and white rings placed on a simple wooden stand, shown as follows:

To create the target, follow these steps:
Create another new sprite with the Paintbrush button.
Select the Ellipse tool and make sure the fill color is red and the border color is white.
Adjust the line thickness to create a fairly thick line.
Draw a vertical oval shape.
Don't worry too much about the size. We will adjust the proportions later. It's easier to draw big shapes first, so you can easily see the details and relative placement. When the drawing is complete, you can scale it down to the desired size. First, we need to create two more oval shapes.
The first method to create these shapes is as follows:
Click on the Ellipse tool.
Place your cursor over the existing oval at the top-left edge of the red fill.
Click on it and drag to the lower-right edge of the red fill to draw another oval. This oval will fit neatly inside the first one.
Repeat these steps to create a third, even smaller oval.
The second method to create these shapes is as follows:
Click on the Duplicate button in the toolbar.
Click on the oval shape you have already made.
When you move the cursor, you will see a transparent "ghost" of the circle, moving along with the cursor.
Click anywhere on the drawing canvas to place a copy of the oval there.
Use the scaling widgets you see around the shape when it's selected, to scale the copied circles down to the right size.
Drag them inside each other to create the finished target disk.

Now that we have our oval shapes, we can continue building our target!
Click on the appropriate sample from the color swatches to change the line color to brown.
Click on the Line tool and draw a vertical line, about as high as the target disk.
Draw another line diagonally down from the upper tip of the first line.
The two legs of the target stand are complete.
Click on the Select tool and drag a box around the entire target disk. This will select all three shapes as a single object.
Click on and drag the rotation pin at the top of the selection box and rotate the disk upward.

Click on and drag the shape over the target stand. The center of the disk should line up with the top of the stand.
Note
About layers
Perhaps, your shapes are overlapping in the wrong way, with the stand on top of the disk, instead of underneath it. This means that the shapes are sorted in the wrong order. A Scratch drawing consists of separate layers, like sheets of transparent papers stacked on top of each other. The sheets on the top will cover the sheets underneath. This way you can create the illusion of depth, by placing objects that should be far away at the bottom of the stack.

Change the order of shapes with the Forward a layer and Back a layer buttons, if needed.

Select the entire drawing by dragging a box around it with the Select tool.
Scale the entire drawing down to the desired size. You can scale proportionately (horizontally and vertically, evenly) if you hold a corner widget while dragging.
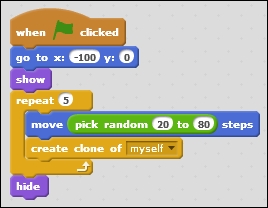
We will write a script for the target we just drew; this script will place copies of the object at random locations on the stage. To do this we will use the new clone block. This is one of the most exciting new features of Scratch 2.0. Instead of manually copying your sprites N number of times, you can just use a script to do this work for you. It can save a lot of time when creating and editing objects.
This script will start with a when <green flag> clicked block, just like the earlier ones.
Attach a go to x: () y: () block. Fill in the numbers
-100and0.
Note
About X-Y coordinates
X stands for the horizontal position, that is, how far left or right something is. Y stands for the vertical position, that is, how high or low something is. This way the computer can easily save the position of any object on the stage. Look at the bottom-right corner of the stage. Here you will see the current position of the mouse shown as X and Y coordinates. This can be a helpful tool when deciding where you want objects to appear on stage with a script. Just point to the right place, look at the numbers, and put them at the right places in the script.
The center point of the Scratch stage has the coordinates (X:0,Y:0). The horizontal positions range from -240 to +240. And the vertical positions range from -180 to +180. If you look at the assignment for the previous target, you will notice that the target is placed somewhat left of the center (-100) and on the center line vertically (0).
Next, add a show block. Yes, the sprite is already visible now, but at the end of the script we will make it disappear. This block makes sure it appears again in time when the script runs.
We are going to make five target clones. We will let the target sprite step right five times and create a clone of itself at each step.
Attach a repeat () block and fill in
5.Inside the repeat () block place a move () steps block.
Instead of a fixed number, use a pick random
20to80block to make the spots where a target will appear a little unpredictable and more interesting.Then, attach the new create clone of () block underneath the move command inside the repeat block. Select myself.
Finally, use the hide option on the original sprite. Place this block at the end, outside the loop.

So now we have a cannon, a cannonball, a bunch of randomly created targets, but still no exciting game. The cannonball can fly through the air, but it doesn't do anything when hitting a target; it just passes right through. This can be easily fixed.
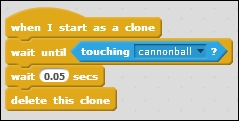
We'll continue scripting the target first. After a clone is created, you can start running a script on the clone. This is a new way of initiating a script.
Start a new script in the target object with a when I start as a clone block.
Attach a wait until () block. This will pause the script until something happens.
Place a touching ()? condition block inside the slot. Select cannonball.
The next step is to attach a wait () secs block.
Fill in a very short time of
0.05seconds. This might seem a little useless, but it will give the other scripts (specifically the cannonball script in this case) time to respond before the target disappears.The last step is to delete this clone.

The targets disappear when hit by the cannonball, but the cannonball can go on through multiple targets. This makes the game a bit too easy. It would be better if the cannonball is stopped by hitting a target as well. So a new cannonball has to be aimed and shot for each target.
Making the cannonball disappear on contact with a target just requires a little addition to the existing script. The cannonball is already reset to its original position when hitting the stage edge. We can use this already existing script and also check for hitting a target.
Click on the cannonball sprite in the Sprites view to see its scripting panel.
Grab an () or () operator block.
Pull the touching <edge>? block from the script and place it in one of the () or () slots. It doesn't matter which one.
Also get a new touching ()? block. Place it in the other slot and have this condition checking for
target. (Have you already properly named your target sprite?)Place this entire conditional structure in the now vacant condition slot in the existing script.
The cannonball gets reset when it touches the edge or a target. It doesn't matter that the target is a clone. It is still called a "target".

Currently the cannonball is moving on in a straight line. In reality, a cannonball doesn't move like that (but we'll be fixing this). It is heavy, and what goes up must come down. You can try it yourself with a ball or a stone. Throw it upwards in front of you and see what happens. Just be careful with the neighbor's windows!


