
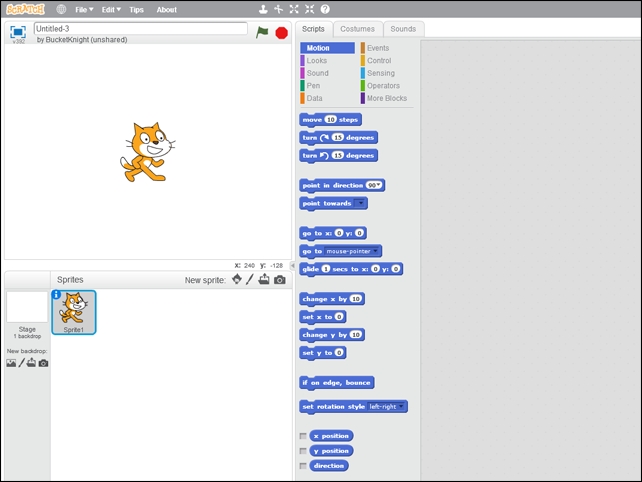
As an active Scratch designer and programmer, we'll spend a lot of time in the Scratch editor. The entire editor is collected in a single page, with a few options that will open a pop-up window to make a selection. In Scratch 2.0, the editor has changed a bit compared to the previous version. So we'll have a look at what's changed and what has stayed the same.
At first, you'll see that the screen is divided in to three sections. There's the Stage area, where we view the results of our work. Below that is the Sprites area, where we can view and select all our sprites. These are like the actors that take part in our project. Clicking on a sprite highlights it as the active sprite to work with.
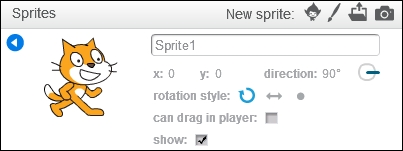
As a new addition, each sprite has a small info button in the top-left corner. Clicking on this button leads to a Properties panel where we can change some general properties such as the name of the sprite, its default direction, and the directional restraints. These used to be in a separate info window above the scripts view. Since changes to these properties are made infrequently, they are now hidden beneath the sprite to save some room.
The way to add sprites has been changed a bit as well. Since the tool is now used online, the importing of existing sprites has been split. We can now choose to load a sprite from the default online library, or we can upload a sprite from our own computer to use online. These uploaded sprites are never directly accessible to other Scratchers, unless you share your project. The option to take a picture with your webcam has been moved to a more obvious location, next to the other sprite-creation icons. This feature was already available, but it used to be hidden under the Costumes tab.
Next, let's have a look at the biggest part of the screen, the Scripts/Costumes/Sounds editor. This is the part of the editor where we will spend most of our time in either creating sprites and costumes or adding scripts to sprites. Between the editor window and the Stage and Sprites windows, you'll find a thin vertical line with an arrow somewhere around the halfway point. Clicking on this arrow will expand/shrink the editor. This allows more space to create scripts and costumes, or more space to view the project and arrange sprites.
At the top of the screen, there is a menu bar with some general functions, such as saving and loading a project. You'll also find the quick copy, delete, and scaling tools here. Added to that is a useful help button. If you are confused about something, just click on the help button and then click on the part that's confusing you. A help page will pop out that explains a bit about the feature you clicked on.

You can also browse through these help pages manually if you just want to learn more about Scratch. You can open the help menu by clicking the question mark icon at the top of the right bar.