
There are a few places in the Scratch editor where we can create or import images. If you used Scratch before, you will be familiar with them already. What has changed is that you can now draw images in two different ways. It's now possible to create sprites as bitmap images or as vector images. Each of these modes has some advantages and disadvantages.
As mentioned before, we can import images from the default library or from our local hard drive. We can do this for the Stage object while adding a new sprite, and also in the Costumes tab to add a new costume. You'll see that the same icons are repeated thrice in these three locations.
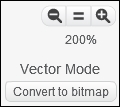
The more interesting addition is the toggle between Convert to bitmap and Vector Mode. You can find this button at the bottom right of the costumes editor, as shown in the following screenshot. What this does is it switches the created sprite between two different ways of drawing. It also changes how the image is calculated by the computer. This can make a difference to the performance speed while the project is running. Let's look at the differences between these two drawing modes.
Bitmap mode is what you will be accustomed to from the Scratch 1.4 program. In bitmap mode, sprites consist of pixels. Pixels are little squares that are placed side by side to form an image. An image like this is saved in the computer's memory as rows of pixels using the same color. For example, there are 10 transparent pixels, then two black pixels, then six orange pixels, and so on. The tools to create a bitmap image are similar to using a paintbrush on paper. Wherever you touch the paper with the brush, a clump of color is created. To create sharper graphics, the toolbox also has options to create (filled) rectangles and ellipses. It's also possible to erase parts of the image, pixel by pixel, if necessary.
Vector mode works quite differently. In vector mode, an image is described as curving lines. An enclosed space in between the lines is simply filled with a solid color. The curves and direction of the lines are saved in the computer's memory as math calculations. When an image is fairly simple, with relatively few complex curves, this can save a lot of memory compared to the saving of bitmap images. An advantage of vector images is that they can be reshaped by pushing and pulling the curved lines around. Another benefit is that vector images can be scaled up without a loss of quality. When bitmap images are scaled up, the pixels grow in size and you get to see the jagged edges. Vector images don't have that problem because the entire vector calculation is just multiplied to recreate the image in a bigger size.
When an image contains many different shapes or subtle color differences, like a photograph for instance, vector images don't work very well anymore. An image like that would contain so many curves and little color-filled shapes that the amount of calculations to save adds up. The resulting file would become bigger than a straightforward bitmap.
Scratch still offers many ways to include images in your projects. There are even a few more options than before. You can get images from elsewhere, take a picture with your webcam, or draw your own images directly in Scratch. The new vector mode offers another way of drawing that can be useful at times. Just keep in mind what kind of an image you want to create, and experiment with both bitmap and vector images to see which one gives you the best result.