

Promoting a server to a domain controller
Promoting a Windows Server installation to a domain controller consists of three steps:
- Installing the Active Directory Domain Services role
- Promoting a server to a domain controller
- Checking proper promotion
When using dcpromo.exe, you do not have to install the role beforehand.
You can promote the server in several ways. The following table displays the possibilities:
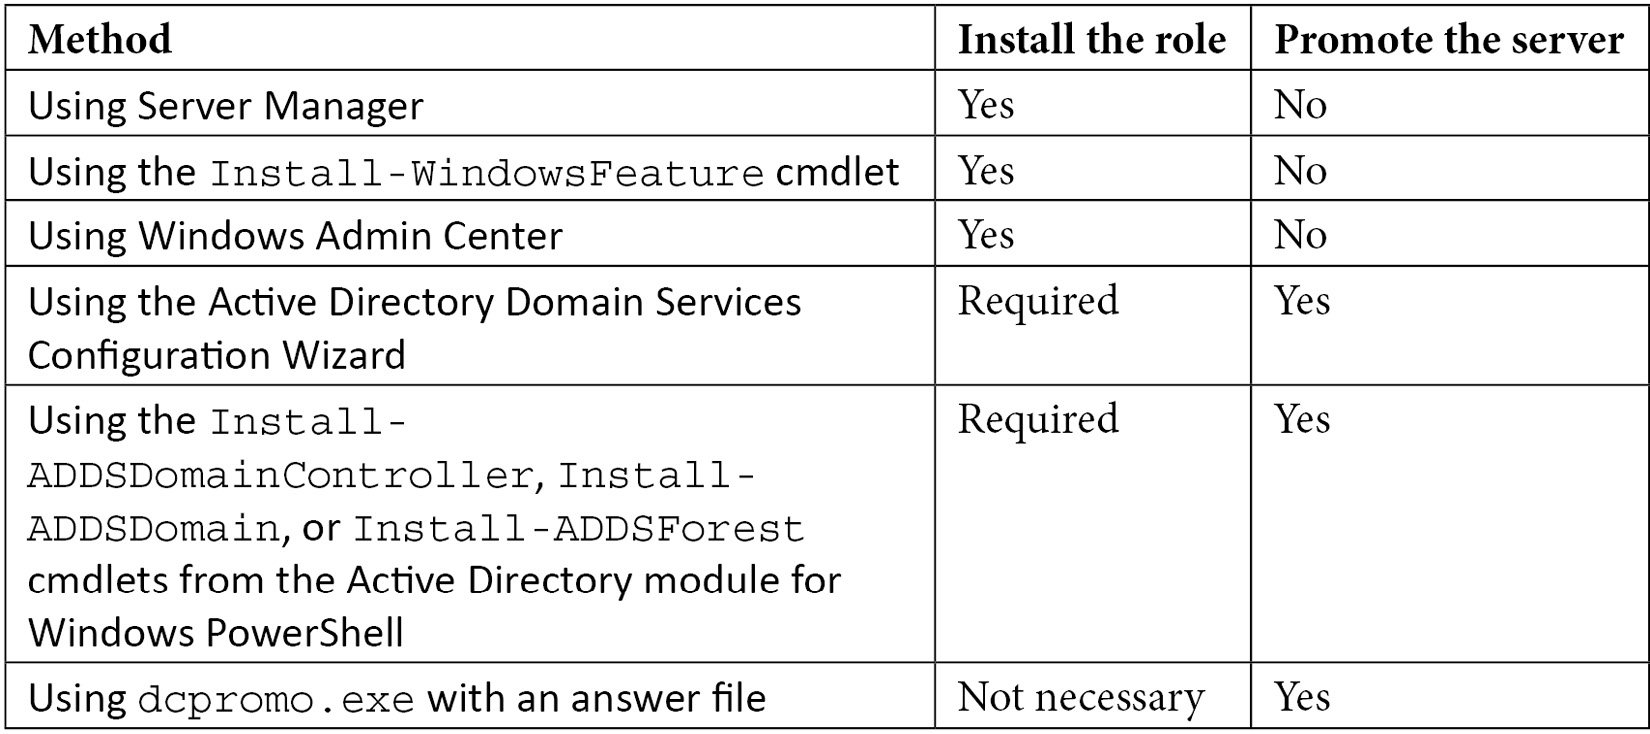
Table 2.1 – Methods for installing the Active Directory Domain Services role and promoting a server to a domain controller
The methods in the table are all explained in more detail in this recipe.
Getting ready
In some organizations, changes can only be made using scripts and must be accompanied by rollback scripts. In these cases, the answer file and PowerShell cmdlets offer the best method. On Server Core installations of Windows Server, only the last two options are available to promote the server, either on the Command Prompt or through Windows Admin Center, unless you use Server Manager to remotely manage the server you intend to promote to a domain controller.
The Active Directory Domain Services Configuration Wizard no longer features the option to not reboot the Windows Server installation intended as a domain controller after successful promotion. If you need this option – for instance, to harden the domain controller before the first boot with custom scripts – then you can't use the Wizard. Use dcpromo.exe or the Install-DDSDomainController, Install-ADDSDomain, or Install-ADDSForest cmdlets in these cases.
When creating an additional domain controller in an existing Active Directory domain or forest, check for proper Active Directory replication before implementing the new domain controller.
How to do it...
Unless you are using dcpromo.exe to promote the Windows Server installation to a domain controller, the Active Directory Domain Services role needs to be installed first.
Installing the Active Directory Domain Services role
There are three ways to install the Active Directory Domain Services role:
- Using Server Manager
- Using the
Install-WindowsFeaturecmdlet - Using Windows Admin Center
Using Server Manager
To install the Active Directory Domain Services role using Server Manager, perform these steps:
- Press Start.
- Search for Server Manager and click its corresponding search result or run
servermanager.exe. The Server Manager window appears. - In the gray top bar of Server Manager, click Manage.
- Select Add Roles and Features from the menu. The Before you begin screen appears, as shown in the following screenshot:
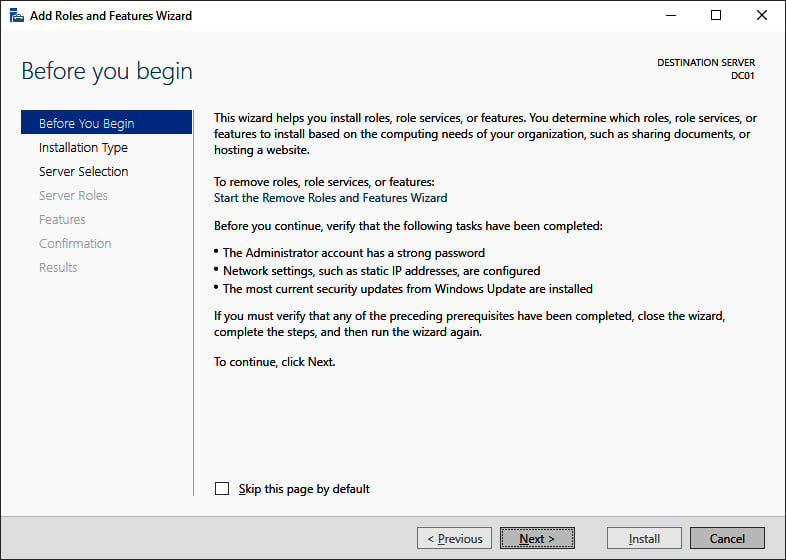
Figure 2.1 – The Before you begin screen of the Add Roles and Features Wizard
- On the Before you begin screen, click Next >.
- On the Select installation type screen, select Role-based or feature-based installation and click Next >.
- On the Select destination server screen, select either the local Windows Server installation from the server pool list, the remote Windows Server installation you intend to promote to the domain controller from the server pool list, or both types of resources.
- Click Next >.
- On the Select server roles screen, select the Active Directory Domain Services role from the list of available roles. The Add Roles and Features Wizard pop-up window appears, as shown in the following screenshot:
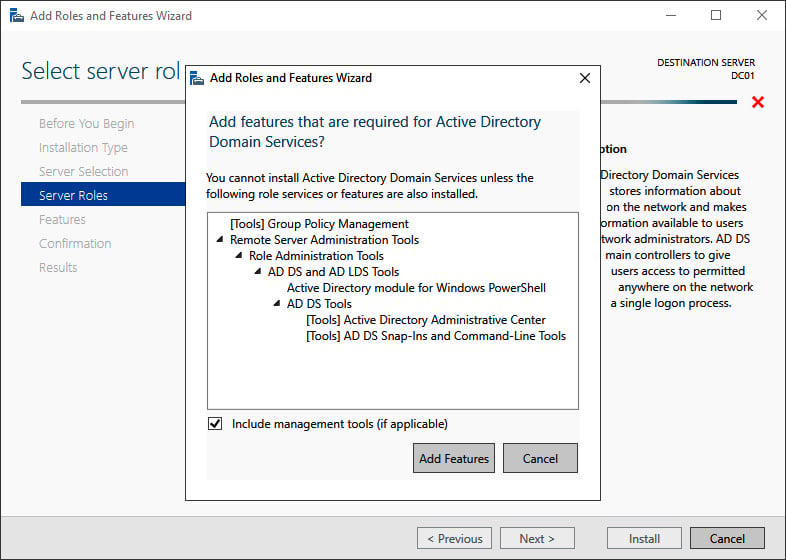
Figure 2.2 – The Add Roles and Features Wizard pop-up window
- On the pop-up screen, click the Add Features button to add the features that are required for Active Directory Domain Services. These features include the Group Policy Management tool, Active Directory module for Windows PowerShell, Active Directory Administrative Center, and AD DS Snap-Ins and Command-Line Tools.
- Back on the Select server roles screen, click Next >.
- On the Select server features screen, click Next >.
- On the Active Directory Domain Services screen, providing an overview of Active Directory and Azure AD, click Next >.
- On the Confirm installation selections screen, click Install. The role and features will now be installed:
Figure 2.3 – The Installation progress page of Add Roles and Features Wizard
- When configuration of the Active Directory Domain Services server role is done, click Close to close the Add Roles and Features Wizard:
Using the Install-WindowsFeature cmdlet
As an alternative to using Server Manager, the Install-WindowsFeature cmdlet can be used. Perform the following line of Windows PowerShell in an elevated window to install the Active Directory Domain Services role:
Install-WindowsFeature AD-Domain-Services -IncludeManagementTools
The preceding line of Windows PowerShell offers the only way to install the Active Directory Domain Services role on a Server Core installation of Windows Server locally.
Using Windows Admin Center
Although a PowerShell script can be run from Windows Admin Center, it also offers a native way to install roles and features. Perform these steps:
- In Windows Admin Center, click the Windows Server installation you want to install the Active Directory Domain Services role onto from the All Connections list.
- In the left navigation menu, click Roles & features.
- In the main pane, select the Active Directory Domain Services role in the Roles and features list by clicking the selection box to the left of it:
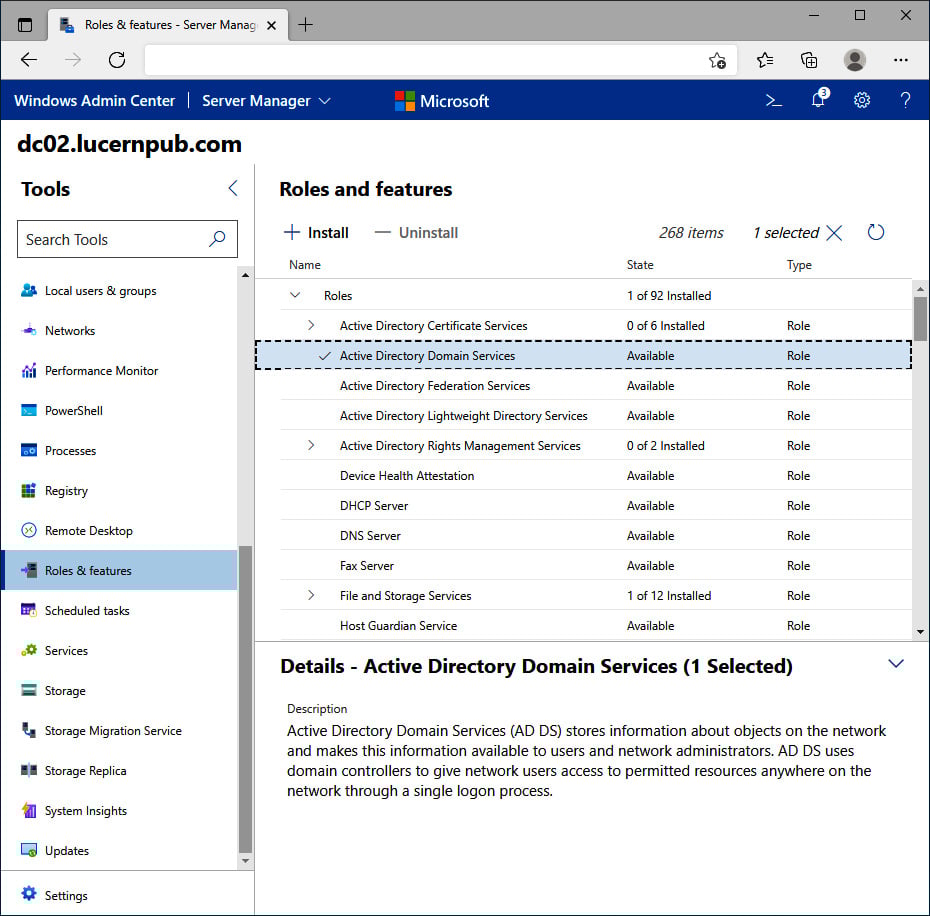
Figure 2.4 – The Active Directory Domain Services role selected in Windows Admin Center
- Click + Install. The Install Roles and Features blade appears.
- Click Yes to continue the installation with the additional Active Directory module for Windows PowerShell, Group Policy Management, AD DS Snap-Ins and Command-Line Tools, and Active Directory Administrative Center features installed.
- A notification pops up, informing you that Windows Admin Center has Successfully completed installation of Active Directory Domain Services, which appears in the notification area when the roles and features have been successfully installed.
Promoting the server to a domain controller
There are three ways to promote a Windows Server installation to a domain controller:
- Using the Active Directory Domain Services Configuration Wizard
- Using the
Install-DDSDomainController,Install-ADDSDomain, orInstall-ADDSForestcmdlets from the Active Directory module for Windows PowerShell - Using
dcpromo.exewith an answer file
Using the Active Directory Domain Services Configuration Wizard
Perform these steps to promote the server to a domain controller:
- Press Start
- Search for Server Manager, click its search result, or run
servermanager.exeor return to Server Manager when you've accomplished installing the Active Directory Domain Services role using Server Manager. - In the left navigation pane of Server Manager, click AD DS.
- Click the More... link in the blue ribbon (as shown in the following screenshot) titled Configuration required for Active Directory Domain Services at server:
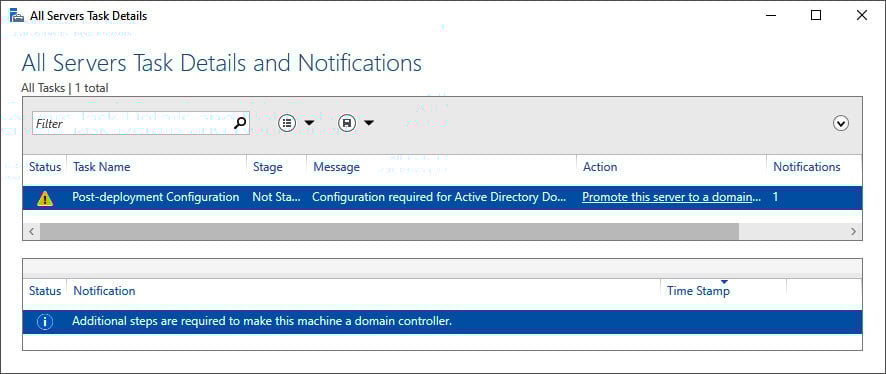
Figure 2.5 – Promote this server to a domain controller link in All Servers Task Details and Notifications
- On the All Servers Task Details and Notifications screen, follow the Promote this server to a domain controller link. The Active Directory Domain Services Configuration Wizard window appears:
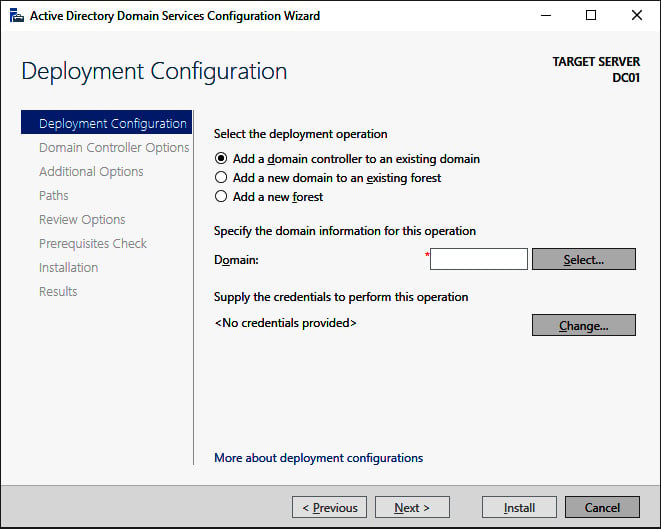
Figure 2.6 – The Deployment Configuration screen of the Active Directory Domain Services Configuration Wizard
Tip
In the top-right corner of every Active Directory Domain Services Configuration Wizard screen, it shows the hostname of the Windows Server installation that you're promoting to a domain controller.
- On the Deployment Configuration screen (as shown in the preceding screenshot), select the type of deployment you intend:
- Add a domain controller to an existing domain
- Add a new domain to an existing forest
- Add a new forest
Important Note
By default, the Add a domain controller to an existing domain option is selected. This option will create a replica domain controller in the domain. If you're not sure which selection to make, please refer to the Choosing between a new domain or forest recipe in Chapter 1, Optimizing Forests, Domains, and Trusts. The More about deployment configurations link at the bottom of the Deployment Configuration screen provides a Microsoft link with more information.
- Depending on your choices on the Deployment Configuration screen, supply information for the Domain or Credentials fields. Click Next to proceed to the next screen.
- In all the other Active Directory Domain Services Configuration Wizard screens, make the appropriate choices for the deployment scenario. Click Next > every time to proceed to the next screen, until you reach the Review Options screen:
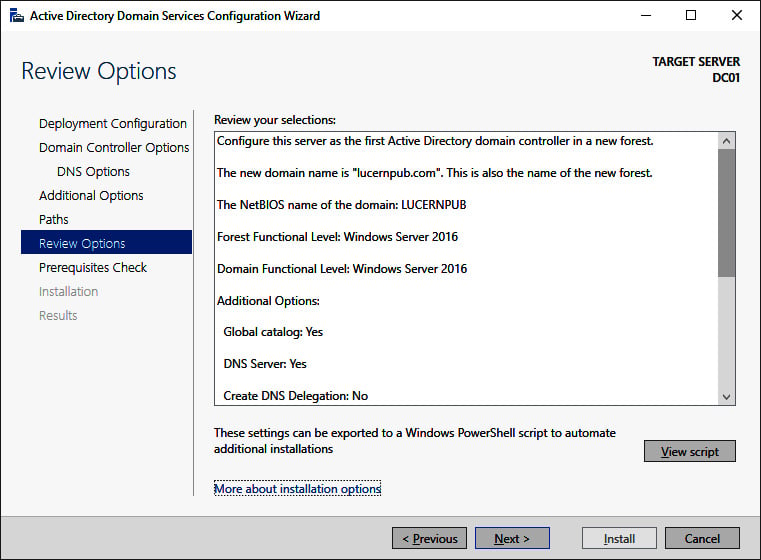
Figure 2.7 – The Review Options screen of the Active Directory Domain Services Configuration Wizard
- On the Review Options screen, review the choices made. Click Next> to proceed to the Prerequisites Check screen.
Tip
The Review Options screen features a button labeled View script. This button displays the Windows PowerShell script used to execute the domain controller promotion. This reusable script may be a real timesaver, especially when adding several domain controllers to an existing domain.
- After the prerequisites checks have been performed, click Install on the Prerequisites Check screen to start promotion.
After successful promotion, the Windows Server installation reboots as a domain controller.
Promoting a domain controller using Windows PowerShell
For the Active Directory module for Windows PowerShell, Microsoft has decided to take a slightly different route. Instead of using a single PowerShell cmdlet to promote a domain controller, there are three separate PowerShell cmdlets for each of the three scenarios, as presented on the Deployment Configuration screen of the Active Directory Domain Services Configuration Wizard:

Table 2.2 – Windows PowerShell cmdlets per domain controller promotion scenario
To add a domain controller to an existing domain, the simplest script would look like this:
Install-ADDSDomainController -DomainName lucernpub.com
However, to add a domain controller to an existing domain, as you would in the previous example, the following script would suffice:
Install-ADDSDomainController -DomainName lucernpub.com -Credential (Get-Credential) -installDNS:$true -NoGlobalCatalog:$false -DatabasePath "E:\NTDS" -Logpath "E:\Logs" -SysvolPath "E:\SYSVOL" -Sitename RemoteLocation
This adds a domain controller to the lucernpub.com Active Directory domain, using credentials you will be prompted for securely. The domain controller is installed with a DNS server and configured as a global catalog server. All the Active Directory-related files are stored in corresponding folders on the E:\ drive, and when successful, the Windows Server installation you intend as the domain controller reboots automatically.
Replace the values in the preceding sample script with the values of your choice.
Promoting a domain controller using dcpromo.exe
Despite many news outlets reporting that dcpromo is dead, the popular option to promote a Windows Server installation to a domain controller is alive and well, even in the latest Windows Server versions. One change to the functionality of dcpromo.exe, when compared to previous versions of Windows Server, is that you can no longer use dcpromo.exe to launch the Active Directory Domain Services Configuration Wizard. You'll need to use dcpromo.exe with an answer file or with all the installation arguments specified.
The benefits of using dcpromo.exe include the use of many options that are not available when using the Active Directory Domain Services Configuration Wizard and also a wide array of sample answer files and scripts. As the type of answer files used when using dcpromo.exe, and the arguments for use on the command line, have been available since the early days of Windows Server, many people have used them, and many people have written them.
Using dcpromo.exe with an answer file consists of running the following command prompt line:
dcpromo.exe /unattend: C:\install\dcpromo.txt
Simply replace the text file location with the file of your choice.
You can also use network paths such as \\server\promotiontext$\dcpromo.txt to supply an answer file to dcpromo.txt. This makes for an ideal scenario where files don't remain lingering on domain controllers promoted this way.
The answer file consists of several arguments. Typical arguments found in the answer file include the ReplicaOrNewDomain, InstallDNS, and ConfirmGC arguments. A prime example of an answer file to add an additional domain controller to an existing domain would look like the following:
[DCINSTALL]
ReplicaorNewDomain= replica
ReplicaDomainDNSName= lucernpub.com
UserDomain= LUCERNPUB
UserName= Administrator
SiteName= RemoteLocation
Password= "P@$$w0rd"
InstallDNS= Yes
ConfirmGC= Yes
CreateDNSDelegation= No
LogPath= E:\Logs
SYSVOLPath= E:\SYSVOL
SafeModeAdminPassword= "P@$$w0rd"
RebootOnSuccess= true
Using this answer file adds a domain controller to the lucernpub.com Active Directory domain, using the credentials for the administrator account with the P@$$w0rd password. The domain controller is installed with a DNS server and configured as a global catalog server. All the Active Directory-related files are stored in corresponding folders on the E:\ drive, and when successful, the Windows Server installation you intend as the domain controller will be rebooted automatically.
Replace the values in the preceding sample file with the values of your choice.
When promotion is successful, the passwords specified as the values for the Password and SafeModeAdminPassword arguments are cleared from the answer file. However, when promotion is unsuccessful, these values remain and may cause harm when falling into the wrong hands.
The arguments in the answer file can also be specified as command-line arguments. The arguments can be reused one on one, so the preceding sample answer file would correspond to the following command line:
dcpromo.exe /unattend /replicaornewdomain:Replica /replicadomaindnsname:lucernpub.com /userdomain:LUCERNPUB /username:administrator /password:"P@$$w0rd" /sitename:RemoteLocation /installdns:yes /confirmgc:yes /databasepath:"E:\NTDS" /logpath:"E:\logs" /sysvolpath:"E:\sysvol" /safemodeadminpassword:"P@$$w0rd"
Replace the values in the preceding sample file with the values of your choice.
Checking proper promotion
After promoting a Windows Server installation to the domain controller, it's recommended to check for proper promotion. Perform these steps to check the promotion:
- Check the logs: The following two files contain all the actions performed when promoting the Windows Server installation to the domain controller. A good way to check for improper promotion is to search for lines containing errors and warnings:
C:\Windows\Debug\dcpromo.logC:\Windows\Debug\dcpromoui.log
- Check the event viewer: In the event viewer (
eventvwr.exe), new dedicated logs are created for Active Directory. Search these logs for any Active Directory-related errors. - Run Windows Update: Even though one of the recommended steps is to update the Windows Server installation you intend to promote to the domain controller, it's also a recommended step to install Windows Updates after the Windows Server installation has been promoted, as updates apply to newly installed server roles and features too. These role-specific updates are only applied after the role is installed.
See also
For more information, refer to the following recipes:
- See the Preparing a Windows server to become a domain controller recipe.
- See the Promoting a server to a read-only domain controller recipe.
- See the Checking replication recipe.