A sequence of Python instructions is often referred to as a script. Likewise, the activity of producing Python code is usually called Scripting.
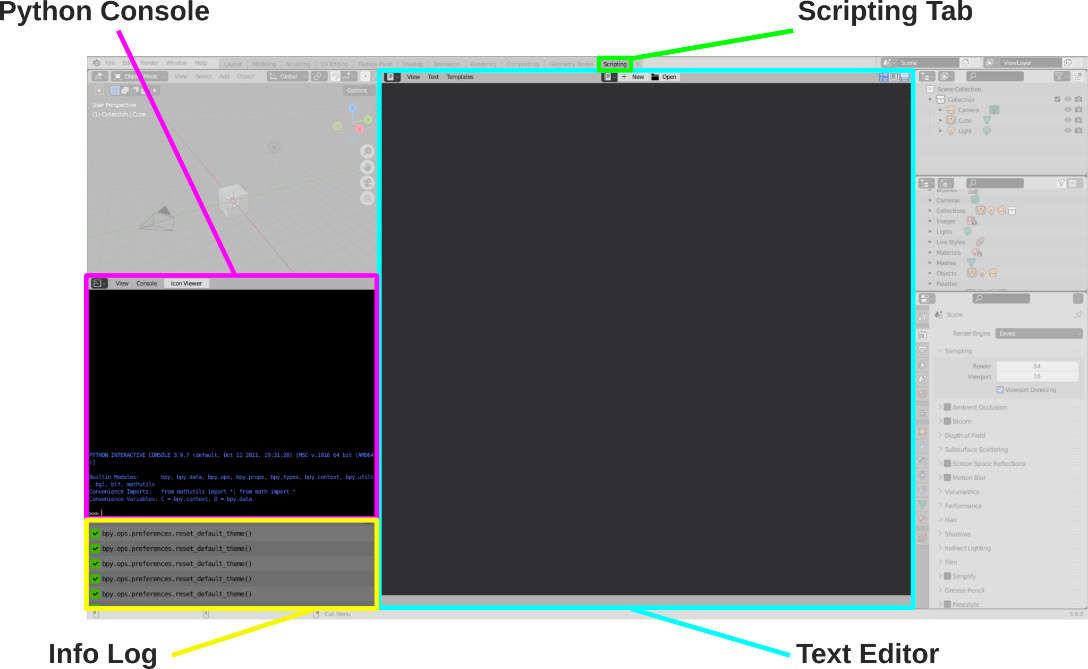
Blender’s interface consists of different workspaces. Each of them is a tab meant for a different activity. At the time of writing, the Scripting tab is the last on the right side of the screen. Clicking on it switches to the interface designed for Python users.
The most significant elements are the Python console, the Info Log, and the Text Editor:
Figure 1.5: Blender scripting interface
We will start our journey in Python by typing commands in the Python console.
The Python console
The console is an interactive terminal with a header that displays the current version of Python (3.10.2, at the time of writing) and a >>> prompt sign to advertise that it’s waiting for interactive text. All we need to do is hover the cursor on it and type an instruction:
Figure 1.6: The Python console
“Hello World!” from the console
The practice called Hello World! is a way to familiarize yourself with a new programming language. It’s about displaying the titular phrase using a command.
We will use the print function for that. Example code for the interactive console starts with the >>> prompt symbol. We don’t need to type that as well in the console: it is already there. We click on the console area and type print("Hello World"):
>>> print("Hello World")
Then press Enter. The console output is displayed in a different color and doesn’t start with the prompt:
Figure 1.7: Displaying our output on the console
We can use the Python console to query information about the Python version.
Checking the Python release
The current version of Python can be displayed anytime using the sys module. We need to import this module and look for its version attribute. That takes the following two lines:
>>> import sys
>>> sys.version
The console prints out verbose information about the version in use:
'3.10.2 (main, Jan 27 2022, 08:34:43) ...'
The three digits of the version number stand for major, minor, and micro versions. A different major release number implies heavy changes in the language syntax: Python 3.0 is very different from any Python 2.x releases. A minor release introduces new features but doesn’t break compatibility with older code. A micro release doesn’t bring changes to the language; it consists of bug fixes and other forms of maintenance.
The changes brought with each new Python version are available as Release Notes on the download page of the Python Software Foundation:
https://www.python.org/downloads/
If our script relies on a feature introduced with a minor release, we can check the version numbers individually using version_info, as seen here:
import sys
if sys.version_info.minor < 6:
    print("Warning: This script requires Python 3.6.x")
Compared with other software, Blender follows the Python release cycle very tightly. This is done mostly to take advantage of the latest improvements in terms of performance and bug fixes.
Checking the Blender release
The current Blender release can be checked in the graphical user interface or in Python scripts.
Checking the Blender release in the interface
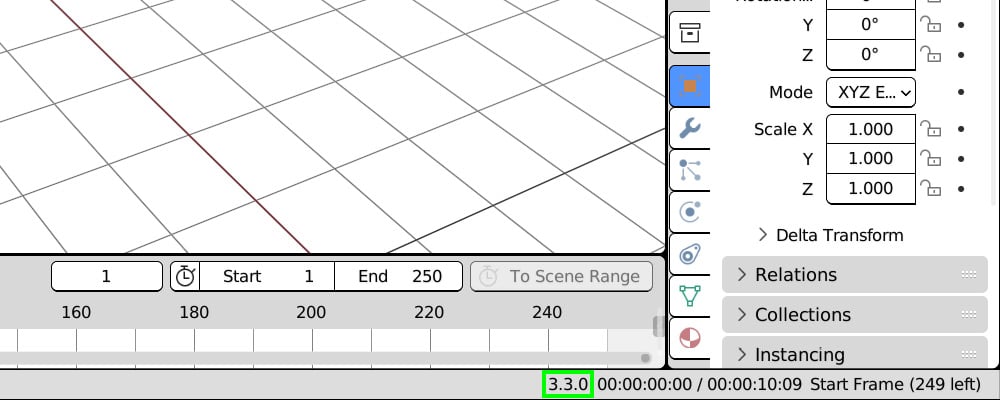
Starting from version 3.0, the most immediate place to check for the version number of Blender is in the lower-right corner of the window. In version 3.3, the version number is followed by the current time and frame set for the scene:
Figure 1.8: Blender version number in the status bar
Another way to display the version number is by clicking the Blender icon in the top-right corner of the menu bar and then selecting About Blender from the menu.
We can also get Blender’s version number via Python scripts.
Checking the Blender release in Python scripts
If our scripts rely on features from a specific version, they must be able to determine on which release of Blender it is running. That information is contained in the bpy.app module. We can display the current version by typing these lines in the console:
>>> import bpy
>>> bpy.app.version
In Blender 3.3.2, the console returns the following:
(3, 3, 2)
Unlike sys.version_info, bpy.app.version doesn’t contain names, just numbers. Nevertheless, we can store them in variables using the Python syntax:
>>> major, minor, micro = bpy.app.version
Then, we can use print to display the single version numbers:
>>> print("Major version:", major)
Major version: 3
>>> print("Minor version:", minor)
Minor version: 3
>>> print("Micro version:", micro)
Micro version: 2
A new major release of Blender brings drastic changes to the interface and workflow, while a minor release introduces new tools for animation or for generating images.
To display the information, we have used the print function. Since functions are the first step toward structured programming, we will have a better look at how they work and how we can change the "Hello World!" message to something else.
Invoking functions
When we use a function, we say that we call or invoke that function. To do that, we type its name, followed by parentheses. Between parentheses, there is the function’s argument, such as the input on which it operates:
Figure 1.9: Function and argument in a Python script
When invoked, the print function reads the argument and displays it on a new line.
The "Hello World!" argument is a string literal: it can be any sequence of characters enclosed between quotation marks ("").
We can feed any other message to print; the output will vary accordingly:
Figure 1.10: Printing text in the Blender Python console
Now that we have gained confidence, we will look at some Blender commands.
The Info Log
The user activity is displayed as Python commands in the log area, at the bottom left of the Scripting workspace. We can open Blender and perform the following operations:
- Delete the default cube in the Viewport via right-click -> Delete.
- From the Viewport top bar, click Add -> Mesh -> Cylinder.
- From the Viewport top bar, click Add -> Mesh -> UV Sphere. We will find these three lines in the Info Log area:
Figure 1.11: History of actions in the Info Log area
The entries of the Info Log are the Python commands triggered by our recent activity. We can copy those lines and use them in our scripts.
Using the lines from the log
Clicking or dragging with the left mouse button selects the log lines. We can copy them to the clipboard via right-click -> Copy:
Figure 1.12: Copying Python commands from the Info Log
We can go back to the startup scene and paste them into the console:
- Restart Blender or click File -> New -> General.
- Go to the Scripting workspace.
- In the Python console, right-click -> Paste, and press Enter.
Executing those lines will delete the initial cube, then add two objects: the same steps run manually earlier. We will see how we can change their content and affect the outcome.
Changing parameters
Let’s not focus too much on the code for now: it will be clearer in the next chapter. Anyway, we might recognize a pattern from the "Hello World!" example:
function(arguments between parentheses)
And at least one argument is self-explanatory in its purpose:
bpy.[…]_uv_sphere_add(…, …, location=(0, 0, 0), …)
location=(x, y, z) represents the 3D coordinates where a new object is added. We can change the last line and create our sphere just above the cylinder.
Let’s revert to the startup scene once more and paste our lines again, but before we press Enter, this time, we change the last zero to 2:
bpy.ops.mesh.primitive_uv_sphere_add(radius=1, enter_editmode=False, align='WORLD', location=(0, 0, 2), scale=(1, 1, 1))
We have just run our first script. It deletes the selected objects and stacks two new shapes on top of each other:
Figure 1.13: Cylinder and Sphere primitives, created via Python
The Python console can execute code with immediacy but is not very practical for more than a few lines. We will now see how to run Python scripts as documents.
The Text Editor
This is the largest element in the Scripting workspace. It can be used for writing text and scripts.
To add a new script, we click the + New button in the top bar and create a new text:
Figure 1.14: Creating a new text object in the Text Editor
Let’s type some words, for instance, a more verbose version of “Hello World!”. Like many programmer editors, Blender displays the line numbers on the left:
Figure 1.15: Writing scripts in the Text Editor
Also, the words have different colors according to their Python meaning: white for the function, yellow for the string, and red for the parenthesis. This feature is called syntax highlighting and gives useful visual feedback: the color of the words depends on their role in the programming language.
Running text documents
If the current text is a Python script, we can execute it from the Text Editor:
- Click on Run Script from the Text menu in the Text Editor menu bar.
- Look for the execution outcome info in the Info Log:
Figure 1.16: Executing scripts in the Text Editor
The Info Log confirms that something has happened:
Figure 1.17: The script execution mentioned in the Info Log
But we might be disappointed, as the printout text is apparently nowhere to be found!
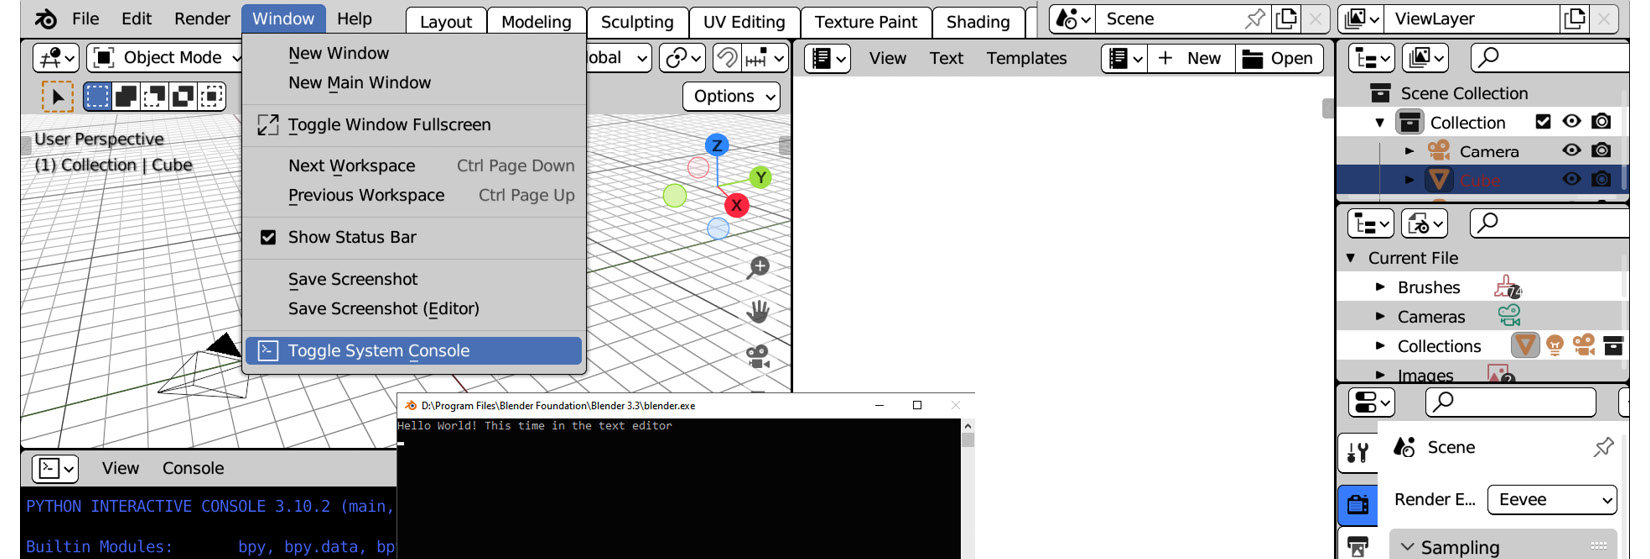
The reason is that the output of the Text Editor goes straight to the System Console, the operating system’s command line.
On Windows, we can display it using Window ->Toggle System Console from Blender’s top bar. To read system messages on a Unix-based system (Linux or macOS), we must start Blender from a command line in the first place.
Once brought up, System Console displays the output printed by the Text Editor:
Figure 1.18: Displaying the System Console on Windows
The default name for our text block is Text. It can be renamed by clicking on it. We’ll better add the .py suffix as an extension to make it clear that it’s a Python script:
Figure 1.19: Renaming text blocks in Blender
Copying the Python console as script
Remember the lines we entered in the Python console earlier? If we haven’t closed Blender or loaded a new scene, we can copy them to the clipboard at once.
- From the Console menu in the Python console top bar, select Copy as Script.
- Create another text block using Text > New from the Text Editor menu.
- Give the text a new name, such as
OurFirstScript.py.
- Paste the lines from the clipboard via right-click -> Paste in the text area.
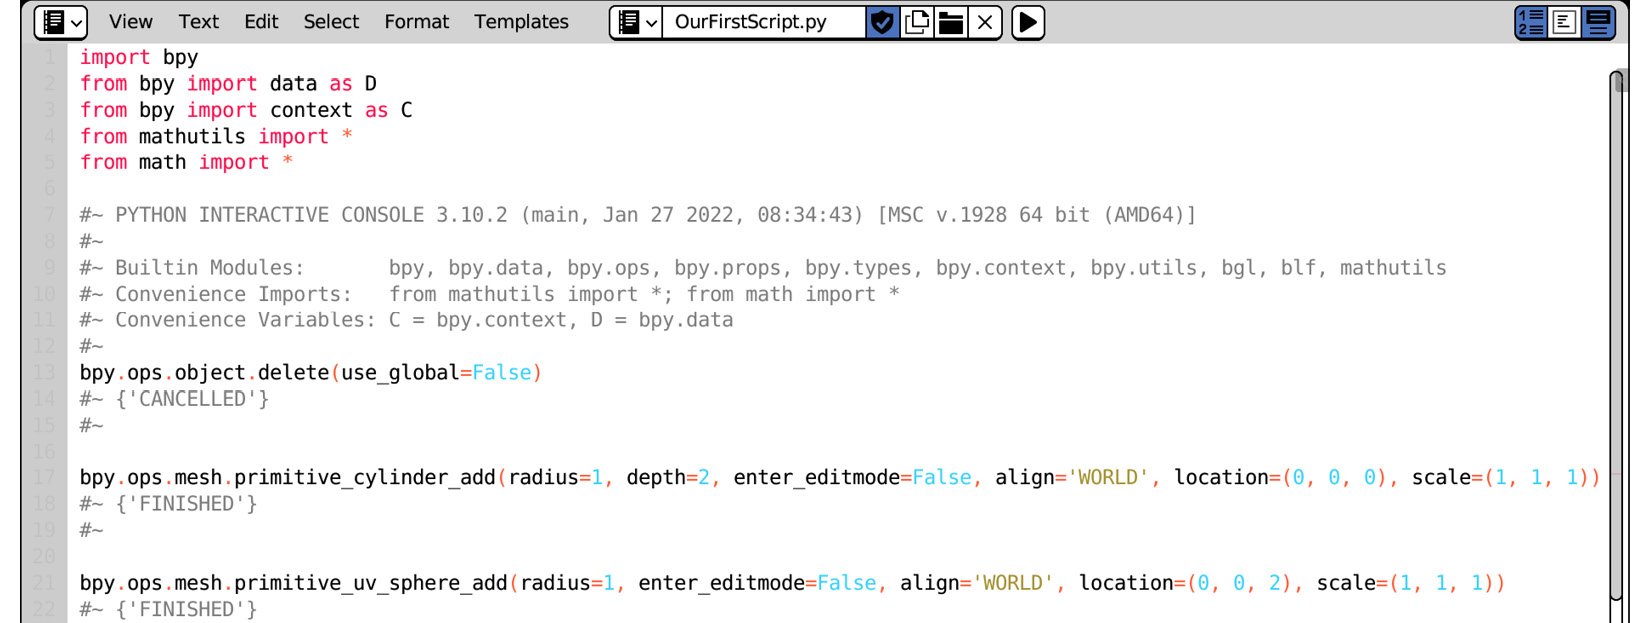
Looking at the Text Editor, it turns out that the full version of the script is a little bit longer than our three lines:
Figure 1.20: The Python console input copied to the Text Editor
The first five rows set up the console environment. They are executed behind the scenes when Blender starts.
Lines starting with a hash (#) are comments: they are ignored by Python and contain reminders or explanations meant for human readers.
Our own instructions are respectively at lines 13, 17, and 21. This script can be executed via Text -> Run Script as we did before or via the Alt + P keys combination.
Exporting text files
The notepad icon lets us switch between different text blocks via a drop-down list:
Figure 1.21: Switching between text blocks in Blender
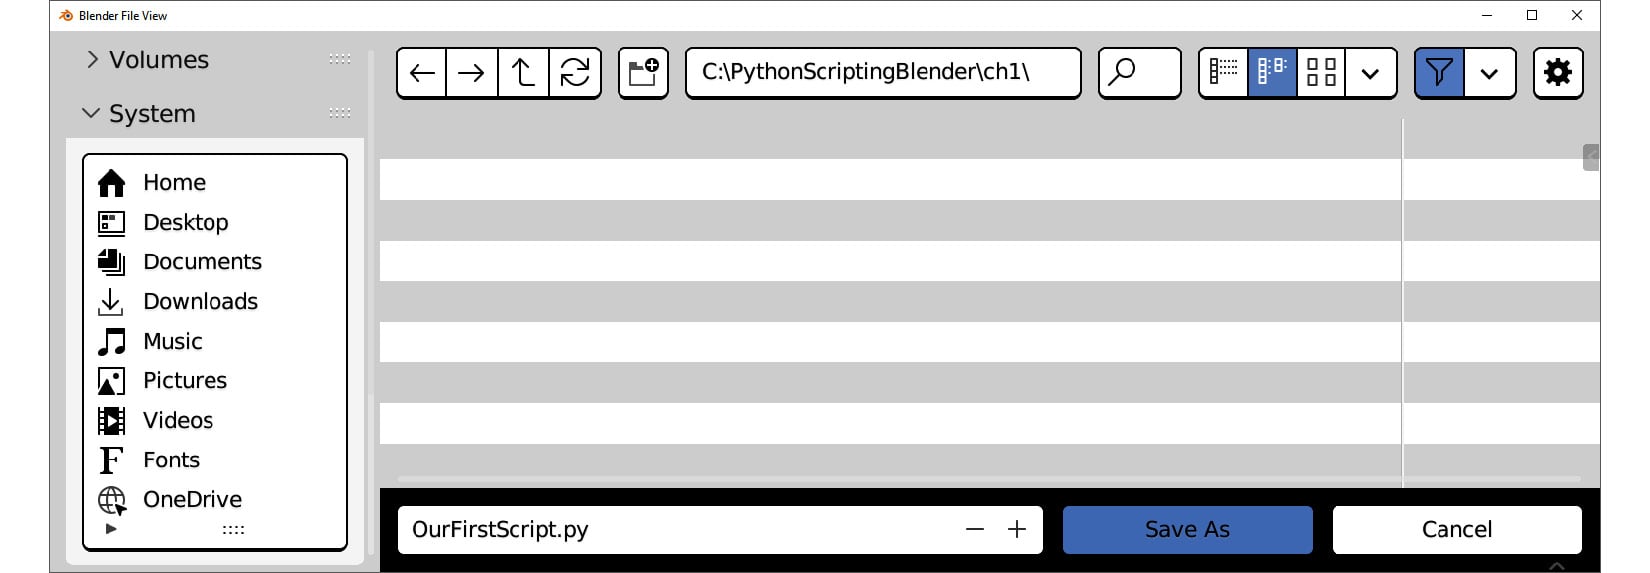
Selecting Text | Save As… from the editor menu bar saves the current text to disk. A new window lets us select a folder and confirm the filename:
Figure 1.22: Saving the content of the Text Editor to file
Blender’s Text Editor is great for quick tests, but a programmer text editor is usually preferred for more serious tasks. We are going to use Visual Studio Code in the next section.



 Free Chapter

