
The layered quartz is quite common in gray sandstone and can be found in many pebbles scattered across a beach. The layers of quartz were laid down over the millennia, sometimes in thick layers, and sometimes thin. Earthquake movement altered the angles of the rock layers as these quartz deposits were being laid. As a result the quartz layers are occasionally at varying angles to each other. The quartz layers also have flecks of broken rock, some containing iron or sulphur deposits, which give a slightly yellow color variation.
The quartz part of these pebbles is worn more because its density is lower than the gray sandstone in which it is encased. Because the pebble has been tossed and polished by the sea, the quartz veins run right through the pebble, sometimes at strange angles.
We have produced a gray sandstone, and quartz material in previous recipes. We can combine them then using a mask to represent the veins as might be seen in real pebbles of this type. So this recipe provides a way of producing a mask ready for combination in the final material of this section.
Reload the pebble-05.blend saved at the end of the last recipe. If you haven't completed that recipe you can download a pre-created one from the Packt Publishing website.
As in previous recipes we will have to temporarily clear the material last created so we have a clean slate to create this new mask material. However, we also need to fix that last material, so that we don't lose it if we need to split this exercise into several days.
With the pebble object selected click the F button, next to the material name
Quartzin the Material panel. Then click the X button to unlink datablock. As in previous recipes, we only want to temporarily unlink the material so that we can create a new one.In the Materials panel create a new material and name it
QuartzMask.Set the Diffuse color to black RGB
0.00, and under Shading set Shadeless.You now have a purely black material, so let's add some purely white veins to complete the mask.
From the Texture properties panel create a new texture of Type Marble, and name it
QuartzThick.Under Marble, set Sharper and Tri, and Noise to Soft. Set Size to
0.91, Turbulence to7.04, and Depth to2.Under Colors/Adjust set Brightness to
0.556and Contrast to5.000.Under Mapping set Size X to
1.30, Y to-0.77.Under Influence set Color to
1.00, and Blend to Screen. Change the color selector to R G B0.000, black.If you perform a quick test render at this point you will see that thick veins have been produced. This will act as the start of our quartz veins to which we will add some thinner veins as seen in the reference photo.
Select the next free texture slot in the Textures properties panel and create a new Marble texture with the name
Quartzthin1.In the Marble tab select Sharper and Tri, and under Noise select Soft. Set Size
1.18, Turbulence2.53, and Depth6.Under the Colors tab set Adjust/Brightness
1.711, and Contrast2.773.Under the Mapping tab, set Size Y
-2.09(X and Z remain the default1.00).Under the Influence tab, set Color to
1.00and Blend to Screen. Alter the color selector to R, G, B0.000, black.You could once again test render after you have saved, but we shall move on to add a final thin vein on our mask material.
Select a free texture slot and create a new texture of type Marble and name it
Quartzthin2.Under Marble tab select Sharper and Tri, and Noise Soft. From the Basis menu select Improved Perlin. Set Size to
0.88, Turbulence to1.93, and Depth to4.Under the Colors tab set Adjust/ Brightness to
2.000and Contrast to5.00.Under the Mapping tab set Size Y to
-1.48and Z to0.86.Finally, under the Influence tab set Diffuse/Color to
1.00, and Blend to Screen.
Save the blendfile, incrementing the file name to pebble-06.blend, and render the QuartzMask material.
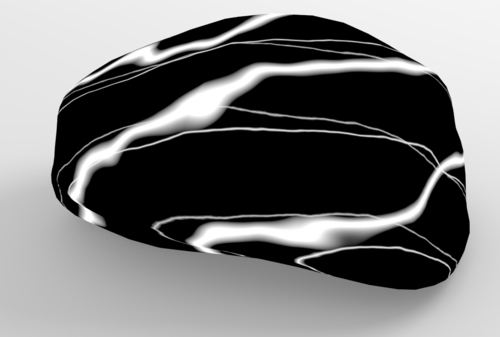
This material is not designed to be used as a direct pebble-like texture. Its purpose is to act as a mask when we mix the other pebble type created in earlier recipes.
The third material created is a mask to use within a material node setup. The idea being that it will combine the two material types by the amount of black, controlling the gray surface material, or white, controlling the quartz material. Since this material has no surface features, other than color, it's a lot easier to create.
Under the Material panel the Shading/Shadeless setting has been checked and the Diffuse color is set to completely black. This ensures that its light level will not be affected by shadows or scene lighting. In other words, the mask will work across the entire objects surface.
Three textures have been used to create the vein-like strata through the pebble shape. These are all based on the Marble procedural texture type but with varied settings. Apart from the Marble type settings there are two areas that are vital to the way each texture is applied and positioned onto our pebble.
This setting under Colors/Adjust/Brightness and Contrast has been employed to alter the thickness and sharpness of the simulated quartz veins. In most cases, the Contrast has been set quite high, while the Brightness has been varied to give different results.
Under Mapping/Size the X, Y, Z values have been changed for each of the three vein textures. This scaling can be used to both alter the rotation of where the marble texture veins will appear, as well as alter the space between the veins. Obviously, if you reduce the scale too much, the texture will appear to become just streaks across the surface and therefore rather unnatural. Because procedural textures are mathematically generated they appear to occupy the whole 3D space. Therefore, because they are mapped to our pebble mesh they look as though they travel right through the surface.
This technique of using scale to rotate a procedural texture is useful in other circumstances and will therefore be used in future recipes. There are also other techniques that can be used to scale and rotate textures without the inherent distortion that this scaling can sometimes give. These will also be explored in future recipes.
You may wonder why we have created this third material when it could have been created with Node textures directly within the node tree. When creating any texture, it's a good idea to see exactly how it will map to the mesh surface. Creating within its own material means we can just see where the veins will be and how they mix with each other. It can be very difficult to conceptualize a surface material without constant test renders. It is faster to render a single material than a complex node setup when you are at the development stage. It is a bit like getting your ingredients correct before baking your perfect cake.