
In this recipe we will create a simulation of seaweed, or other living crustacean, that can be found on the sea washed base of rocks on the edge of a beach. We will explore texture nodes in this recipe, using some comprehensive texture node modifiers.
You will need to load the blendfile saved at the end of the last recipe. If you have not completed that recipe you can download a pre-created blendfile from the Packt Publishing website.
We can add more to bed our rock into the life rich environment of the seashore.
Select a free texture slot, below the last one created, and create a new node texture. Name it
NT-Blend-maskand delete the Checker input.Add a Blend texture with SHIFT+A (that is the 5th selection down on the Add menu, and the 2nd in the Textures sub menu). In future, you should know how to add a texture node using this key combination.
In its settings select type Easing and ensure it is a Horizontal blend. Now connect it to the Output node.
Blends are very useful to help mask parts of a texture. However, we can modify the blend to do much more than just go from black to white.
Create an Add/Color/RGB Curves node between the texture and output. Use your mouse to modify the curve to look something like in the following screenshot:

Change the default name of the Output node to
Vegetation-stencil.Back in the Texture panel let's set the way this texture will be applied to our material.
Below the texture name in the panel you will see that there is a new selector called Output: if you click on this a list of available outputs for that node texture will be shown. Select
Vegetation-stencil.It is possible to set up multiple named outputs that can individually be selected in the Texture panel. Each named output can have multiple nodes to control that output thus making a truly versatile texture tool.
Under Influence select Color and set to
0.420. Under Blend select Overlay, and Stencil, and finally select RGB to Intensity and set the color to R0.16, G0.10, B0.09.Select a free texture slot below the
NT-Blend-masktexture previously created. This time, rather than creating a new texture select from the list, click on the checker icon by the name and selectNT-Blend-mask. Yes, it's the same texture but we are going to add a new output after further modifying the Blend.Copy the RGB Curves node (select and Shift+D) and move it below. You could have just created a new node but sometimes it's quicker to copy one already in the node tree. Modify the curve so that it looks like the following screenshot.

Connect the Blend Color output socket to this new RGB Curves node input socket.
You can create a Viewer node and connect the Blend output socket to the Viewer node. This will enable you to see its output at this stage of the node tree.
Create a new Add/Textures/Clouds node and set to Grayscale Soft, Depth
2, and Size0.250.Create a Add/Color/Mix node and connect the second RGB Curves node to Color1 and the Clouds Texture node to Color2, and the Mix type to Overlay. You can feed its output socket to the Viewer node to see what it looks like.

Create, or copy, another RGB Curves node and connect it from the output socket of the Mix node. Modify the curve so that it looks like the following screenshot. You will see that the Viewer node has been moved to after the Mix node.

Feed its output socket to the Viewer node to see how that has altered the Blend.
You have three more jobs to do to complete this new output. Firstly, we will scale it slightly and then invert it, and finally create a new named output that we can use in the material.
Create an Add/Distort/Scale node connected from the last RGB Curves node. Set its scale as X to
0.70, Y to0.70, and Z to1.00.Create an Add/Color/Invert node from the Scale node.
Create a new Add/output node and name it
Water-stencil.
Switch back to the Texture panel, so that we can set the influence of this new modified texture node output.
Select the
Water-stencilOutput and in the Influence tab select RGB to Intensity and Stencil.As you can see, it has no visual impact on the material as yet. This node texture output has become an irregular mask for a texture we will create to simulate crustaceans, or seaweed growth on the base of the rocks.
Select the next free texture slot and create a new texture of type Clouds and name it
Limpets.Under Influence/Diffuse select Color and set to
0.345. Under Influence/Geometry select Normal and set to-2.000. Set Blend type to Mix, and RGB to Intensity and the color values to R0.00, G0.09, B0.01.Finally, under Clouds set GrayscaleGrayGrayscale, Noise Soft, Basis as Improved Perlin, Size
0.03, Depth2.
Save your completed blendfile, incrementing the filename. It's time for a final render.
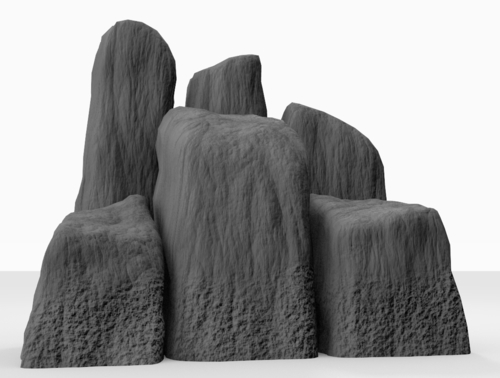
This recipe has used the Texture node system to demonstrate the extraordinary capabilities now offered in the Blender 3D suite. Node textures enable any procedural or image texture to be filtered and modified in many exciting ways. Here we used it to create some quite complex stencils or masks. These were then used to mix and combine textures in quite subtle ways. However, there are only three textures used to produce this effect.
A texture node was created with two outputs, both acting as masks or stencils for the last texture. Although it is possible to create almost any texture variation with a node texture, we have actually covered those areas that are most frequently used. These include mixing methods, levels adjustment, and distortions.
A node texture can be used in both node and standalone materials. Here we used a standalone material but later we will take this same material and integrate it into a node material, adding extra details to simulate the progress of creatures on its surface.
Procedural textures are superb at simulating natural organic surfaces such as stone. However, you can also use real rock face photos to modify a surface. Used in combination with procedurals you can produce some stunning results.
When creating node textures one must be careful not to produce a loop in the node structure. It is currently possible to link an output back into itself. However, the connector will turn red, showing that you are creating a loop.
It is also possible to add the same named node texture back into itself via the Add/Input/Texture. In such a case the small view will turn bright red, as will the output. But the texture will still render, sometimes producing weird results. As Blender is in a constant state of development these easily avoided annoyances will be tidied up. You can keep up to date with all the developments by checking the Bug Tracker or joining one of the support forums.
Here are some really useful websites to help you get the best out of a constantly developing 3D graphics suite.
Graphical Org is the place to download the latest builds of Blender http://www.graphicall.org/builds/index.php.
CIA.vc is the open source version control informant for Blender http://cia.vc/stats/project/Blender.
The Blender Bug Tracker (you will need to register to submit a bug) https://projects.blender.org/tracker/?atid=498&group_id=9&func=browse.
The Blender release logs for all versions of Blender http://www.blender.org/development/release-logs/.