
This recipe will show you how to record the viewport while you work. This can be useful for creating your own tutorials or showing friends or employers your creation process.
First, you will need enough space on your computer to hold the movie file that you create. These files can get very large depending on what resolution you are recording at.
Then, you will also want to have your model at a point where you would like to start recording. Keep in mind this will not record audio.
1. To start recording, you can go to Render | Record Movie and you will see the following window after you click on it:

2. On this screen you will adjust the settings to what you need. The first thing you will need to adjust is Size. You can use the Presets drop-down menu or you can enter a custom resolution into the textboxes.
3. Next, you will adjust the Timing, giving you the ability to make the file size smaller by recording fewer frames or to speed up or slow down a sculpt. If you record with a high frames/second timing and play back at a low frames/second timing, your video will be slow and slightly choppy in its movement. If you set the record with frames per second as low and the playback with frames per second as high, you will get a fast time lapse of your work.
4. By checking the Automatically pause recording when idle checkbox you will save lots of time by not having to cut out all the slow parts of your video where nothing is happening. If your mouse stops moving then your video stops recording.
5. The Preview window shows you what the beginning of the video will look like and also what the thumbnail for the file will be. If you mark the Mudbox Window option you will be able to see the toolbars. By marking the 3D View Only choice, you will only see the inside of the viewport.
6. Once you begin recording, there will be a countdown timer before the recording starts and you will have a Pause and Stop button in the lower right-hand side of the Mudbox window.
7. When you finish recording, you will see the window as shown in the next screenshot, which allows you to delete the recording or save it as one of a few different file types:

8. After hitting Save As, you choose where you would like to save the movie and it will create the file for you.
You can also create a turntable by going to Render | Create Turntable Movie, which will give you this window:
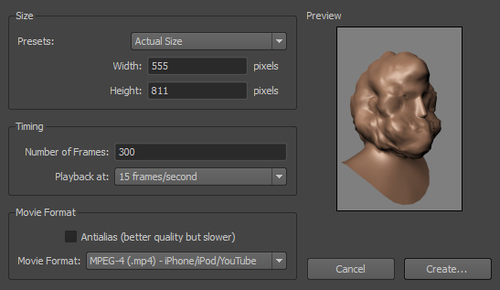
1. In the same way that you set the size of Record Movie, you will also need to set the size of the turntable. Actual Size will fit the sculpt perfectly within the window.
2. Under Timing, you can adjust the frames per second and the Number of Frames you want the turntable to be. The more frames you have, the longer it will be, and the more frames per second you have, the faster it will be.
3. The Movie Format section is like the Save As section of the Record Movie. Here you choose the type of movie file and you have a checkbox for Antialias. Antialiasing will improve the quality but it will increase your render times. This refers to the crispness of your edges.
4. Once you're ready, you can click on Create... and choose a place to save your file. It will start writing the file and you can see the process of the load in the bottom-left corner.
The Creating a three-point lighting preset recipe in Chapter 8, Ready for My CloseUp