
We will create a node material made up from the three materials created in the previous recipes. One representing the base gray sandstone texture, another representing the quartz layers, and a third that will act as a mask to mix the final result.
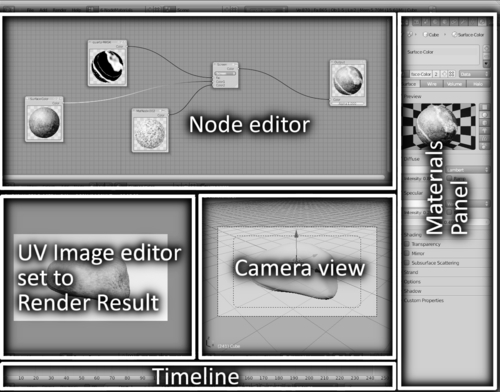
To help manage material node creation, it is a good idea to rearrange the interface as shown below. This gives a large Node editing window with the Material and Texture properties conveniently on the right of the screen. It provides a camera view and an Image editor with the render result. If you don't feel confident about setting this up yourself refer to Chapter 4, Managing Blender Materials, which includes a simple recipe for creating such a view.
Load u
p the pebble-06.blend saved at the end of the last recipe. Should you have not completed that recipe you can download it from the Packt Publishing website.
To create a node material we should have the object selected and ideally start with the main material selected. In our case, it is the Surface-Color material created at the beginning of the first recipe in this section.
With the pebble object selected change the Node type to Material in the Node editor.

Now select the Surface Color material using the Browse ID data button from the Materials panel in the header. That's the little material icon next to the material name.

This selector is the same as that in the Materials properties panel but more convenient when we are working with nodes.
Finally, select the UseNodes check-box to enable the Node editor.
A blank Material node linked to an Output node should be displayed.
In the Material node choose the SurfaceColor material created earlier.
If you render at this point the pebble would display the SurfaceColor material because that's the only node material being fed to the Output node. It's time to add our
Quartzmaterial to the node tree.Ensure your mouse cursor is within the Node editor view and press the keyboard shortcut Shift+A, and from the displayed list add another Material node.
Depending on what node is selected, before you added this new node, Blender will attempt to make a link automatically. This may not be what you need. To remove an incorrect link, just drag the link away from the input it may have incorrectly attached to. You can learn all about node editing from the BlenderWiki.
http://wiki.blender.org/index.php/Doc:Manual/Materials/Nodes/Usage
In this Material node, choose the
Quartzmaterial created earlier.Press SHIFT+A and add a Mix node from the Color menu. Link the Color output socket from the SurfaceColor material node to Color1 input, and the Color output socket from the
Quartzmaterial node to Color2 input. Change the mix type to Screen.Add a new Input/Material node, and select material
QuartzMask. Connect its Color output to the Mix/Fac input node.
Save your
work as pebble-07.blend and render to view your simulated quartz-veined pebble material.
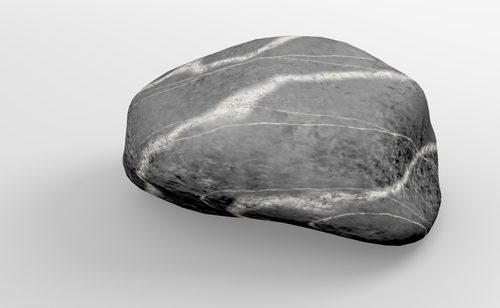
Blender Node editor is incredibly useful in combining materials in all kinds of new ways. It allows multiple materials to be combined on single objects. We have employed a simple mask here to accurately combine totally different materials onto our pebble simulation. In a sense we have created a new form of stencil to mix different textures controlled by a mask material. The difference with a node material is that the mask is much more flexible than the texture example we used in the individual materials.
Of course, that is not the only thing that material nodes can achieve. However, it is a very useful technique simply achieved using three materials and an uncomplicated mixing method.
Material nodes in Blender are one of the unique features that make it such a versatile 3D suite. Nodes can be used to create really detailed and interesting materials, something that is not possible with materials alone. We have used it here to mix two separate materials, using a third to filter the mix result. Later, we will examine more complex examples of node tree set ups. However, it's important to realize that a good node material does not have to be complex to work.
You may have noticed that your renders are not quite the same as those illustrated in this book. That is because I have set up some variations in the lighting and rendering options to produce a better quality render. This is not necessary while you are developing a material solution as it will increase the render times for all test renders. However, if you would like to know how to duplicate the look of the renders in this chapter there is a recipe included in Chapter 4, Managing Blender Materials.