

Run & Jump is a 2D platformer video game created for this book to serve as a base for our editor scripting experiments. In this section, we will talk about the video game and what kind of things we want to achieve.
Keep in mind that it is not important to understand in detail how Run & Jump is implemented. It's enough just to understand the workflows associated with the content creation of this video game.
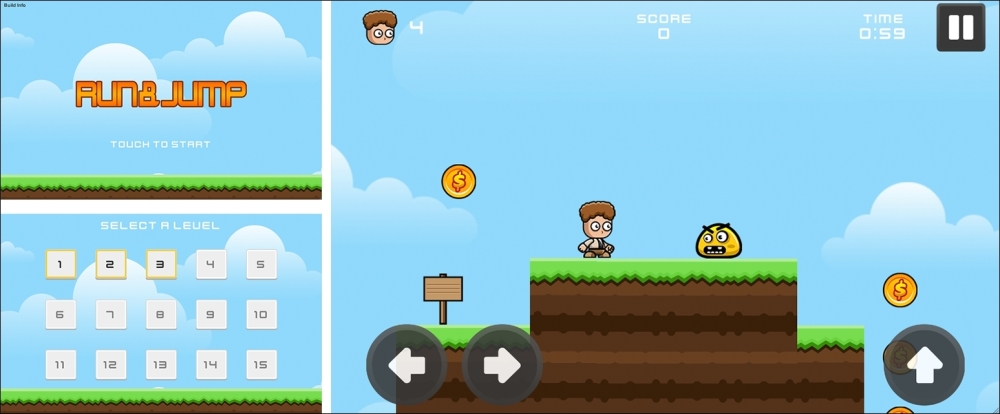
In this video game, the player takes control of Timmy, a guy who likes to collect coins and invests his time searching for hidden treasures. On his journey, he needs to avoid obstacles and enemies to reach the finale of each level and win. You can see how the video game looks in the following screenshots:
To play the video game, you will have to clone or download the project from https://github.com/angelotadres/RunAndJump in GitHub.
When you are ready, open the project in Unity. You will see the following folder structure in the Project browser:

To test the game, open the scene Title inside the Scenes folder and then press the Play button in the Unity toolbar:

To control Timmy, use the left and right arrows on your keyboard. Pressing the space bar makes him jump, and pressing it again while he is in the air makes him perform a double jump.
Currently, there are three levels implemented for this video game to test its functionality. In the next section, you will learn how to add more levels.
In this video game, each level is a Unity scene inside the folder Levels. When you start playing Run & Jump and then select a specific level, the video game call the LevelHandler scene and this starts the script LevelHandlerScene.cs.
This scene has all the GUI necessary for the level, and the script is responsible for the game's status detection (playing, paused, and so on), when the player wins or loses, and loading of the specific level scene using the method Application.LoadLevelAdditive.
Note
Unlike LoadLevel, LoadLevelAdditive does not destroy objects in the current scene. Objects from the new scene are added over the current one.
Each level scene is composed of several prefabs. We will refer to these in the rest of the book as level pieces prefabs.
Navigate to Prefabs | LevelPieces to check the available level piece prefabs. The following table contains a description of each one:


To get a better understating of what is involved in creating levels, let's create a new one. The goal is to copy the following level (or at least try to do so):
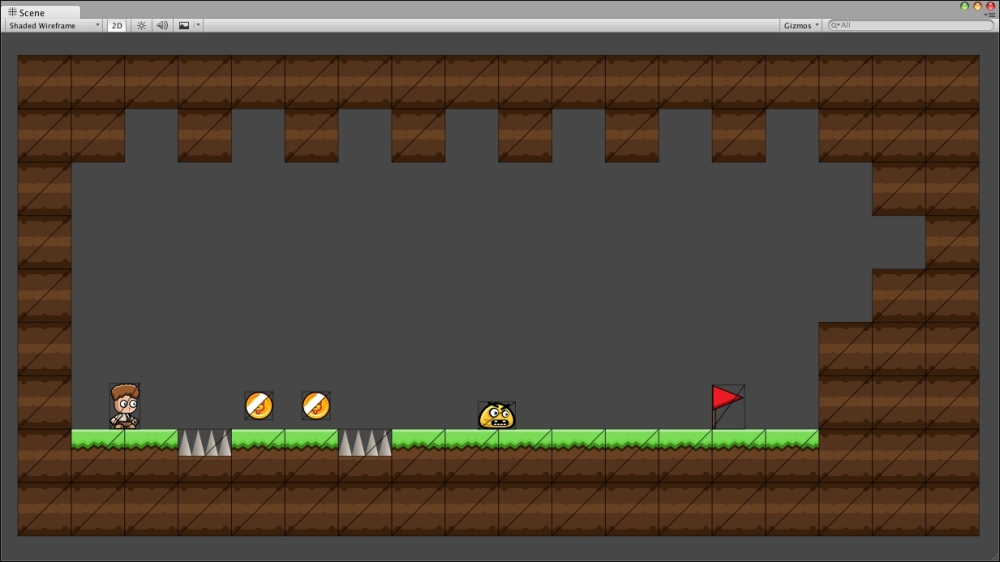
For this, you need to perform the following steps:
Add a new Game Object to the scene and attach the
level.csscript located inScripts|Level. This script contains the base to make our level work.Navigate to
Prefabs|LevelPiecesand clone the prefabs in the scene until you complete creating the level. All the prefabs must be nested inside the game object you created earlier.When you are done, click again on the root game object. If you check the Inspector window, you will see the following:

Here, you will be able to adjust the properties of the level, such as the maximum time taken to beat the level and get the score bonus, Gravity, Bgm (background music), and Background. You can play with these values: for the Bgm, you can grab an audio clip from the folder
Audio/Bgm; and for the background, you can grab a sprite fromArt/Bg.As soon you finish, save the scene inside the folder
Levelswith the nameMyLevel_level.
Tip
To align the prefabs among themselves, select the Transform tool and press and hold the V key to activate the Vertex-Snapping mode.
Run & Jump comes with a custom tool that allows you to set up the order and the name of the levels and also add these to the Scenes in Build list automatically. We must use this in order of make our level usable by the video game (one of the requirements is to include the suffix _level in the name of the scene).
In the Unity editor menu, navigate to Tools | Level Packager | Show Levels Package:

This will display the following in the Inspector window:
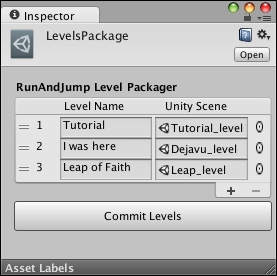
Currently, there are only three levels listed, so click on the + icon to create a new item in the list. Now, add the scene you created in right column and add the string My Level in the left column. This will add your level as the fourth one.
Save the changes by clicking on the Commit Levels button.
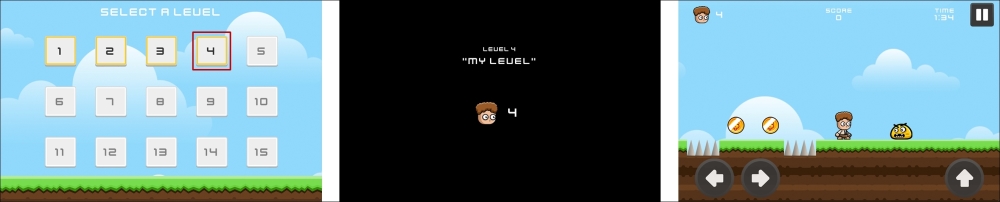
To check the scene you created, open the scene Title inside the Scenes folder, and then click on the Play button to run the video game:
Now you know the necessary amount of effort it takes to create a level for this game; so let's make this level creation process the first thing to improve.