

Imagine a scenario where you are responsible for generating several levels for Run & Jump. You know this task is time consuming, and copying and pasting prefabs to place them in the right position is not the most efficient way to achieve this.
Basically, most of the 2D level editors use a Canvas/Brush metaphor to design the user interaction. This means the level scene is your canvas and using the mouse cursor as a brush, you paint over it level prefab instances.
Taking this in to consideration, the first thing we will create is a tool called Level Creator to make this process easier using the Canvas/Brush metaphor, and of course, in the process, we will cover several editor scripting topics.
The features of the Level Creator are as follows:
Automates the creation of a scene capable of being used as a level. This means that you can generate a scene with a game object, and the level script attached to it, with just a simple click.
Displays a grid on the Scene View option to be used as a reference. All the level piece prefabs will snap to this grid by default.
Controls and validates how the properties of the level script are changed.
Improves the visibility of the available level pieces prefabs by creating a Palette window to show a preview. This classifies the prefabs by their category.
Implements the Canvas/Brush metaphor allowing four modes: view, paint, edit, and erase level pieces prefabs.
Customizes the look and feel of the tool to improve its own appearance.
For now, let's focus on automating the creation of a scene capable to be used as a level.
Note
As you notice, Run & Jump is fully playable at it is but we are going to make a few improvements in its implementation to achieve a seamless integration with the Level Creator tool. Is because of that, all the current levels aren't be editable by the tool.
All the design decisions in this book were taken in order to make easy to understand the code related to editor scripting.
In the rest of this chapter, we will work on the first scripts of the Level Creator tool in order to automate the creation of a scene capable to be used as a level.
The goals here are:
We need to create a few folders to keep our development organized. Remember, for this entire book, we are working on the Run & Jump project.
You will find a folder called Tools in the root of the project. Right now this folder has one inside with the scripts of the tool we used to add our levels to the game.
Inside the Tools folder, create a new folder called LevelCreator and then match the folder structure, as shown in the following screenshot:
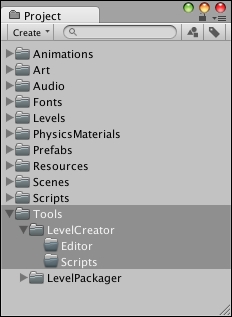
This folder structure is just a suggestion, but you must always consider creating a root folder for your custom tools.
As we were saying, we want to create a scene capable to be used as a level, but instead doing this manually in Unity, we are going to achieve the same using code.
We are going to implement a few methods to do this. Inside the folder Tools/LevelCreator/Editor, create a new script called EditorUtils.cs and add the following code:
using UnityEngine;
using UnityEditor;
using System.Collections.Generic;

namespace RunAndJump.LevelCreator {
  public static class EditorUtils {

    // Creates a new scene
    public static void NewScene () {
      EditorApplication.SaveCurrentSceneIfUserWantsTo ();
      EditorApplication.NewScene ();
    }

    // Remove all the elements of the scene
    public static void CleanScene () {
      GameObject[] allObjects = Object.FindObjectsOfType<GameObject> ();
      foreach (GameObject go in allObjects) {
        GameObject.DestroyImmediate (go);
      }
    }

    // Creates a new scene capable to be used as a level
    public static void NewLevel () {
      NewScene ();
      CleanScene ();
      GameObject levelGO = new GameObject ("Level");
      levelGO.transform.position = Vector3.zero;
      levelGO.AddComponent<Level> ();
    }
  }
}
The NewLevel method is the one that executes all the work using the help of the following two methods:
NewScene: This creates a new scene, but before doing that, asks whether we want to save the scene that is currently open. All this is done usingEditorApplication, a static class with several methods to know the state of the editor (playing, paused, compiling, and so on) and create, save, or load scenes and projects.CleanScene: This removes all the elements of the scene. Remember the camera created by default with each scene in Unity? Well, this method is going to take care of that using theDestroyImmediatemethod. This is similar to the commonDestroymethod but this works in an Editor context.
Note
To learn more about the EditorApplication class, visit http://docs.unity3d.com/ScriptReference/EditorApplication.html.
Tip
In order to avoid class name conflicts, it's always a good idea to use namespaces. In this project, all the video game classes are in the RunAndJump namespace and the Level Creator classes are in the LevelCreator.RunAndJump namespace.
Similar to the HelloWorld example we created at the beginning of this chapter, we need to make the NewLevel method accessible through the Unity editor menu using the MenuItem attribute.
Inside the folder Tools/LevelCreator/Editor, create a new script called MenuItems.cs. We will use this to add all the future menu items that the tool requires; for now, add the following code:
using UnityEngine;
using UnityEditor;
namespace RunAndJump.LevelCreator {
public static class MenuItems {
[MenuItem ("Tools/Level Creator/New Level Scene")]
private static void NewLevel () {
EditorUtils.NewLevel ();
}
}
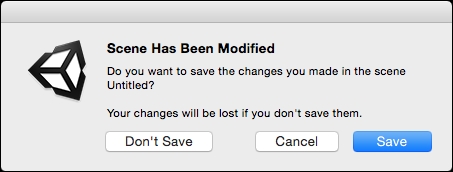
}Now, the NewLevel method will be available when you navigate to Tools | Level Creator | New Level Scene. Save all the scripts changes and for Unity to compile, then click on New Level Scene:

A dialog window will ask you whether you want to save the current changes of the scene (if this one has modifications):
After this, a new scene will be created with the game object containing the level script:
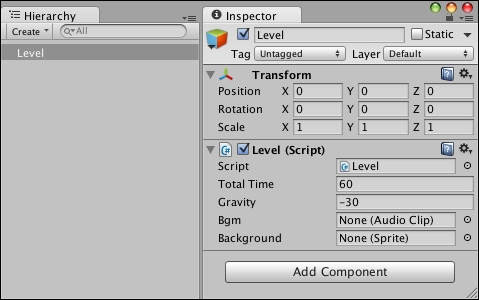
Congratulations! We have the starting point for the Level Creator tool creating a level scene with just one click!