Book Image

Hands-On Object-Oriented Programming with C#

By : Raihan Taher
Book Image

Hands-On Object-Oriented Programming with C#

By: Raihan Taher

Overview of this book

Object-oriented programming (OOP) is a programming paradigm organized around objects rather than actions, and data rather than logic. With the latest release of C#, you can look forward to new additions that improve object-oriented programming. This book will get you up to speed with OOP in C# in an engaging and interactive way. The book starts off by introducing you to C# language essentials and explaining OOP concepts through simple programs. You will then go on to learn how to use classes, interfacesm and properties to write pure OOP code in your applications. You will broaden your understanding of OOP further as you delve into some of the advanced features of the language, such as using events, delegates, and generics. Next, you will learn the secrets of writing good code by following design patterns and design principles. You'll also understand problem statements with their solutions and learn how to work with databases with the help of ADO.NET. Further on, you'll discover a chapter dedicated to the Git version control system. As you approach the conclusion, you'll be able to work through OOP-specific interview questions and understand how to tackle them. By the end of this book, you will have a good understanding of OOP with C# and be able to take your skills to the next level.
Table of Contents (16 chapters)

Writing your first program in Visual Studio

VS is the IDE where developers mostly code while working with the C# language. As you already have a basic idea of how VS works, let's write our first program in VS. Let's create a console application, name the solution MyFirstApp, and press OK. The default solution template will be automatically added, which includes one Program.cs with the Main program, and a number of other files.

Let's build a program that generates an ATM machine. There will be a menu that has three options:

  • Withdraw
  • Deposit
  • Balance check

The withdrawal will be performed on the balance (initially $1,000) and a deposit will add an amount to the current balance. Now, let's see what the program looks like:

class Program
{
static void Main(string[] args)
{
int balance, depositAmt, withdrawAmt;
int choice = 0, pin = 0;
Console.WriteLine("Enter your ledger balance");
balance = int.Parse(Console.ReadLine());
Console.WriteLine("Enter Your Pin Number ");
pin = int.Parse(Console.ReadLine());

if(pin != 1234)
{
Console.WriteLine("Invalid PIN");
Console.ReadKey(false);
return;
}

while (choice != 4)
{
Console.WriteLine("********Welcome to PACKT Payment Bank**************\n");
Console.WriteLine("1. Check Balance\n");
Console.WriteLine("2. Withdraw Cash\n");
Console.WriteLine("3. Deposit Cash\n");
Console.WriteLine("4. Quit\n");
Console.WriteLine("*********************************************\n\n");
Console.WriteLine("Enter your choice: ");
choice = int.Parse(Console.ReadLine());

switch (choice)
{
case 1:
Console.WriteLine("\n Your balance $ : {0} ", balance);
break;
case 2:
Console.WriteLine("\n Enter the amount you want to withdraw : ");
withdrawAmt = int.Parse(Console.ReadLine());
if (withdrawAmt % 100 != 0)
{
Console.WriteLine("\n Denominations present are 100, 500 and 2000. Your amount cannot be processed");
}
else if (withdrawAmt > balance)
{
Console.WriteLine("\n Sorry, insufficient balance.");
}
else
{
balance = balance - withdrawAmt;
Console.WriteLine("\n\n Your transaction is processed.");
Console.WriteLine("\n Current Balance is {0}", balance);
}
break;
case 3:
Console.WriteLine("\n Enter amount you want to deposit");
depositAmt = int.Parse(Console.ReadLine());
balance = balance + depositAmt;
Console.WriteLine("Your ledger balance is {0}", balance);
break;
case 4:
Console.WriteLine("\n Thank you for using the PACKT ATM.");
break;
}
}
Console.ReadLine();
}
}

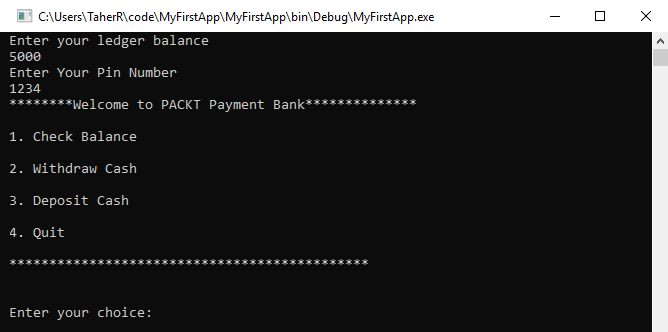
Now, let's illustrate the program. The program requests a PIN number before opening the ATM machine. The PIN is not checked and can be anything. Once the program starts up, it creates a menu in the front of the console with all of the desired options.

You can see that the entire code is written inside a while loop, as it ensures that the program is kept alive for multiple executions. During execution, you can choose any of the options that are available and perform the action associated with it.

To execute the program, just click on the Run button on the toolbar of the IDE:

If the program does not run automatically, you can look at the Error List window to figure out the actual issue. If you made a mistake in the code, VS will show you the appropriate error message and you can double-click on this to navigate to the actual location.

How to debug

If you have heard about VS, you must have heard about the debugging capabilities of the IDE. You can start the program in debug mode by pressing F10. The program will start in debug mode with the context in the first line. Let's execute a few of the lines. This will look as follows:

The highlighted line in the code editor workspace depicts the line where the current execution has halted. The line is also marked with an arrow on the very left of the code editor. You can continue pressing F10 or F11 (step into) buttons to execute these lines. You must inspect the Locals window to find out about all of the values of the local variables during their execution.

Debugging through code

For really advanced users, the .NET class library opens up some of the interesting debugger APIs that you can invoke from your source code to call a debugger manually.

From the very beginning of a program, there is a DEBUG preprocessor variable, which determines whether the project was built in debug mode.

You can write the code in the following way:

#IF DEBUG
/// The code runs only in debug mode
#ENDIF

The preprocessor directives are actually evaluated during compile time. This means that the code inside IF DEBUG will only be compiled in the assembly when the project is built in debug mode.

There are other options such as Debug.Assert, Debug.Fail, and Debug.Print. All of these only work during debug mode. In release mode, these APIs won't be compiled.

You can also call the debugger attached to the process if there is any such process available, using the Debugger.Break() method, which will break in the debugger at the current line. You can check the debugger. IsAttached is used to find out whether the debugger is attached to the current process.

When you start debugging your code, VS launches the actual process as well as one in .vshost in its filename. VS enhances the experience of debugging by enabling Partial Trust's debugging and improving the F5 experience by using the .vshost file. These files work in the background to attach the actual process with a predefined app domain for debugging to make a flawless debugging experience.

.vshost files are solely used by the IDE and shouldn't be shipped in an actual project.

VS needs Terminal Services to run these debuggers as it communicates with the process even when it is in the same machine. It does this by using a Terminal Service to maintain a seamless experience with both normal and remote debugging of a process.