Book Image

Learn Microsoft Power Apps - Second Edition

By : Matthew Weston, Elisa Bárcena Martín
4 (2)
Book Image

Learn Microsoft Power Apps - Second Edition

4 (2)
By: Matthew Weston, Elisa Bárcena Martín

Overview of this book

Microsoft Power Apps provides a modern approach to building low-code business applications for mobiles, tablets, browsers, and Microsoft Teams. The second edition of Learn Microsoft Power Apps will guide you in creating well designed and secure apps that transform old processes and workflows. 
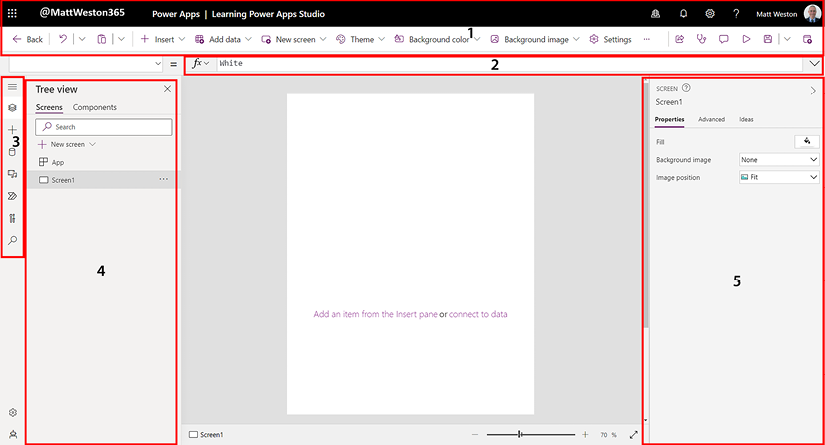
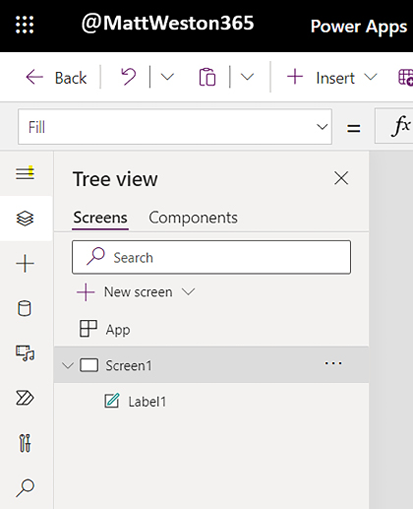
Learn Microsoft Power Apps starts with an introduction to Power Apps to help you feel comfortable with the creation experience. Using screenshots from the latest UI, you will be guided through how to create an app, building your confidence to start developing further. This book will help you design, set up, and configure your first application by writing simple formulas. You'll learn about the different types of apps you can build in Power Apps and which one applies best to your requirements. In addition to this, you’ll learn how to identify the right data storage system for you, with new chapters covering how to integrate apps with SharePoint or Dataverse. As you advance, you’ll be able to use various controls, connectors, and data sources to create a powerful, interactive app. For example, this book will help you understand how Power Apps can use Microsoft Power Automate, Power BI, and Azure functionalities to improve your applications. Finally, you will be introduced to the emerging Power Apps Copilot tool, which uses artificial intelligence to accelerate the app building process. By the end of this Power Apps book, you’ll be ready to confidently develop lightweight business applications with minimal code.
Table of Contents (27 chapters)
24
Other Books You May Enjoy
25
Index
Appendix

Using Power Apps Studio

Power Apps Studio is your primary developer tool for creating, updating, testing, and deploying canvas apps. In this section, we will explore Power Apps Studio, which is where you will take your app ideas from concept to delivery. It is important that you know your way around the studio so that your development time is spent creating the app rather than looking for options and controls. Understanding your development environment will vastly improve your development experience and will also allow you to greatly expand the functionality that’s available within your app.

By the end of this section, you will know about the key areas of Power Apps Studio, including the primary menu area and the formula bar. You will also learn how to view your screens, use the canvas, and find and review the properties of your app.

Power Apps Studio is completely browser-driven and is supported by all modern browsers, unlike other developer tools. Everything you do is, by default, saved to your Power Platform environment, so you don’t need to concern yourself with maintaining code in a code repository.

Power Apps Studio will launch when you start creating your app or if you open an existing app in edit mode. This screen consists of the following areas:

  • Menus
  • Formula bar
  • Left rail
  • Tree view
  • Properties

These are shown in the following screenshot:

Graphical user interface, application  Description automatically generated

Figure 1.21: The Power Apps Studio screen

Most of the key activities we can perform are located in the menus, so let’s familiarize ourselves with what they are.

Power Apps Studio menus

The menus within Power Apps Studio are designed to be contextual, which means that they change depending on the activity that you are carrying out within the studio. For example, if you are working with a screen, you will see some options, and if you’re using a text box then you will see other options.

There are some parts of the menu which remain consistent though. For example, the left side of the menu will always give you the ability to leave the studio using the Back button, the ability to undo and redo actions as well as the ability to insert new controls:

A screenshot of a computer  Description automatically generated with low confidence

Figure 1.22: The left side of the app studio menu

On the right side of the menu are your app buttons, where you can share your app, make comments, switch into test mode, save and publish:

Icon  Description automatically generated

Figure 1.23: The right side of the app studio menu

designed to have the same look and feel as the menus that you use throughout the rest of the Microsoft Office suite. These menus use groups to combine similar functions to make your app creation experience as consistent as possible.

Now that we have looked at the menu and learned how we can add new items to our Power App, let’s look at the formula bar, which is where we can tell the app what to do.

Power Apps formula bar

The formula bar is the key development area and allows you to build logic and actions for the components that you place on the screen. Its look, feel, and behavior is very similar to Microsoft Excel, where logic is built using formulas. We will explore formulas in more detail in Chapter 6, Exploring Formulas:

Figure 1.24: The Power Apps formula bar

Microsoft has produced an extensive guide to the formulas within Power Apps. This can be found on the Microsoft Docs site at https://learn.microsoft.com/en-us/power-platform/power-fx/formula-reference.

When we create content with our app, we need to be able to navigate it. This functionality is provided by the Screens browser in the Tree view pane.

Tree view

The Tree view list on the left-hand side of Power Apps Studio is a very important part of your app development experience. It doesn’t just show the screens that you have created – it also shows you a hierarchical view of all of the controls that you have added to your screens:

Figure 1.25: The Screens browser

The Tree view also allows you to see and interact with any of the components that you have within your app. We will investigate this more in Chapter 7, Exploring Reusable Controls.

When you are in a Tree view, screens and components will have an ellipsis (...) next to them, which allows you to perform a number of actions without having to interact with the control or locate it on the canvas itself. Some of the key actions that you can undertake are as follows:

  • Rename: Change the name of the screen or control
  • Copy and Paste: Copy the selected control to the clipboard and then paste it again
  • Reorder: Change the order of the controls in the same way as we discussed when we looked at the Home menu
  • Align: Align the control on the canvas (this will only appear when selecting the menu for a control, not a screen)
  • Delete: Remove the selected object
  • Duplicate screen: Create an exact replica of your selected screen

While screens and controls are important, there is one other item listed in the screen’s browser that is extremely important.

App

The App selection option in the screens list corresponds to the app as a whole. The options that are available to you on this object are extremely limited, but it does give you access to the OnStart event. This is a really useful event as you can carry out particular actions when the app is loaded for the first time without the need for any interaction from the user.

This is commonly used to create local caches of data so that the app is ready to serve data when it’s finished loading. It can also be used to populate a cache so that it can be used for offline working. It is worth noting that this OnStart event will only run when the app is launched from the browser or from a mobile device; it will not fire when you’re using preview mode in the studio.

You can run an OnStart event manually and at any time by clicking on the ellipsis next to App and selecting Run OnStart.

Now that we have found out where we can view our screens, let’s focus on where most of the work will take place.

The Power Apps canvas

The Power Apps canvas is your main working area and allows you to build your app by placing components on the screen using the Insert menu. From here, you can drag and drop them around the screen:

Graphical user interface, application, Word  Description automatically generated

Figure 1.26: The Power Apps canvas in phone mode

Any controls that are added to the page can be selected so that you can interact with them. For example, if you place a rectangle icon onto the screen, you will notice that it has a number of handles surrounding it, which means that you can resize the component by holding down the mouse button and then dragging. You can also move it around the screen and place it exactly where you want that control to appear:

Figure 1.27: Control interaction points, which allow you to move and resize the icon

Unlike with other developer tools, you are unable to place a control outside the boundary of the screen, which means that if you use a component, it will be displayed on your screen unless you change its visibility to hidden.

Breadcrumb

Now that we have a component on the screen, you will notice that a breadcrumb at the bottom of the screen has started to build. This will show you the component hierarchy that you are currently interacting with:

Figure 1.28: The breadcrumb

In the case of our rectangle, the only parent for that control is Screen1; however, when we investigate Forms and Gallery controls later in this book, you will see this expand further as we can nest controls inside a form or a gallery.

Zoom

As you start to add more controls to the screen, it is particularly useful to zoom in and isolate specific parts of the screen or zoom out to be able to view the canvas in its entirety. Zoom is located at the bottom right of the canvas window and can be modified by using the slider control or by using the increase (+) and decrease (-) buttons at either end of it:

Figure 1.29: Zooming in and out with the zoom control

When using your zoom control, you can quickly return to the best possible fit by clicking on the best fit for the window button, which is located to the far right of the zoom and represented by the diagonal arrows.

Looking at the Properties area

The Properties area, which can be found on the far right of the screen, is your toolbox for each component that you place on the screen.

This will allow you to quickly browse and modify the various properties associated with the control that you have selected:

Figure 1.30: The properties for Screen1 being displayed in the Properties area

The Properties panel will group these options into two distinct areas, as follows:

  • Properties
  • Advanced

Let’s look at each of them in detail.

Properties

When you select a control on the canvas, the Properties group will show you the common properties that you will need in order to start customizing it. If we take our rectangle as an example, the Properties display will relate to the fill color, border, and positioning. If we were to compare this to a label control, we would also see text color as a property:

Figure 1.31: The properties of a rectangle showing the different parts of the control that you can change

The common elements of the controls can be edited from the Properties tab, and allow simple interaction. If we want to dive more into the various options, then we need to head to Advanced.

Advanced

While the Properties group will show you the common properties that you can set, the Advanced tab will show you all of the properties for your selected control. It also gives you the ability to search for a property and type your formula or value straight into the property:

Figure 1.32: The Advanced properties tab

The key difference to be aware of when working with Advanced is that you don’t have the same graphical representation that you do on the Properties tab. For example, the Fill is represented as the red, green, blue, and alpha values, which means you can’t select a color from a color palette.