Book Image

Instant E-commerce with OpenCart: Build a Shop

By : Murat Yilmaz
Book Image

Instant E-commerce with OpenCart: Build a Shop

By: Murat Yilmaz

Overview of this book

<p>For years, starting an e-commerce shop was considered a hard task with the need of a significant amount of money, time, and resources. OpenCart makes this process easier and enables anyone to create an attractive and profitable e-commerce solution. This concise guide will show you how to create a robust and striking online store with OpenCart.</p> <p>"Instant E-Commerce with OpenCart: Build a Shop" teaches you how to build your own online shop with step-by-step, easy-to-follow instructions. You will learn how to install, configure, and customize your own shop in order to create an attractive and fully functional store in no time. If you have always wanted to create an online shop, but don’t know how, then this book is for you!</p> <p>In "Instant E-Commerce with OpenCart: Build a Shop", you will be taken through the required steps to create an awesome e-commerce solution. This book starts by showing you how to correctly set up and install OpenCart, before moving on to creating products and their attributes.</p> <p>If the world of payment gateways and shipping options sounds complicated, don’t worry. This guide will take you through the essentials required to set up and manage how your customers are going to pay for and receive their orders! Finishing with vouchers, templates, and SEO, this book will ensure you end up with a powerful, attractive, and profitable online store.</p>
Table of Contents (7 chapters)

Adding tax data (Simple)


Generally, the tax rate for a product is calculated according to the geographical shipping location of a customer. We will now see how we can enable taxes for a product, and how we can enter the tax class, rates, and grouping information for it.

How to do it...

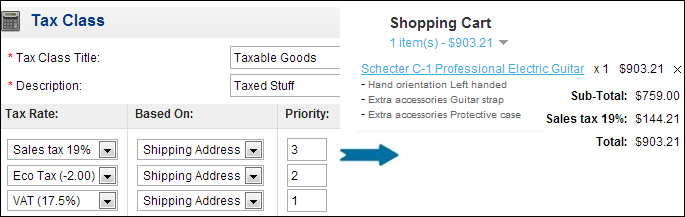
  1. Let's apply the default tax class to the product under the Data tab. It is called Taxable Goods by default. The right-hand side of the page shows the result when the edited product is added to the shopping cart.

  2. Assume that our store also ships to Germany. Now let's add the tax rate for customers who will order from Germany. We will need to define the tax zone. Let's go to System | Localisation | Geo Zones and then click on the Insert button. We have added all the geo zones of Germany. Let's go to System | Localisation | Taxes | Tax Rates and insert the following tax rate and connect it with the geo zone.

  3. Go to System | Localisation | Taxes | Tax Classes, edit Taxable Goods, and insert Sales tax 19% in the Tax Name field for the newly added tax rate.

  4. Now if we open a test customer account with a shipping address from Germany, log in to the system, and add a product to the shopping cart, we will see that the correct tax value is applied.

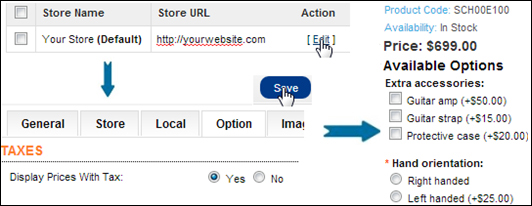
  5. By default, the prices are shown inclusive of tax. It is possible to change this setting. Here is how to do it. Click on the System menu, click on Settings, and edit the Option tab. Now the front page shows the price without the tax included, as shown on the right-hand side of the following screenshot:

How it works...

The default tax class is applied to a product after it is added to the shopping cart. OpenCart shows UK tax zones on installation by default if a tax class is enabled for a product.