

We will learn how to configure the look of our shop as well as its stock handling, local language, currency, checkout, and tax options.
Let's open the Settings menu from the System menu and then click on Edit to open the main settings screen for our store. Let's fill in the General tab according to our store information. Then, let's click on the Save button on the same page. After that, let's browse to the URL
http://yourwebsite.com/index.php?route=information/contactto see how this information will be shown on the Contact us page. The link to this page is also located at the bottom of every page of our website.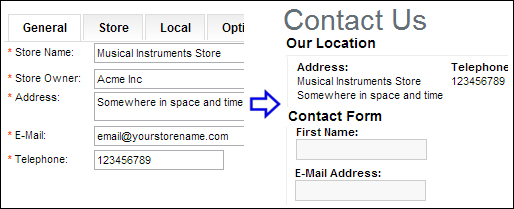
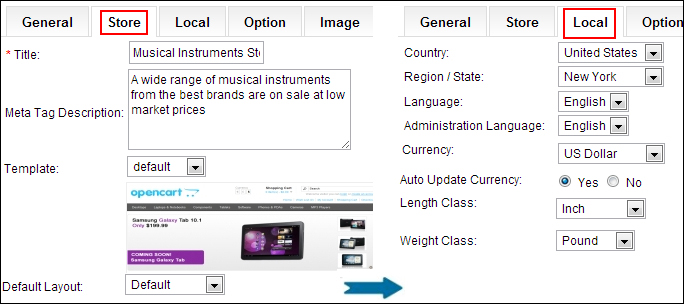
Let's continue with the Store and Local tabs and provide more information for our store.
Now let's fill the Option and Image fields as well.

Let's learn the details of the options we have just set.
Following is an explanation of some of the options under the Store tab:
Title: This is shown as the title of the store in the search engines as well as on a visitor's browser tab
Meta Description: This is for the search engines; it is shown as a description under the title
Following is an explanation of some of the options under the Local tab.
The Country and Region/State tabs: These are used to enter information for the "shipping from" address.
Auto Update Currency: We can automatically update the currency rates using this option. The rates will be updated using the Yahoo! Finance service working in the background.
The Length and Weight Class tabs: Measurement types are selected here. Typically, a store in the US will use inches and pounds instead of meters and kilograms that are used in the EU.
The following is an explanation of the options under the Option tab:
Default Items per page (part of the the Admin and Catalog tabs): This is for paging purposes and generally set to a high value for admin panels, for easier administration. A very large value for the customer catalog can make the site slower if it is getting a lot of page views.
Category Product Count: If set to Yes, all the subcategories will show the number of products under them. It can have a negative impact on the performance of large stores.
Allow Downloads: We set this to No for a store that sells physical products.
Taxes: We use this section to show prices either with or without the tax included, and define the address source for which the taxes need to be calculated. Typically, you will not need to change the settings here.
Customers Online: If set to Yes, online guests and customers are tracked in a special report, along with detailed information, such as their last visited page, IP address, and so on. The report is available under the Customers Online menu under Reports | Customers.
Login Display Prices: It is possible to show prices only when a customer logs in to the store. When it is set to Yes, guest users will not be able to see the sale prices of the items.
Account Terms: It is wise to force users to accept a privacy policy when they create an account. In this way, you can be on the safer side legally.
Guest Checkout: This is the fastest way to order from a store, without the customer having to sign up for the store at first. But, they will not be able to track the status of their orders online.
Checkout Terms: Again, it is safer to force users to accept the terms and conditions of use.