Book Image

Instant E-commerce with OpenCart: Build a Shop

By : Murat Yilmaz
Book Image

Instant E-commerce with OpenCart: Build a Shop

By: Murat Yilmaz

Overview of this book

<p>For years, starting an e-commerce shop was considered a hard task with the need of a significant amount of money, time, and resources. OpenCart makes this process easier and enables anyone to create an attractive and profitable e-commerce solution. This concise guide will show you how to create a robust and striking online store with OpenCart.</p> <p>"Instant E-Commerce with OpenCart: Build a Shop" teaches you how to build your own online shop with step-by-step, easy-to-follow instructions. You will learn how to install, configure, and customize your own shop in order to create an attractive and fully functional store in no time. If you have always wanted to create an online shop, but don’t know how, then this book is for you!</p> <p>In "Instant E-Commerce with OpenCart: Build a Shop", you will be taken through the required steps to create an awesome e-commerce solution. This book starts by showing you how to correctly set up and install OpenCart, before moving on to creating products and their attributes.</p> <p>If the world of payment gateways and shipping options sounds complicated, don’t worry. This guide will take you through the essentials required to set up and manage how your customers are going to pay for and receive their orders! Finishing with vouchers, templates, and SEO, this book will ensure you end up with a powerful, attractive, and profitable online store.</p>
Table of Contents (7 chapters)

Learning to use modules (Simple)


OpenCart provides a set of modules that help us further customize and enhance our shops. Some of these modules are enabled, by default, upon installation.

How to do it...

In this recipe, we will look at the most useful modules and learn how we can take advantage of them.

Working with banners

Banners, simply defined, are images with links to advertised products or websites. In OpenCart, we can manage and replace banners easily.

  1. Let's define a new banner by going to System | Design | Banners and inserting a new banner with multiple images.

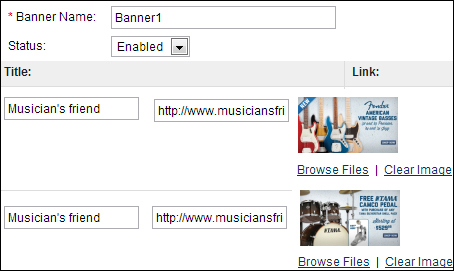
  2. After this, let's go to Extensions | Modules and edit the Banner module. We choose Banner1 as the name for the newly added banner and also provide the dimensions and location of the banner.

  3. The following screenshot shows how it will appear on the store front's category page. Note that the images rotate automatically in a few seconds as we have provided two images for the banner.

Using the Specials module

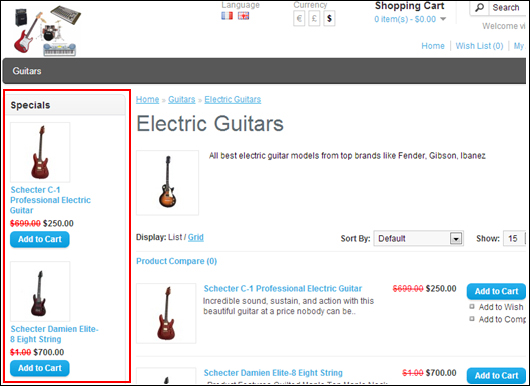
  1. This is a very useful module for promoting the products for which there are special price discounts. After installing and enabling this module using the Modules section under the Extensions menu, we create a placeholder to show the special items.

  2. In the following example, a special box will be shown only at the bottom of all the content on the Product page (a maximum of three specials) and on the left-hand side of the Category page (a maximum of five products)

  3. Here are two screenshots that show how the module will appear on a product page:

  4. The same module is shown on a category page in the following screenshot:

Tip

Modules behave differently according to the selected layout structure and placement.