

The following is the process of downloading and extracting Siebel CRM software installers:
Register at Oracle E-Delivery
Understand the license agreement
Download the installation archives
Download Oracle Siebel Documentation
Extract the installation archives
Extract the Siebel installers
Adjust browser security settings
In the following section, we will discuss these steps in detail.
Oracle makes Siebel CRM software available for download on its E-Delivery website at http://edelivery.oracle.com. Before we can download software from this site, we have to register with our name, company, and e-mail address and accept the trial license terms and export restrictions outlined on the website. Oracle will send a notification e-mail after approximately one business day.
Oracle grants an unlimited developer license for its software. The license agreement grants "a nonexclusive, nontransferable limited license to use the programs only for the purpose of developing, testing, prototyping, and demonstrating your application, and not for any other purpose."
It is important that we read and understand the license agreement.
Because of the size of the .zip archives that contain the Siebel CRM installation files, it is highly recommendable to use a download management tool such as Free Download Manager.
After logging in to Oracle's E-Delivery website, we choose Siebel CRM in the Select a Product Pack drop-down list and choose Microsoft Windows (32-bit) in the Platform drop-down list. The following screenshot shows this selection:
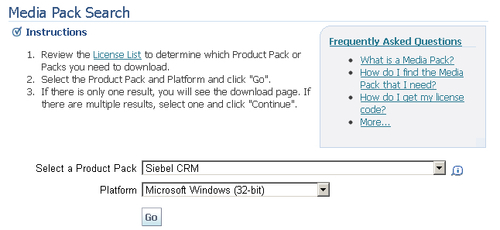
After clicking the Go button a list of media packs is displayed. To obtain the installers for Siebel Industry Applications 8.1.1, used throughout this book for the case study examples, we must click the media pack named Siebel Business Applications (with Translations) Media Pack 8.1.1.0 Release for Microsoft Windows (32-bit) (Part Number B52660-07).
From the resulting list, the following .zip archives must be downloaded and stored in a single folder:
Siebel Business Applications Version 8.1.1.0 Siebel Client (Part 1 of 2)
Part Number: V14869-01 Part 1 of 2 (Full size: 1.9 GB)
This archive contains the base installer for the Siebel Mobile/Developer Web Client and some language packs (including the American English (enu) language pack).
Siebel Business Applications Version 8.1.1.0 Siebel Client (Part 2 of 2)
Part Number: V14869-01 Part 2 of 2 (Full size: 624 MB)
This archive contains the remaining language packs for the Siebel Mobile/Developer Web Client.
Siebel Business Applications Version 8.1.1.0 Siebel Client Part 2 (Part 2 of 2)
Part Number: V15040-01 Part 2 of 2 (Full size: 953 MB)
This archive contains the base installer for the Siebel Sample Database as well as language packs for Handheld applications and the sample database.
Siebel Business Applications Version 8.1.1.0 Siebel Tools
Part Number: V15391-01 (Full size: 1.9 GB)
This archive contains the Siebel Tools installer.
Siebel Business Applications Version 8.1.1.0 ImageCreator Files
Part Number: V14502-01 (Full size: 213 MB)
This archive contains the Image Creator files for all supported operating systems.
The ZIP Preview feature of Free Download Manager can be used to dramatically reduce the download size by only selecting the files we need. Regarding language packs, we should always download the American English (enu) language pack. Other language packs can be downloaded as needed.
We should use an unzip utility such as 7-Zip to extract the entire content of the downloaded .zip files to a separate folder.
The Oracle Siebel Documentation (also known as Siebel Bookshelf) can be accessed online and downloaded in various versions from the following Oracle Technology Network website:
http://www.oracle.com/technetwork/documentation/siebel-087898.html
To support the examples in this book, it is recommendable to download the Siebel Business Applications 8.1 Documentation Library.
The Siebel Image Creator, extracted along with the installation archives, must be used to create the Siebel installation images.
The following procedure describes how to create a Siebel installation image for Siebel Tools, the Siebel Mobile or Developer Web Client, and the Siebel Sample Database using the Siebel Image Creator:
|
Step |
Description |
Tasks and Example Values |
|---|---|---|
|
1 |
Start the Siebel Image Creator |
Double-click the |
|
2 |
The Welcome dialog is displayed |
Click Next. |
|
3 |
Display of options |
Choose Create a new image.... Click Next. |
|
4 |
Specify the directory to which the installer images should be copied |
Example: C:\Siebel_Install_Image. Click Next. |
|
5 |
Application type selection |
Select "Siebel Industry Applications". Click Next. |
|
6 |
Select operating system platform |
Select Windows. Click Next. |
|
7 |
Select products |
Select the following:
Click Next. |
|
8 |
Specify languages |
Select ENU - English (American). Click Next. |
|
9 |
Progress of the file extraction process is displayed |
Wait for completion. |
|
10 |
Success message is displayed |
Click Finish. |
As a result, the folder specified in step 4 of the previous procedure now contains several subfolders with the installers for the Siebel Mobile or Developer Web Client, Sample Database, and Siebel Tools.
In order to allow the browser to download and install the ActiveX controls for the Siebel High-Interactivity Framework, we must adjust the security settings of Microsoft Internet Explorer as follows:
1. Open Internet Explorer.
2. Navigate to the Tools menu and select Options.
3. In the Options dialog, click the Security tab.
4. Click the Trusted Sites icon.
5. Click the Sites button.
6. 6. Uncheck the flag Require server verification (https:) for all sites in this zone.
7. In the Add this website to the zone field enter
http://localhost.8. Click the Add button.
9. Repeat steps 7 and 8 and create an entry for your machine's hostname.
Note
You can obtain the hostname of your machine by entering hostname in a command shell window.
10. Click the Close button.
11. Click the Custom Level button in the Security Level area.
12. From the Reset to drop-down list on the bottom of the dialog, select Low.
13. Click Reset....
14. Click Yes.
15. Click OK.
16. Click Apply.