

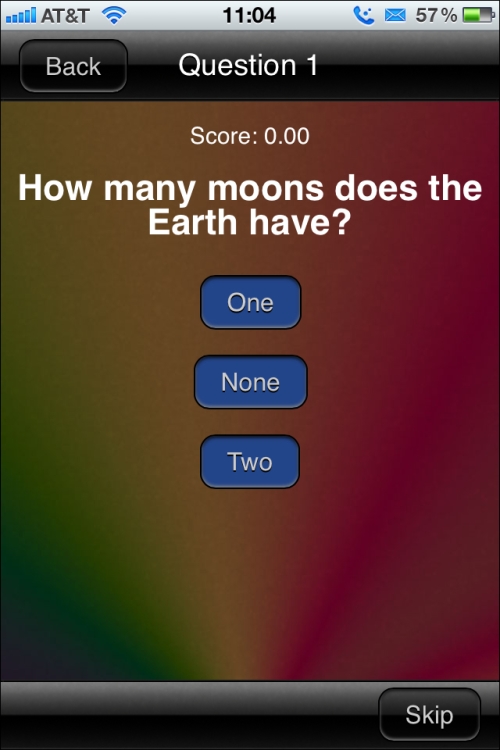
To get started, create a file named gameView.html under the www/views directory. When we're done, we'll have a view that looks like the following screenshot for iOS:
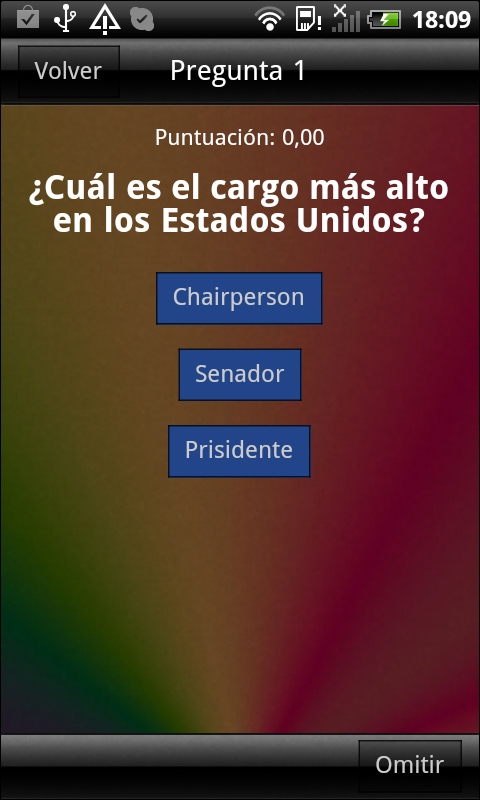
For Android, the view will look like the following screenshot:
Now, before we get too deep into the view itself, let's go over the view stack and how it helps us deal with navigation. The view stack is shown in the following screenshot:
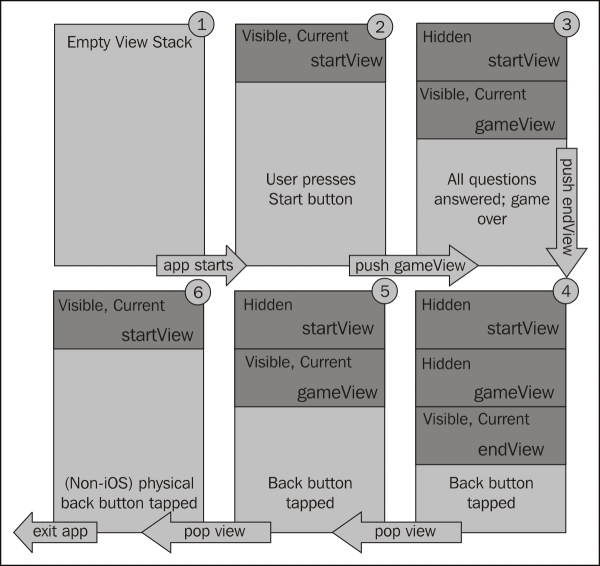
The view stack is really just a stack that maintains the list of previously visible views and the currently visible view. When our app first starts, the stack will be empty as identified in the first step in the preceding screenshot. Then, the startView view is pushed onto the stack using the showView method, and you have the stack in (2). When the player taps the Start button, the gameView view is pushed onto the stack, which results in the stack as seen in (3). Then, when the game is over, we'll push the endView view on the stack, resulting in (4).
Because we're tracking all these views, including the ones that are no longer visible (especially at the end of the game), it makes it easy to go back to a previous view. For iOS, this is done via the back button. For Android, the device often has a physical back button that is used instead. Regardless of how a back event is triggered, we need to be able to go backwards in the stack.
Let's say that the user now decides to go back in the stack; we would have the stack in (5). If they decide to go back another step, (6) would result. At this point, iOS would permit no further backtracking, but for Android, another back event should exit the user out of the app.
The game view will be very similar to our start view, except that it is a little more complicated. After all, it plays an entire game. Thankfully, there's really nothing terribly new here, so it should be smooth going.
Let's start with the HTML portion of the view given as follows:
<div class="viewBackground">
 <div class="navigationBar">
  <div id="gameView_title"></div>
  <button class="barButton backButton"
   id="gameView_backButton" style="left:10px"></button>
 </div>
 <div class="content avoidNavigationBar avoidToolBar"
  id="gameView_gameArea">
  <div id="gameView_scoreArea" style="height:1em; text-
   align: center;"></div>
  <div id="gameView_questionArea" style="text-align:
   center"></div>
 </div>
 <div class="toolBar">
  <button class="barButton" id="gameView_nextButton"
   style="right:10px" ></button>
 </div>
</div>
I've highlighted what's new in the earlier code, but there is not much as you can see. First we've defined a back button that lives in the navigation bar, and in the content area we've defined two new areas: one for the player's score, and another for the actual question (and answers).
Up next, while similar to the localized content in the start view, we have templates that specify how a question and its answers are displayed; this is given as follows:
<div id="gameView_questionTemplate" class="hidden">
 <h2>%QUESTION%</h2>
 <div style="text-align:center;">%ANSWERS%</div>
</div>
First, we define the question template, which consists of a second-level heading that will have the question's text, and a div element that will contain all the answers. But what will the answers look like? That's next:
<div id="gameView_answerTemplate" class="hidden">
 <button class="barButton answerButton"
  onclick="gameView.selectAnswer(%ANSWER_INDEX%);">%ANSWER%
 </button><br/>
</div>
Each answer will be presented as a button with the answer text inside, and an onclick event attached to call the gameView.selectAnswer() method with the selected answer.
Of course, as these are templates, they don't appear to the player, and so they are given the hidden class. But we'll definitely make use of them in our JavaScript when we construct an actual random question to display to the player. Let's go over the script now:
<script>

  var gameView = $ge("gameView") || {};

  gameView.questionNumber = -1;
  gameView.score = 0;
  gameView.theCurrentQuestion;
By now you should be familiar with our namespacing technique, which comes first in our code. After that, though, we define the properties in our view. The question number, which will act as our counter so that when it reaches ten, we know the game is over; the score; and the current question. The latter isn't obvious, but it will be an actual question object, not an index to the object.
After that, we have the initializeView function, which will wire up all the widgets and do the localization of the text, as seen in the following code snippet:
gameView.initializeView = function ()
  {
  PKUTIL.include ( ["./models/quizQuestions.js",
      "./models/quizQuestion.js"] );
  gameView.viewTitle = $ge("gameView_title");
  gameView.viewTitle.innerHTML = __T("APP_TITLE");

  gameView.backButton = $ge("gameView_backButton");
  gameView.backButton.innerHTML = __T("BACK");
  PKUI.CORE.addTouchListener(gameView.backButton, "touchend",
      function () { PKUI.CORE.popView(); });

  gameView.nextButton = $ge("gameView_nextButton");
  gameView.nextButton.innerHTML = __T("SKIP");

  PKUI.CORE.addTouchListener(gameView.nextButton, "touchend",
      gameView.nextQuestion);

  gameView.scoreArea = $ge("gameView_scoreArea");
  gameView.questionArea = $ge("gameView_questionArea");
}
I've highlighted a few areas in the preceding code block. The last ones are more or less the same, as we're storing the gameView_scoreArea and gameView_questionArea elements into properties for later use, so that's not really anything new. What is new about it is that we aren't loading any content into them yet.
The second highlight is not something you'd really ever add to a production game. You may ask, so why is it here? The idea is that this button lets us skip the current question without a penalty. Why? The answer is testing. I don't want to have to tap through an answer, tap through the alert saying if I got it right or wrong a million times to see if the localization is working for all the questions. Hence, skip was born.
The first highlight though, is more interesting. It's a JavaScript include. "Wait," I hear you saying, "JavaScript doesn't do includes." And you'd be right.
But, it is possible to simulate an include by using XmlHttpRequest, which is often referred to as AJAX. With this short include statement, we're asking the browser to load the two referenced JavaScript files (quizQuestions.js and quizQuestion.js) on our behalf. It's important that this happens too; otherwise, our game would have no questions!
The PKUTIL.include() function is defined in www/framework/utility.js. We'll worry about the full implementation details a little later in this project, but it would suffice to say, it does what it says. The scripts are loaded and waiting for us when we need to use the questions. (At this point the reader with a gazillion questions is asking this key question, "Does the order matter?", the answer is, "Yes." And you'll see why in a short bit.)
So now that we have the initialization for gameView down, let's look at another key method: viewWillAppear. It is shown in the following code snippet:
gameView.viewWillAppear = function ()
{
  gameView.questionNumber =1;
  gameView.score = 0;
  gameView.nextQuestion();
}
The latter part of this code is fairly innocuous. We set the question number to 1, the score to zero, and call the nextQuestion() method, which, as it is turns out, renders the next question and displays it to the player.
The viewWillAppear() function, as you may remember, is called by
PKUI.CORE.pushView() and PKUI.CORE.showView() methods just prior to the actual animation that renders the view onscreen. Therefore, the act of the Start button on the start view pushing the game view on the stack will call this function, and start the game.
It also works when we're coming back to the view by popping the end view off the stack. We'll receive a viewWillAppear notification, reset the game, and it's as if the user gets a whole new game. It's almost magic!
Note
To those who have done any amount of Objective-C programming for iOS using Apple's frameworks, I'll apologize right now for using the concepts in the framework. It's just that, well, they fit the view model so well! If you prefer Android's methodology, or Microsoft's, feel free to substitute. I just happen to like the framework Apple has built up for their platform.
Of course, we need to actually do something when the back button is pressed, the code for it is as follows:
gameView.backButtonPressed = function ()
{
  PKUI.CORE.popView();
}
The popView() method is literally the reverse of pushView. It takes the currently visible view (gameView), pops it off the stack, and displays the underlying view, in this case, startView. The best thing to do here would be to prompt the player if they really wanted to do this; it will end their game, perhaps prematurely. For now, as an example, we'll leave it at this.
Next, we need to define how a question is displayed on the screen. We do that in nextQuestion()
, as seen in the following code snippet:
gameView.nextQuestion = function ()
{
First, we'll get a random question from the QQ namespace:
  // load the next question into the view
  gameView.theCurrentQuestion = QQ.getRandomQuestion();
Next, we get our templates:
  var theQuestionTemplate =
    $ge("gameView_questionTemplate").innerHTML;
  var theAnswerTemplate   =
    $ge("gameView_answerTemplate").innerHTML;
Now that we have our templates, we'll replace all occurrences of "%QUESTION%" with the translated question, as shown in the following code snippet:
  theQuestionTemplate = theQuestionTemplate.replace(
    "%QUESTION%",
    __T(gameView.theCurrentQuestion.getQuestion()) );
Generating the answers is a little more tricky. There may be two, three, or more answers for any one question, so we'll ask the question for a list of randomized answers first, and then loop through that list while building up an HTML string, as shown in the following code snippet:
  var theAnswers =
    gameView.theCurrentQuestion.getRandomizedAnswers();

  var theAnswersHTML = "";

  for (var i=0; i<theAnswers.length; i++)
    {
For each answer, we'll replace the %ANSWER% text with the translated text of the answer, and "%ANSWER_INDEX%" with the current index (i), as shown in the following screenshot:
        theAnswersHTML += theAnswerTemplate.replace(
          "%ANSWER%",
          __T(gameView.theCurrentQuestion.answerAtIndex(
          theAnswers[i] ) )).replace ( "%ANSWER_INDEX%",
          theAnswers[i] );
    }
Now that we've got the HTML for our answers, we can replace %ANSWERS% in the question template with it as follows:
    theQuestionTemplate = theQuestionTemplate.replace (
      "%ANSWERS%", theAnswersHTML );
At this point, we can display the question to the player:
gameView.questionArea.innerHTML = theQuestionTemplate;
We also want to update the player's score. We're going to have an artificially absurd scoring system to highlight whether or not our localization is working correctly. Note that the 2 in the following code snippet specifies we want two decimal places in the score.
    gameView.scoreArea.innerHTML = __T("SCORE_%1",
      [ __N(gameView.score, "2") ]);
We'll also update the view's title with the current question number. This time the "0" following code snippet indicates no decimal points:
    gameView.viewTitle.innerHTML = __T("QUESTION_%1",
      [ __N(gameView.questionNumber, "0") ]);

}
All of this is well and good, but it does nothing without the user being able to select an answer, which is where the next function comes in:
  gameView.selectAnswer = function ( theAnswer )
  {
First, we'll ask the current question if the answer selected is correct using the following code snippet:
    if (gameView.theCurrentQuestion.testAnswer ( theAnswer ))
    {
If it is, we'll tell the user they got it right, and increment their score as follows:
        alert (__T("CORRECT"));
        gameView.score += 483.07;
    }
    else
    {
But if it is wrong, we'll indicate that it is incorrect, and decrement their score (We're mean, I guess. Not really though-we want to test that negative numbers work too.), using the following code snippet:
        alert (__T("INCORRECT"));
        gameView.score -= 192.19;
    }
Next, we check to see if we've asked the last question in the set as follows:
    if (gameView.questionNumber >= 10)
    {
If we have, we'll communicate the score to the end view and push it onto the stack. This ends the game, using the following code snippet:
        endView.setScore ( gameView.score );
        PKUI.CORE.pushView ( endView );
    }
    else
    {
In this case, we've got more questions to answer, so we load the next question as follows:
        gameView.questionNumber++;
        gameView.nextQuestion();
    }
  }

</script>
With that, we're done with the game view. Tell me, that wasn't too difficult, was it?
We implemented the actual game in one view. We also learned how to handle the back button on Android, and back navigation on iOS. We also gained an understanding of how to use HTML blocks that are hidden as templates for dynamic content.
If you remember, I mentioned that we'd talk about that wonderful little include function a little more. Let's look at it a bit closer:
PKUTIL.include = function ( theScripts, completion )
{
First off, let me clue you into something: we're using recursion here to load the scripts. So, as you'll see in the following code, we're testing the length of the incoming array, and if it is zero, we call the completion method passed to us. This allows us—if we like—to have code called after all the scripts are loaded. This code block is as follows:
var theNewScripts = theScripts;
  if (theNewScripts.length == 0)
  {
    if (completion)
    {
       completion();
    }
    return;
  }
In the next section, we'll pop off the next script to load. This also explains that the array must contain the scripts in reverse order of their dependencies. Yes, you could reverse the array yourself and you should, but I wanted to make the point. To pop off the script the following code instruction is used:
var theScriptName = theNewScripts.pop();
Then we call another previously unknown function, PKUTIL.load()
. This method takes the script filename, and then calls the completion function we've given it. It will call it regardless of success or failure. Notice that it is an incoming parameter to the completion function. This function is shown in the following screenshot:
  PKUTIL.load ( theScriptName, true, function ( success, data )
  {
If the script was successfully loaded, we create a SCRIPT DOM element and add the data to it. It is important to note that nothing happens with the script until we actually attach it to the DOM. We do this by appending the child to the BODY. It is at this point that whatever is in the script will be executed. This conditional if block is shown in the following code snippet:
    if (success)
    {
      var theScriptElement = document.createElement("script");
      theScriptElement.type = "text/javascript";
      theScriptElement.charset = "utf-8";
      theScriptElement.text = data;
      document.body.appendChild ( theScriptElement ); // add it as a script tag
    }
If we fail to load the script, we'll generate a log message on the console. You could make a case that something worse should happen, like a fatal error that stops everything, but this also permits loading libraries that may or may not be there and taking advantage of them if they happen to exist. Perhaps not a feature one would use frequently, but useful at times nonetheless. The conditional else block is as follows:
    else
    {
      console.log ("WARNING: Failed to load " + theScriptName );
    }
And say hello to our little friend, recursion. We call ourselves with the array of script names (minus the one we just popped), with the completion function, and sooner or later, we'll end up with no items in the array. Then, the completion function will be called as seen in the following code block:
    PKUTIL.include ( theNewScripts, completion );
  }
  );
}
The PKUTIL.load() function is another interesting beast, which must work correctly for our includes to work. It's defined something like the following (for full implementation details, visit https://github.com/photokandyStudios/YASMF/blob/master/framework/utility.js#L126):
PKUTIL.load = function ( theFileName, aSync, completion )
{
First, we'll check to see if the browser understands XMLHttpRequest. If it doesn't, we'll call completion with a failure notice and a message describing that we couldn't load anything, as shown in the following code block:
  if (!window.XMLHttpRequest)
  {
    if (completion)
    {
      completion ( PKUTIL.COMPLETION_FAILURE,
                   "This browser does not support
                    XMLHttpRequest." );
      return;
    }
  }
Next we set up the XMLHttpRequest
, and assign the onreadystatechange function as follows:
  var r = new XMLHttpRequest();
  r.onreadystatechange = function()
  {
This function can be called many different times during the loading process, so we check for a specific value. In this case, 4 means that the content has been loaded:
    if (r.readyState == 4)
    {
Of course, just because we got data doesn't mean that it is useable data. We need to verify the status of the load, and here we get into a little bit of murky territory. iOS defines success with a zero value, while Android defines it with a 200:
      if ( r.status==200 || r.status == 0)
      {
If we've successfully loaded the data, we'll call the completion function with a success notification, and the data, as follows:
        if (completion)
        {
          completion ( PKUTIL.COMPLETION_SUCCESS,
                       r.responseText );
        }
      }
But if we've failed to load the data, we call the completion function with a failure notification and the status value of the load, as follows:
      else
      {
        if (completion)
        {
          completion ( PKUTIL.COMPLETION_FAILURE,
                       r.status );
        }
      }
    }
  }
Keep in mind that we're still just setting up the XMLHttpRequest object and that we've not actually triggered the load yet.
The next step is to specify the path to the file, and here we run into a problem on WP7 versus Android and iOS. On both Android and iOS we can load files relative to the index.html file, but on WP7, we have to load them relative to the /app/www directory. Subtle to track down, but critically important. Even though we aren't supporting WP7 in this book, the framework does, and so it needs to handle cases like this using the following code snippet:
  if (device.platform=="WinCE")
  {
    r.open ('GET', "/app/www/" + theFileName, aSync);
  }
  else
  {
    r.open ('GET', theFileName, aSync);
  }
Now that we've set the filename, we fire off the load:
  r.send ( null );

}
Note
Should you ever decide to support WP7, it is critical that even though the framework supports passing false for aSync, which should result in a synchronous load, you shouldn't actually ever do so. WP7's browser does funny things when it can't load data asynchronously. For one thing, it loads it asynchronously anyway (not your intended behavior), and for another thing, it has a tendency to think the file simply doesn't exist. So instead of loading scripts, you'll get errors in the console indicating that a 404 error occurred. And you'll scratch your head (I did!) wondering why in the world that could be when the file is right there. Then you'll remember this long note, change the value back to true, and things will suddenly start working. (You seriously do not want to know the hours it took me to debug on WP7 to finally figure this out. I want those hours back!)