Book Image

Mastering Adobe Captivate 2017 - Fourth Edition

By : Dr. Pooja Jaisingh, Damien Bruyndonckx
Book Image

Mastering Adobe Captivate 2017 - Fourth Edition

By: Dr. Pooja Jaisingh, Damien Bruyndonckx

Overview of this book

<p>Adobe Captivate is used to create highly engaging, interactive, and responsive eLearning content. This book gives you the expertise you need to reinforce your own professional-quality eLearning course modules.</p> <p>The book takes you through the production of three pieces of eLearning content. First, you will learn how to create a typical interactive Captivate project. This will give you the opportunity to review all Captivate objects one by one and uncover the application's main tools. Then, you will use the built-in capture engine of Captivate to create an interactive software simulation and a Video Demo that can be uploaded to your YouTube channel or published as an MP4 video. Finally, you will approach the advanced responsive features of Captivate to create a project that can be viewed on any device. At the end of the book, you will empower your workflow and projects with the most advanced features of the application, including variables, advanced actions, using Captivate with other applications, and more.</p> <p>This book is an advanced tutorial, containing all the assets required to build its sample projects. Self-exploration is encouraged through extra exercises, experimentation, and external references.</p>
Table of Contents (15 chapters)

Touring the Captivate interface

In this book, we will cover the three steps of the process requiring the use of Captivate. You will discover that Captivate has specific tools to handle each of these three steps.

Downloading the example code
Before you start reading this section, it is important that you download the sample files we refer to throughout this book. You can download the sample files for all Packt Publishing books that you have purchased from your account at
http://www.packtpub.com. If you purchased this book elsewhere, you can visit http://www.packtpub.com/support and register to have the files emailed directly to you.

You will now discover this new interface using the following steps:

  1. Open Captivate.
  2. If needed, click the Recent tab at the top of the Welcome screen.
  3. Click the Browse button at the bottom of the Recent tab of the Welcome screen.
  4. Open the Chapter01/encoderDemo_800.cptx file in the exercise folder.

Your screen should look similar to this screenshot:

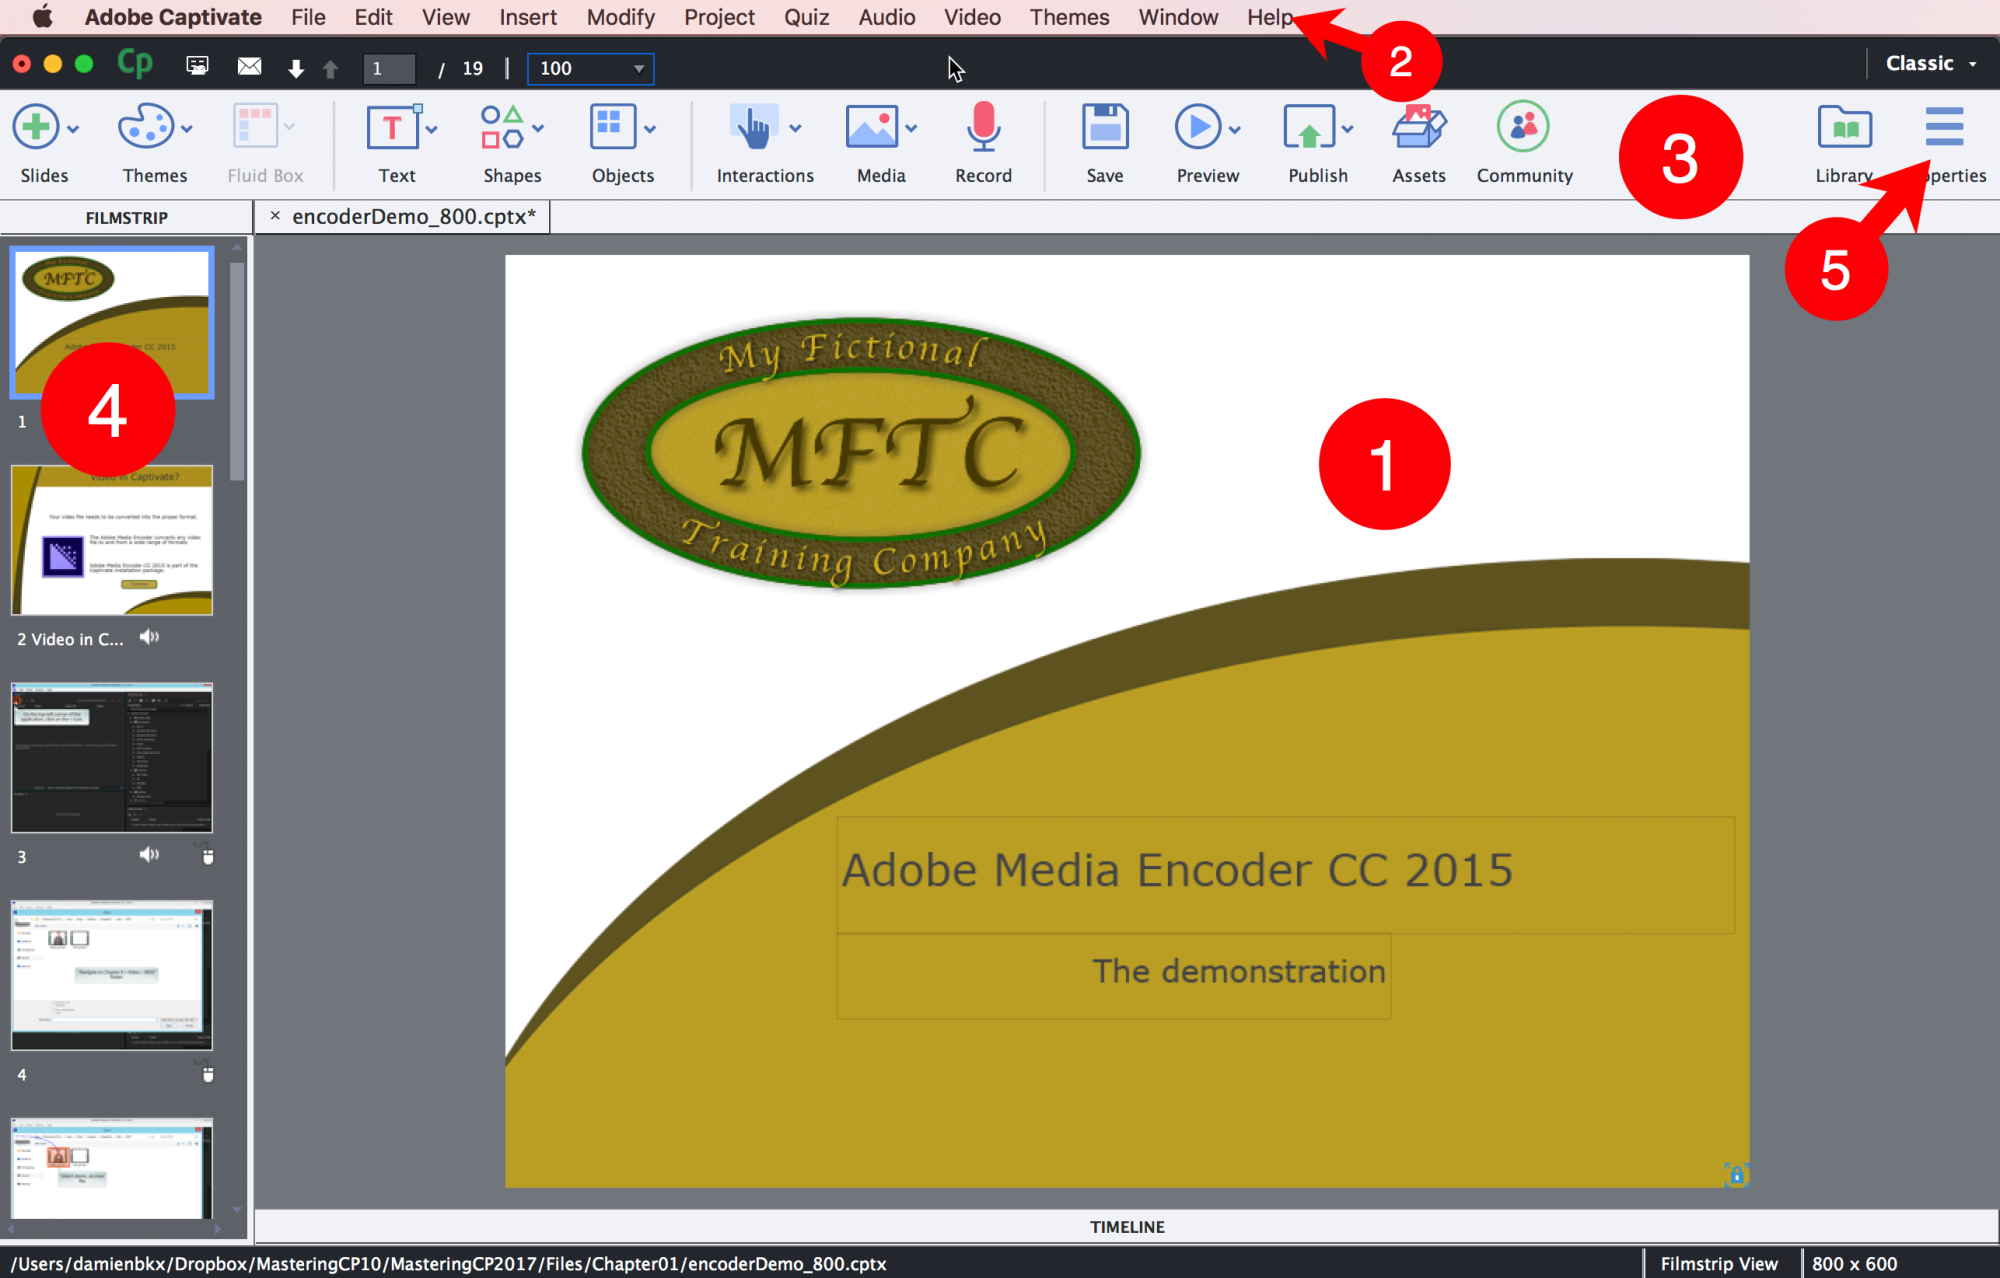
The default Captivate screen looks very simple and clean. The main area is covered by the Stage (1). The Stage is where you lay out the objects that make up each slide of the project. The objects on the Stage will appear in your course. The objects in the Scrap Area (the grey area around the slide) will not show in the slide itself.

At the very top of the screen is the Menu bar (2). The Menu bar gives you access to a wide range of Captivate features.

Below the Menu bar is the main Toolbar of Captivate 2017 (3). The Toolbar is primarily used to insert new slides and new objects into the project, but it also contains important tools for operations, such as previewing, publishing, and saving.

On the left side of the screen is the Filmstrip (4). It shows the sequence of slides in your Captivate project. The primary use of the Filmstrip is to let you select the slide(s) you want to work with, but it can also be used to perform basic operations on the slides, such as reordering or deleting slides.

  1. At the far right side of the Toolbar, click the Properties icon (5).

This action reveals the Properties inspector. The Properties inspector is one of the most important components of Captivate. It is used to control and adjust the properties of the selected object.

  1. Click the Properties button on the Toolbar again to hide the Properties inspector.
  2. Click the Library icon located just next to the Properties icon to open the Library panel.

The Library panel is another very important component of Captivate. It maintains a list of all the assets (such as images, audio clips, animations, and so on.) included in the current project.

  1. Click the Library button on the Toolbar to close the Library.
  2. Click the Timeline button that stretches across the bottom of the screen. This action reveals the Timeline panel.

The Timeline panel is used to arrange the sequence of objects on the current slide. In short, you use the Timeline panel to decide when an object appears on the stage and how long it stays visible. This panel is also used to set up the stacking order of the objects. You will learn more about the Timeline in Chapter 4, Working with the Timeline and Other Useful Tools.

It is possible to open many panels at the same time.

  1. Click the Properties button on the Toolbar to reopen the Properties inspector.

Both the Timeline and the Properties inspector should now be open.

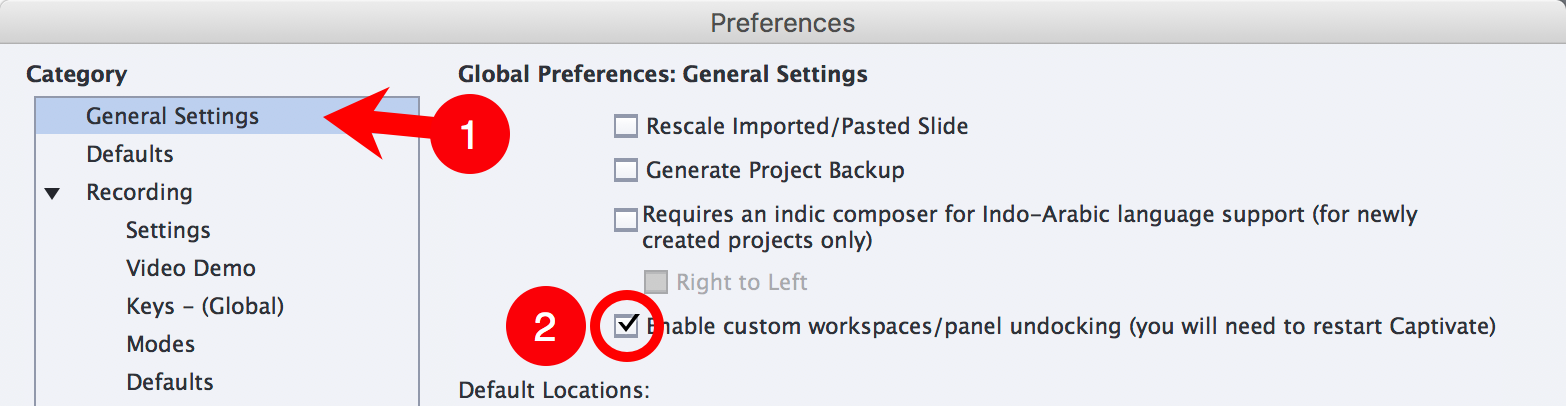
Because the Properties inspector, Library, and Timeline are the most important panels of Captivate; they are only one mouse click away on the default user interface. However, Captivate contains many other panels that give you access to a myriad of interesting tools. To get the most out of Captivate, you should know how to turn panels on and off.

  1. Open the Window menu.

The Window menu displays a list of all the panels that are available in Adobe Captivate. Note the checkmark in front of the Filmstrip, Timeline, and Library entries of the Window menu. This reminds you that these panels and icons are currently visible on the interface.

  1. Click the Library menu item of the Window menu. This action removes the Library icon from the Toolbar.
  2. Click the Window | Library menu item again to reactivate the Library icon of the Toolbar and open the Library panel.
  3. Click the Window | Slide Notes menu item to open the Slide Notes panel.

The Slide Notes panel appears at the bottom of the screen next to the Timeline panel, as shown in the following screenshot:

If you have used Captivate before, the Slide Notes panel is one of those areas that has been entirely updated in the Captivate 2017 release. Let's now open one more panel.

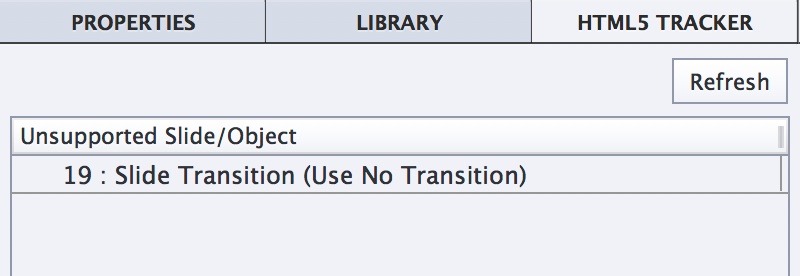
  1. Use the Window | HTML5 Tracker menu item to open the HTML5 Tracker panel.

The HTML5 Tracker panel lists the features and objects used in the current project that are not supported in HTML5. There should be one unsupported feature listed in the HTML5 Tracker panel because the transitions between slides are not supported in HTML5.

Note that this panel is floating on top of the interface. This is very different from the Slide Notes panel you opened earlier that was attached (docked) at the bottom of the interface.

Each panel of Captivate is either docked or floating. Also note that in Captivate 2017, it is not possible by default to dock a floating panel or undock a docked panel.

The interface is now very different from what it was when you first opened Captivate.

  1. Exit Captivate without saving any changes made to the open file.
  2. Reopen Captivate.

When Captivate reopens, you should see the Recent tab of the Welcome screen by default. There is a thumbnail showing the last open project(s).

  1. Double-click the encoderDemo_800 thumbnail to reopen the project.

When the project reopens, note that the default Captivate interface is displayed, even though many more panels were open when you exited Captivate.

Thanks to these little experiments, you were exposed to some important basic concepts about the Captivate interface. Before moving on, let's summarize what you have learned so far:

  • The Captivate interface is composed of panels laid out around the main editing area called the Stage.
  • The grey area around the Stage is called the Scrap Area. Objects on the Scrap Area do not show in your online course.
  • By default, most of the panels are hidden, making the interface simple and clean.
  • The Properties inspector, the Library panel, and the Timeline are the most important and most commonly used components of Captivate. This is why they are easily accessible from the default interface.
  • Some panels of Captivate are not immediately available on the default interface. You must use the Window menu to show and hide these panels.
  • The panels of Captivate are either docked on the interface or floating on top of it.
  • When you close and restart Captivate, the interface returns to its default layout.

Using the Advanced Interface Mode

If you are used to other Adobe tools, such as Photoshop, InDesign, or Illustrator, the default behavior of the Captivate interface probably looks very different. Luckily, there is a way to make the Captivate interface behave similarly to the interface of other popular Adobe tools. This is called the Advanced Interface Mode.

  1. Use the Adobe Captivate | Preferences (macOS) or the Edit | Preferences (Windows) menu item to open the Preferences dialog of Captivate.

  1. In the General Settings category of the Preferences, select the Enable custom workspaces/panel undocking option, as shown in the following screenshot:
  1. Click OK to validate the new option and close the Preferences dialog.
  2. As indicated in the Preferences dialog box, restart Adobe Captivate to enable the new option (make sure you don't save the eventual changes made to the file).
  3. When Captivate restarts, double-click the encoderDemo_800 thumbnail of the Recent tab of the Welcome screen to reopen the project.

Note that the Properties and Library icons of the Toolbar are no longer displayed.

  1. Go to Window | Properties to reopen the Properties inspector.
  2. Use the same procedure to reopen the Library, the Timeline, and Slide Notes panels.
  3. Return to the Window menu again, this time to activate the HTML5 Tracker floating panel.
  4. At the bottom of the interface, click the Timeline button to reveal the Timeline panel.

The interface should now look pretty much the same as when you closed Captivate earlier in this chapter.

  1. Restart Captivate one more time without saving the changes made to the project.
  2. When Captivate restarts, reopen the project by clicking the encoderDemo_800 thumbnail on the Recent tab of the Welcome screen.

In Advanced Interface Mode, the panel layout is always maintained when you restart Captivate.

In the next section, you will take a closer look at those panels. But first, let's first have a quick summary of what has been covered in this section:

  • To make the Captivate interface behave like the interface of other common Adobe tools, you must switch to the Advanced Interface Mode.
  • To enable the Advanced Interface Mode, select Enable custom workspaces/panel undocking in the Preferences box of Captivate. It is necessary to close and restart Captivate for this change to take effect.
  • In the Advanced Interface Mode, the Library and the Properties icons of the Toolbar are not displayed. Enabling and disabling panels is done exclusively through the Window menu.
  • In the Advanced Interface Mode, the workspace is always maintained when you restart Captivate.

Working with panels

You already know that Captivate contains a lot of panels and that those panels can be shown or hidden using the Window menu. In the Advanced Interface Mode, the Captivate interface offers even more flexibility. In this section, you will learn how to move the panels and create a unique custom screen.

  1. Place your mouse on the black line at the top of the floating HTML5 Tracker panel.
  2. Drag the panel to the right and drop it on top of the Properties and Library labels in the top right corner of the screen.

When a panel is moved above a possible docking location, a blue outline appears on the screen. Releasing the mouse at that moment docks the panel at the location highlighted by the blue outline.

This action docks the HTML5 tracker panel with the Properties inspector and the Library panel, as shown in the following screenshot:

This first action illustrates how to dock the panels that are initially floating on the interface. You will now do the opposite to illustrate that a panel that is initially docked can be turned into a floating panel:

  1. Place your mouse on top of the Library label on the right side of the screen.
  2. Drag the Library panel out of the Library/Properties/HTML5 Tracker group and drop it on top of the stage.

The Library panel is now a floating panel, even though it was docked by default. You have now arranged the panels in a truly unique way. This customized arrangement of your panels is called a workspace.

Creating a new workspace

The Advanced Interface Mode of Captivate allows you to apply your own unique (custom) workspaces. Depending on the project you are working on, the size of your computer screen, your working habits, and so on, you might want to have several workspaces and quickly switch between them. In this section, you will first learn how to reset the default workspace. Then, you will create and save a new custom workspace.

The default workspace you see when you first open Captivate is called the Classic workspace, as shown in the top right corner of your screen.

  1. Click the Classic button at the top right corner of the screen.
  2. Choose Reset Classic in the drop down menu, as shown in the following screenshot.

After doing this, your Captivate screen reverts to what it looked like when you opened the application at the beginning of this chapter:

The default Classic workspace is an excellent starting point for defining a custom workspace.

  1. Use the Window | Timing Properties menu item to activate the Timing panel on the right side of the screen.
  2. Select the Adobe Media Encode CC 2015 title on the slide and note that the Timing panel updates.

Just like the Properties inspector, the Timing panel always shows the properties pertaining to the object you select. Note that the Timing panel of Captivate precisely sets the timing of that object and also applies effects to that object.

  1. Use the Window | Properties menu item to activate the Properties inspector.
  2. Drag the Properties inspector out of the Properties/Timing group and drop it on top of the Filmstrip label on the other side of the screen. This docks the Properties inspector with the Filmstrip panel.

After this last action, your screen should look like the following screenshot:

This workspace is very practical when you have to precisely define the timing and apply effects to the selected object. You will now save this panel layout as a new workspace.

  1. Click the same Classic button you used earlier at the top right corner of the screen.
  2. Choose New Workspace from the drop down menu.
  3. In the New Workspace dialog, name your new workspace Timing and click OK.

Note that a Timing button now replaces the Classic button. You can use this button to switch between the Classic workspace and your own custom Timing workspace!

  1. Click the Timing button at the top right corner of the screen.
  2. Select the Classic workspace in the drop down menu to reapply the default Classic workspace.
  3. Click the Classic button and reapply the Timing workspace.

This demonstrates how you can quickly switch between your saved workspaces.

Extra credit

You now know all the tools to create custom workspaces. Take some time to experiment with these tools on your own. Try turning panels on and off using the Window menu. Explore the other panels of Captivate, such as the Question Pool and the Swatch Manager. When you feel like you have a great workspace, save it under a name of your choice.

Renaming and deleting custom workspaces

If you ever need to rename or delete a custom workspace, use the following steps:

  1. Go to Window | Workspace | Manage Workspace.

Note that the Window | Workspace menu displays the very same information as the workspace switcher button at the top right corner of the screen.

  1. In the Manage Workspace dialog, choose the workspace to delete/rename.

Note that the default Classic workspace is not listed. This means that this default workspace cannot be renamed or deleted.

  1. Click the Rename or Delete button. In this example, click the OK button to close the box without any changes.
  2. Open the workspace switcher one more time to reapply the Classic workspace before moving on to the next topic.
Updating a workspace
There is no menu item to update an existing workspace. If you want to update an existing workspace, use the New Workspace menu item and give the new workspace the name of the existing workspace you want to update.

Workspaces in normal mode

You can return to the normal interface mode using the following steps:

  1. Use the Adobe Captivate | Preferences (macOS) or Edit | Preferences (Windows) menu item to reopen the Preferences dialog of Captivate.
  2. In the General Settings category, deselect the Enable custom workspaces/panel undocking and click OK to validate.
  3. Restart Captivate without saving the changes made to the open project.
  4. When Captivate reopens, double-click the encoderDemo_800 thumbnail to reopen the project.

Confirm that the Properties and Library buttons are back in the top right corner. This indicates that you are back in normal interface mode.

  1. Click the workspace switcher button at the top right corner of your screen. It should currently read Classic.

In normal interface mode (that is, when the Enable custom workspaces/panel undocking option of the Preferences is not selected), only the Classic workspace can be applied or reset. If you want to use your custom Timing workspace again, you first need to return to Advanced Interface Mode and to restart Captivate.

Before moving on to the next topic, these are the key points to keep in mind when creating custom workspaces:

  • It is necessary to set Captivate to Advanced Interface Mode to dock and undock panels and create new workspaces.
  • Use the Window | Workspace | New Workspace menu item to save the current panel layout as a new workspace. This menu item is also accessible from the workspace switcher at the top right corner of your screen.
  • Use the Window | Workspace | Manage Workspace menu item to rename or delete your custom workspaces.
  • To update an existing workspace, use the New Workspace command to give the new workspace the same name as the workspace you want to update.
  • The default Classic workspace of Captivate cannot be deleted or renamed.
  • In normal interface mode, only the default Classic workspace is available.