Understanding color profile and how it factors into your image
The last topic we need to cover to get you up and running is the topic of the color profile. Believe it or not, there is no absolute version of “red.” If you doubt this, stop by your local paint counter and look at the vast number of swatches available to cover a wall. For this introduction, I will share with you the two most common color profiles, and then tell you how they are different. Aside from that, we will not talk much more about them until later chapters, because I want to keep it simple.
The two most common color profiles are as follows:
- RGB
- CMYK
Notice the differences in the exact same image in the following comparison; it is the same image, only with different color profiles:
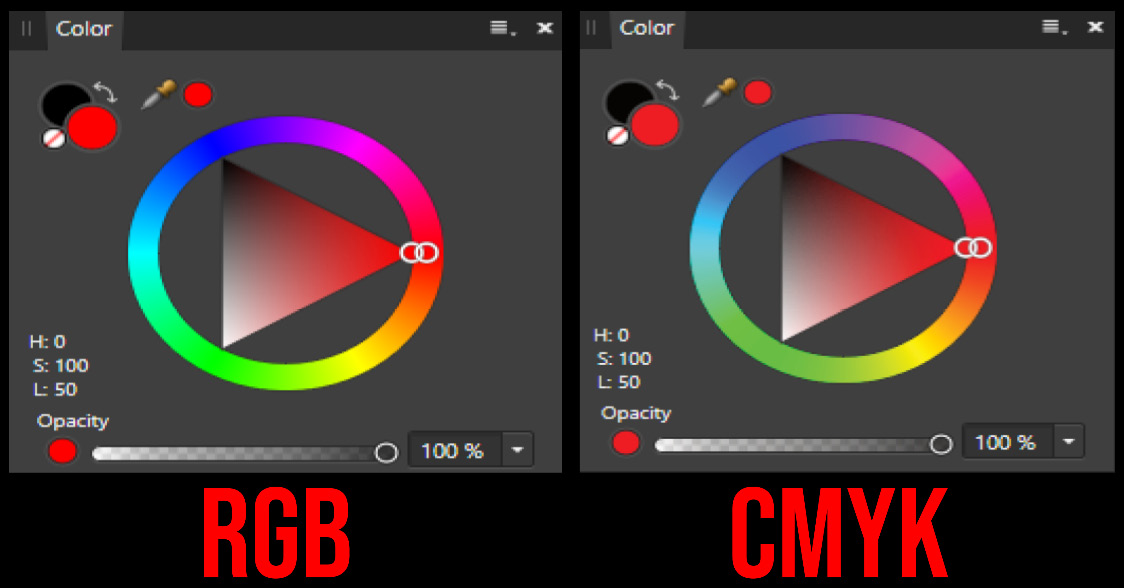
Figure 1.7 – The most commonly used color profiles in digital art
Let’s define them a bit more specifically.
RGB
RGB stands for red, green, and blue. This color profile is used for artwork for digital use, as this is how your monitor displays colors. However, today, most printers have programs that will convert any color to an RGB color, so it is quickly becoming the standard across the board. All the colors that you see are composed of these three colors in various combinations (we will deal with these combinations in Chapter 10) but for the purpose of this introduction, all you need to know is that it is the one we will be working with most frequently.
CMYK
CMYK stands for cyan, magenta, yellow, and black, and these are the colors of the printer cartridges in your home printer. All the various colors you see are made by varying combinations of these four colors.
For the beginner, we will be dealing with only one color space, which is the traditional RGB8 color space. (We will discuss variants in the more advanced sections, but for now, just stick to the normal RGB8 color space for this conversation.)
The interface is your control panel for all the wonderful things you can accomplish in Affinity, so your understanding of the interface will be crucial to your success. To make you as familiar as possible as quickly as possible, I have broken it down into multiple sections and given a short explanation of how to get back to the default in the event you make a mistake with the interface…because as a beginner, you will.
Let’s start by opening the program and clicking on File | New. It does not matter what size document you create, just click on Create so you can explore the interface along with us. In the next section, we will look at main areas of the Affinity Photo interface.
The six areas of the Affinity Photo Interface
When you open the program for the first time, you will be greeted with this default interface (or some version of it – slight modifications may exist based on developer changes, but it has never significantly changed in all the years I have been using it). For simplicity’s sake, we are going to divide the interface into six areas so you can navigate to the areas I discuss during the explanations later.
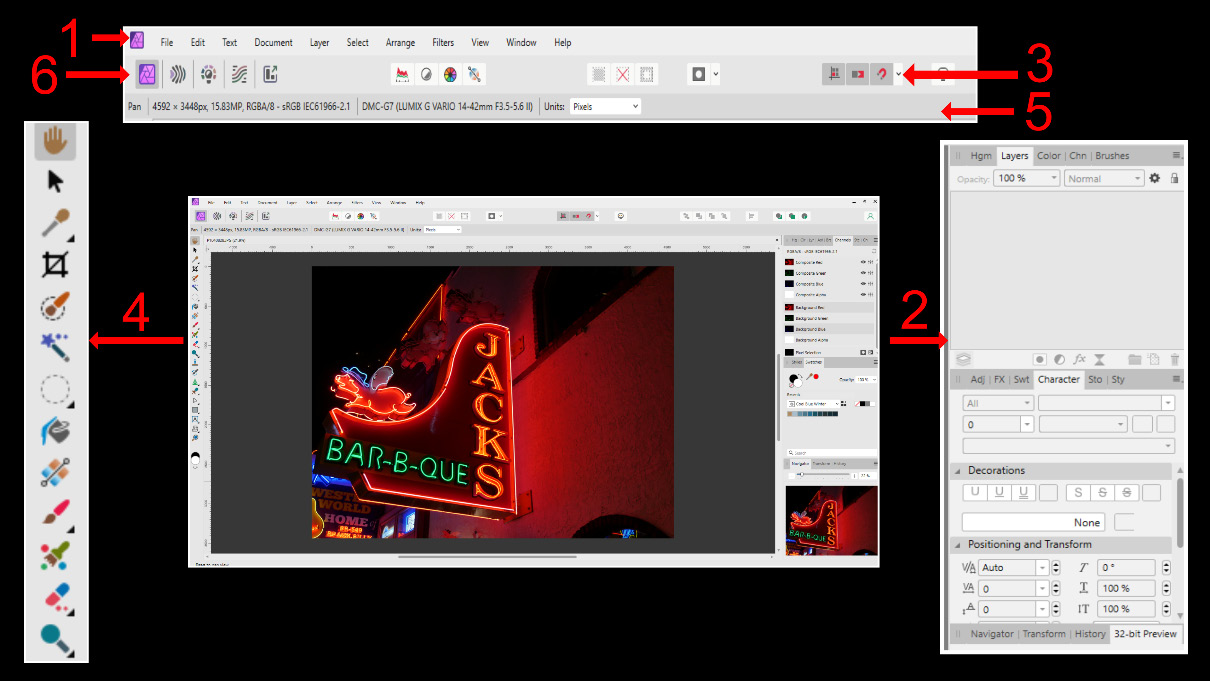
Figure 1.8 – Major sections of the Affinity interface
Let’s go over these areas one by one:
- The menu bar (1)
The menu bar is in the upper-left corner at the very top of the window. This is where most of the basic functionality is stored; things like Open, Place, Save, and Export are all on the File tab.
- The studio area (2)
On the right side, there is a set of panels called Studio panels. These are groups of commands dedicated to certain things, such as Color, Layers, and Channels. The panels form the studio and can be hidden or retrieved (it is not uncommon to click a panel out of the interface…but do not worry, I will show you how to get it back). There can be a left and right studio in the default layout (in this figure, we only have the right studio shown).
- The toolbar (3)
Above the canvas space, there is a section referred to as the toolbar. These are common tools such as Flip, Rotate, Quick mask, and so on.
- The tools (4)
Separate from the toolbar is the tools area, which is along the left-hand side of the studio by default, and it contains the actual tools we will use to edit. Tools such as brushes, gradients, and selection tools are all in this area.
- The context toolbar (5)
Right above the viewport (under the tools menu) is the context toolbar, and I want you to think of this as the options you have for each tool.
The context toolbar will change with the tool.
- The personas (6)
Affinity Photo has a tremendous amount of versatility and multiple personas to perform different tasks. For the majority of the book (all chapters except 17, 18, and 20), we will be in the Photo persona, but there are chapters on each of the other personas.
Customizing your Studio panels
Panels are movable and can be rearranged by clicking and dragging them up and down, as well as brought out closer to the workspace where you are editing. We will be working with this in various projects as we begin actually editing.
You can customize what panels are shown by clicking on Window | Studio, and then checking the panels you want to have showing based on your workflow:
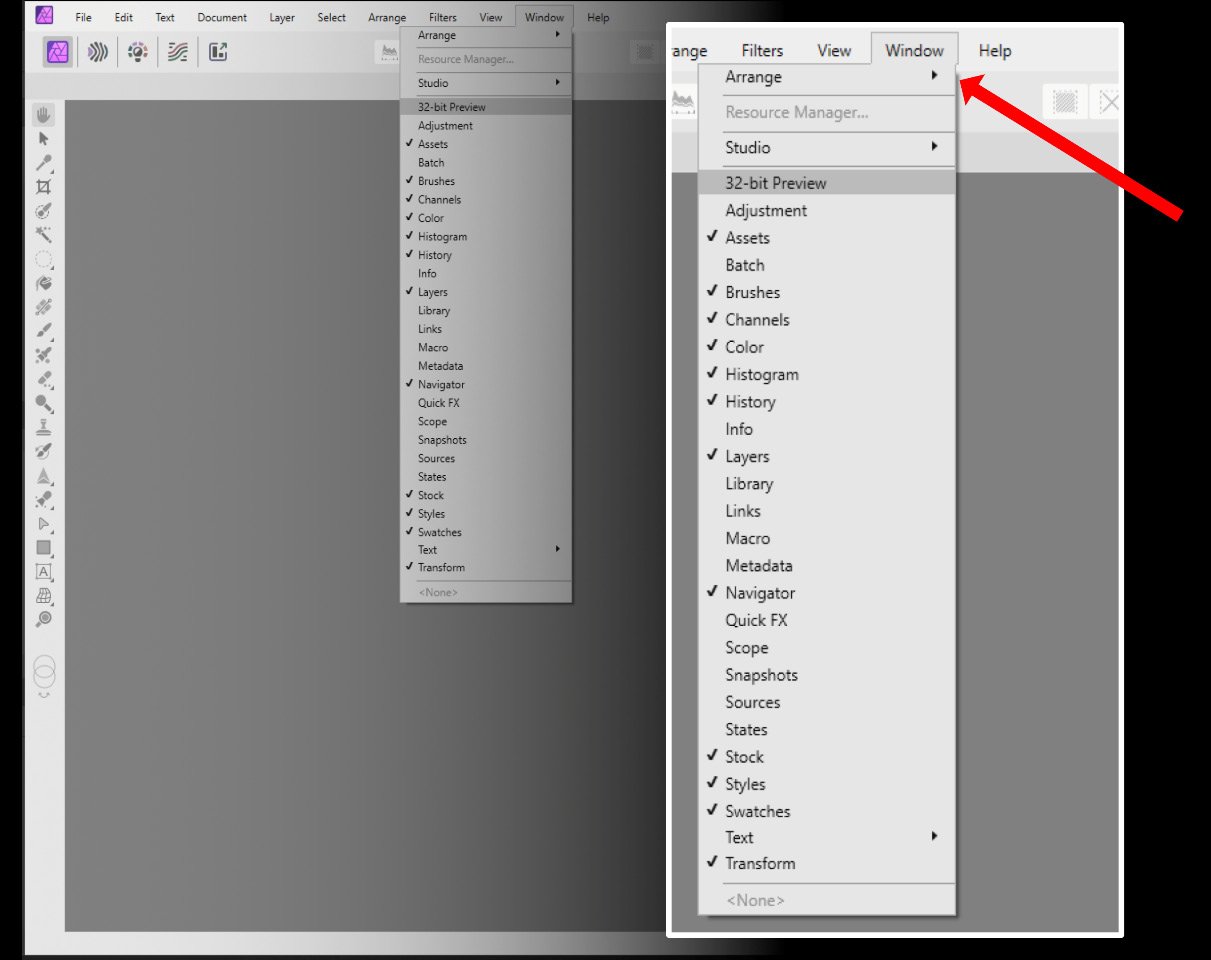
Figure 1.9 – Customizing Studio panels
Customizing your toolbar
This toolbar can be customized by going to the View menu and clicking on Customize Toolbar…:
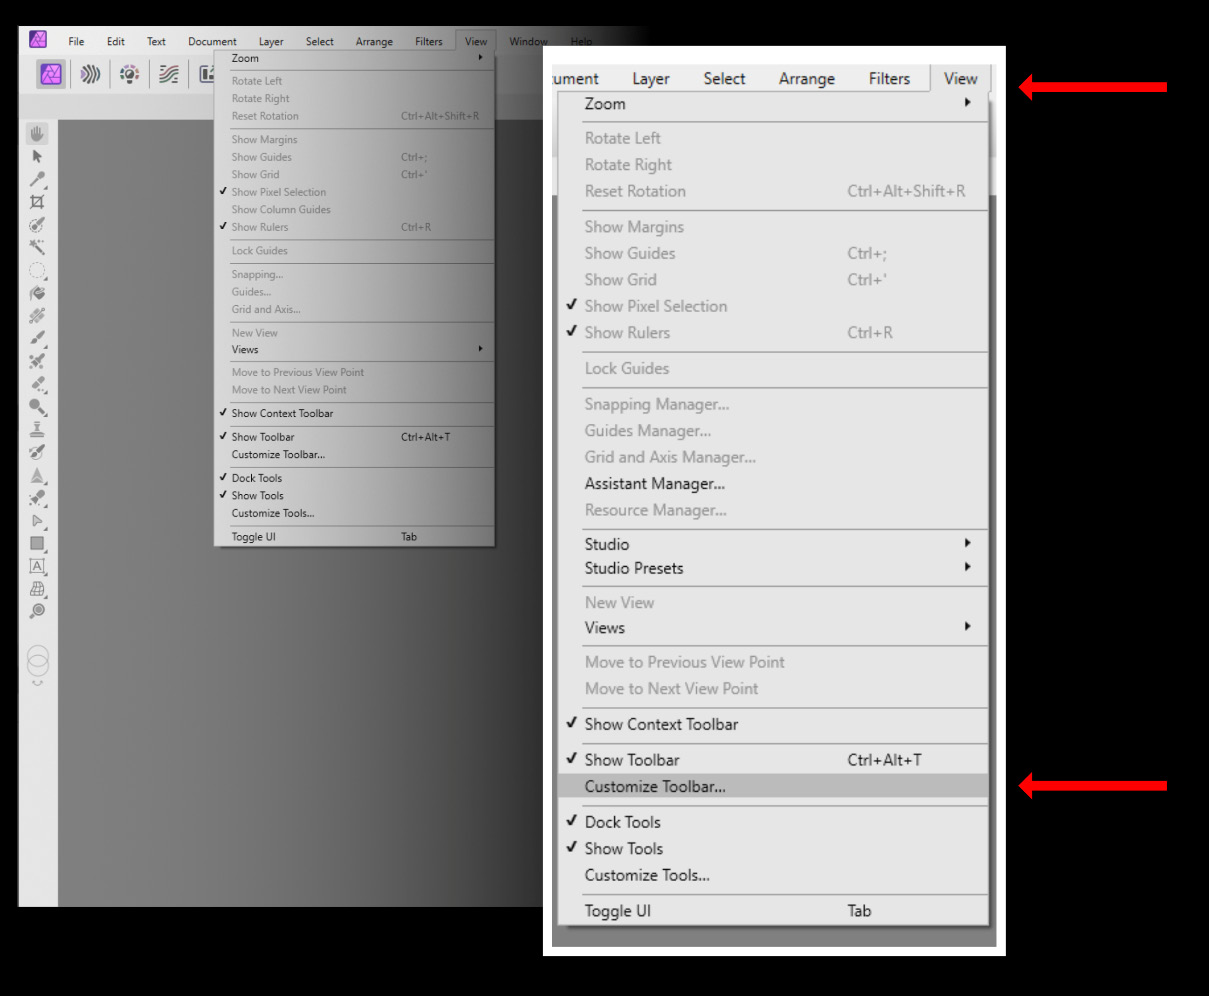
Figure 1.10 – Customizing the toolbar
To add a tool to the toolbar, simply drag the tool into the open space (noted by the dotted lines in the toolbar), and do the opposite to remove them:
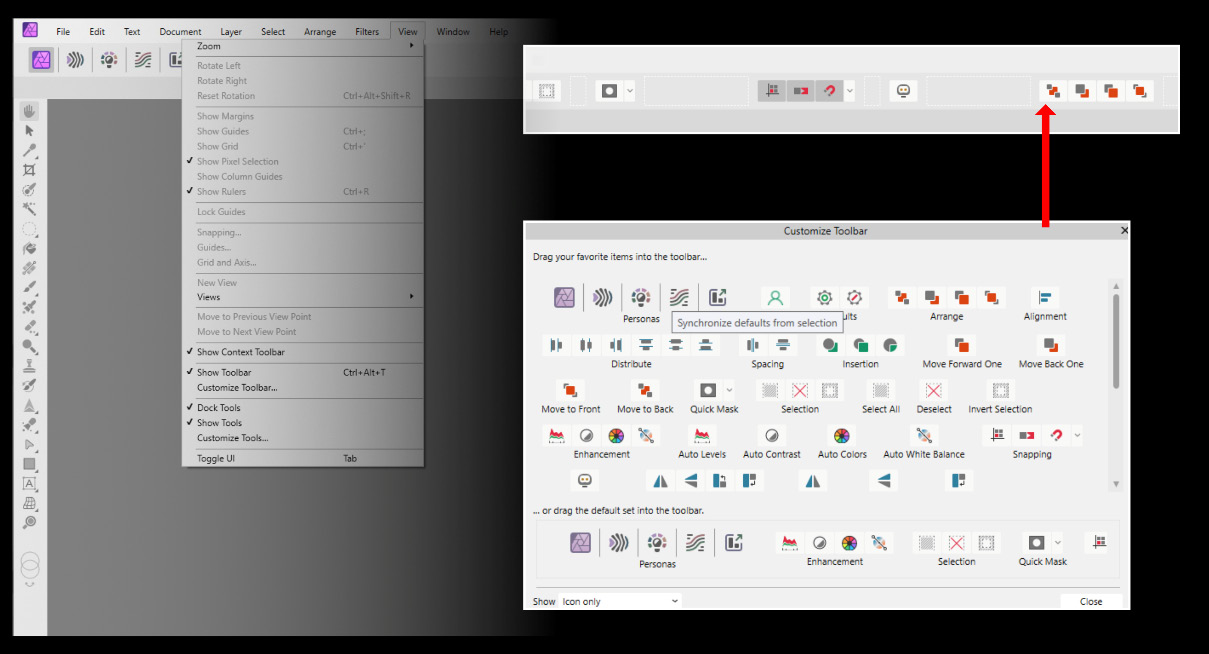
Figure 1.11 – Dragging images into the toolbar
Customizing your tool menu
You can customize the tools by clicking on View | Customize Tools…:
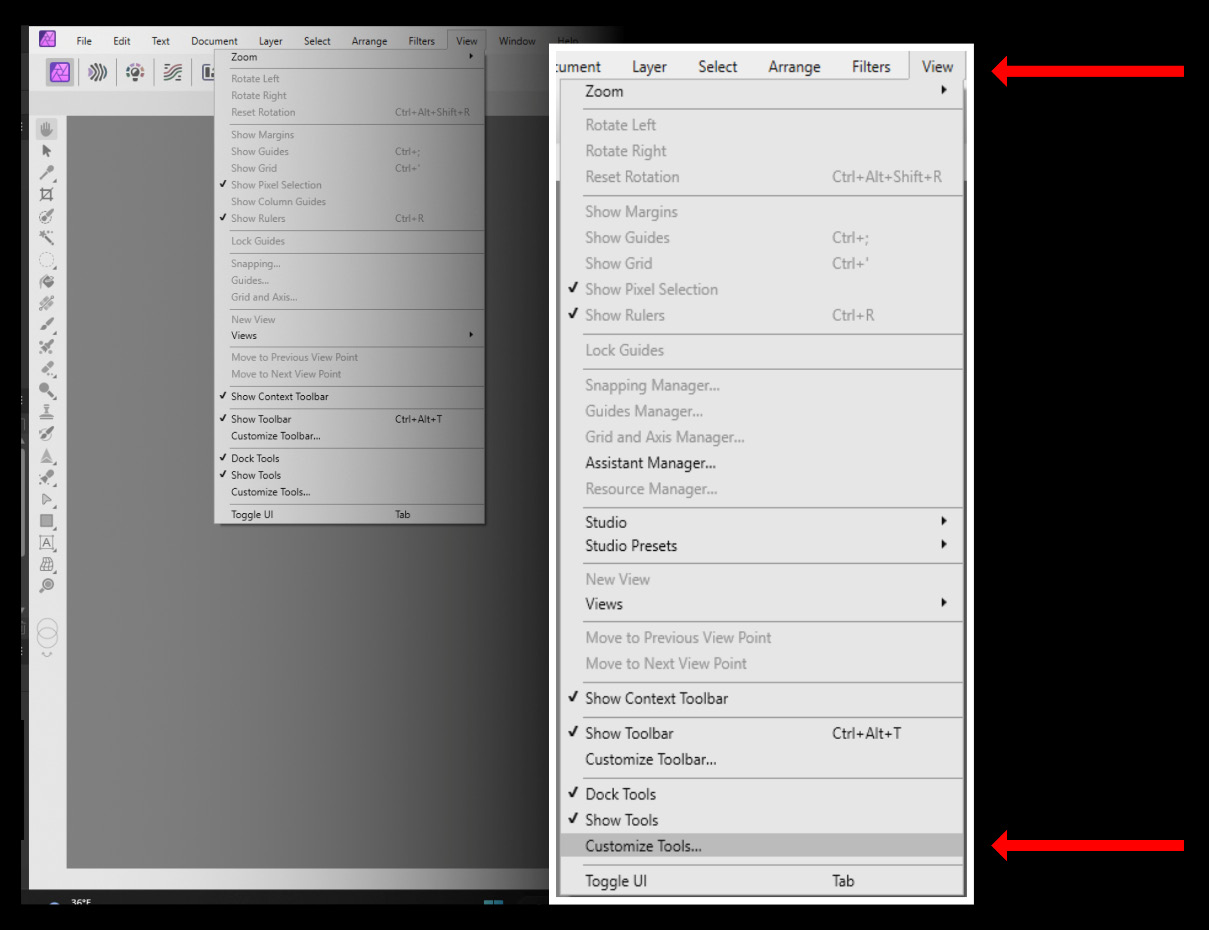
Figure 1.12 – Customizing the tools
To add a tool, simply drag it over to the tools area and it will be added; reverse the operation to remove tools that you do not want:
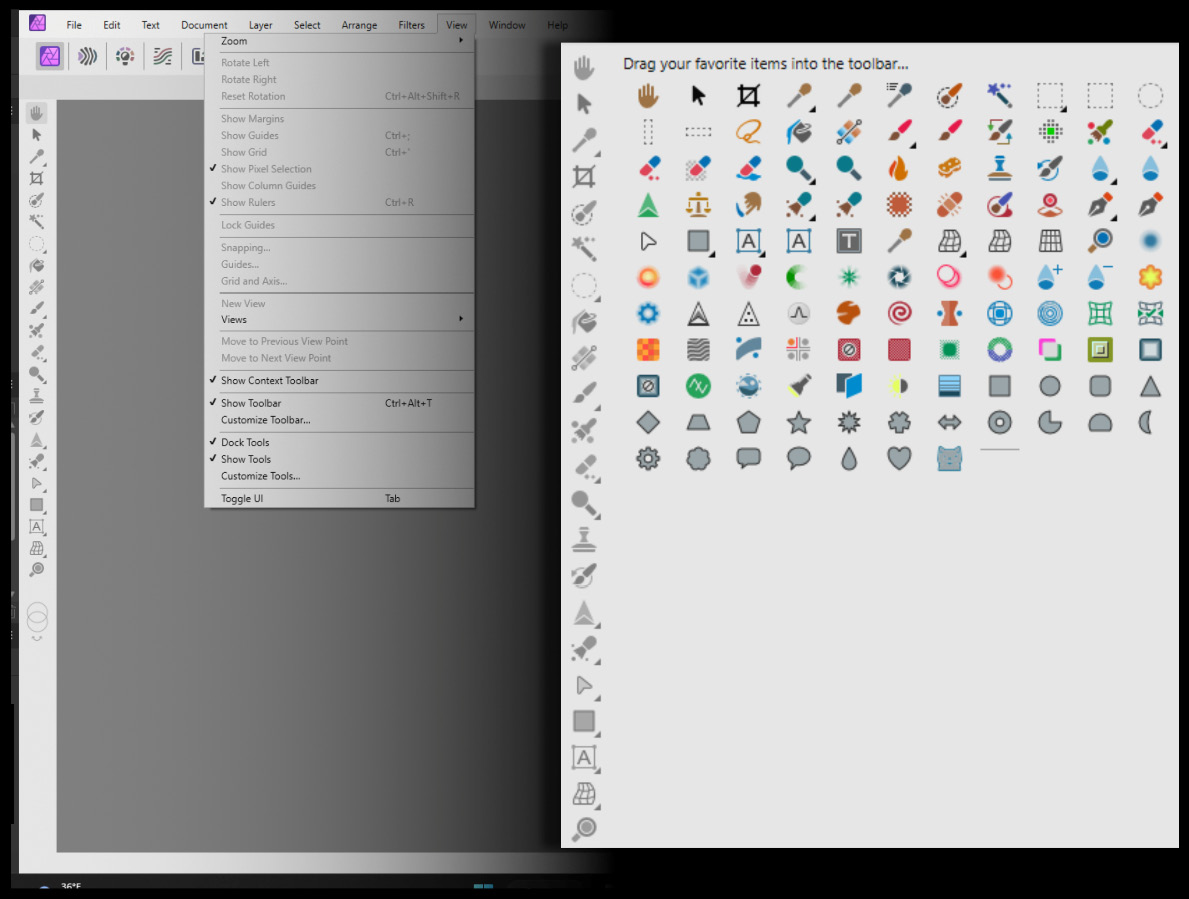
Figure 1.13 – Adding tools to the tools section
Saving your workspace
As you develop as an editor, it is not uncommon that you will develop different workspaces, or layouts, where you keep your tools in certain areas, and you will favor certain tools. Affinity allows you to save workspaces for just this purpose.
To save a workspace, go to Window | Studio | Add Preset…:
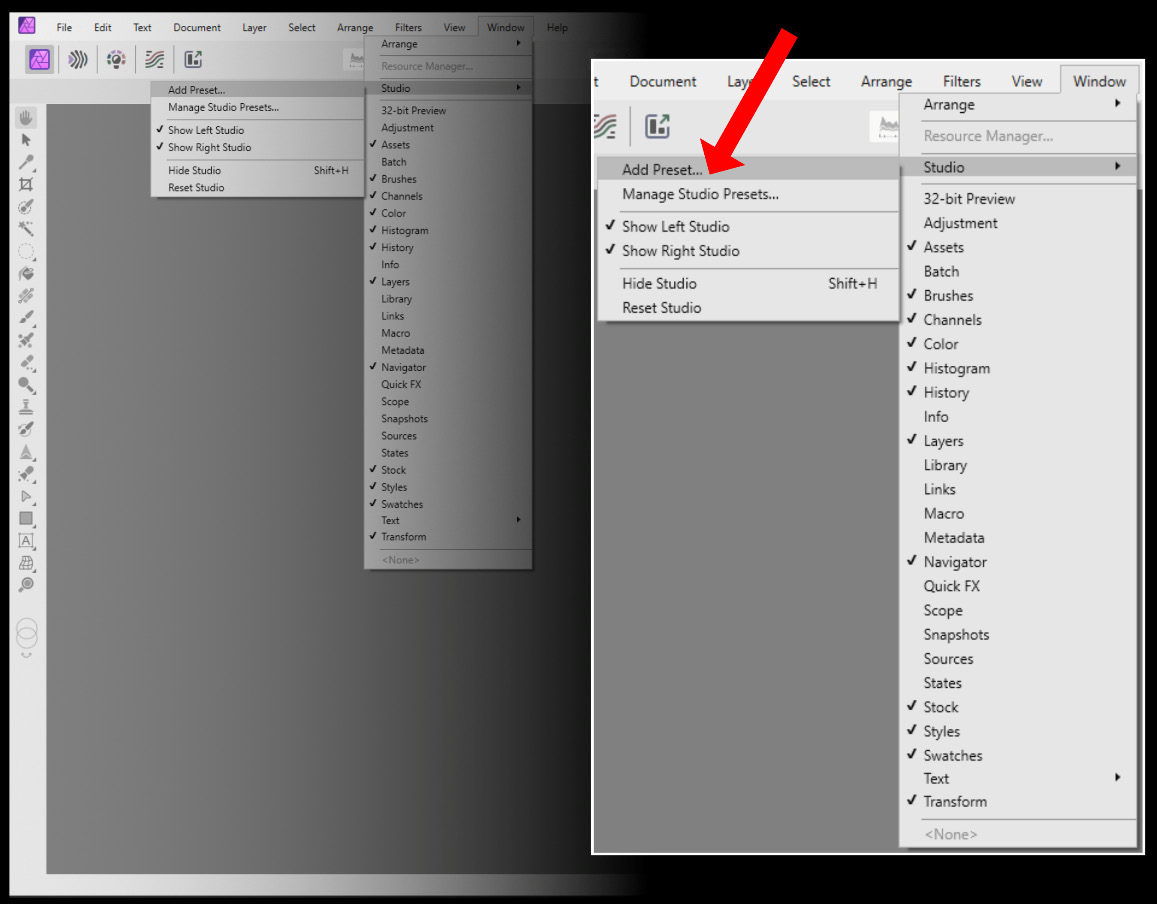
Figure 1.14 – Adding studio presets
You can manage presets as well if you decide to change (add or remove) them later.


