
The decision of which version control system (VCS) to use is one of the most important pipeline decisions to make when you are planning your CryENGINE project.
It is also one of the first things that should be discussed, since a lot of other aspects of your production will depend on it.
Version control is incredibly useful in any area of game production. What a VCS basically does is keep track of changes made to your files and allows you to review those changes and even helps you revert to the older versions of your files.
This means if you make a mistake or delete or lose a file, it is generally very easy to recover whatever you have lost. In addition to this, using a VCS makes it a lot easier to collaborate since you will always have an overview of what changes your team members made to the project files.
Even today, where VCSs such as SVN, Perforce, or Git have become very affordable, or even free, there are still teams out there working without the safety net of a version control system.
One method often used by less experienced mod teams is to work out of a shared folder, which is accessible for everybody from the network. While it might seem simple and easy to work this way with everybody just copying their files into the shared folder, there are a lot of things which can go wrong, which are as follows:
Files can get overwritten accidently
Code and script conflicts cannot be caught and resolved easily
Tracing back older changes becomes extremely difficult
With low cost version control systems being widely available today, there is no reason even for small teams to work this way. Setting up and maintaining a version control solution will of course consume a certain amount of time, but it is always time well invested.
Let's have a look at a real-life example. You are working on a CryENGINE game project and you discover a game breaking bug. Let's say someone on your team submitted something which broke the game. Now it is up to you to identify and fix the issue. Having no access to either the file history or changes done to the individual files will make it very difficult for you to solve the issue. However, in a project environment with a VCS setup, you could simply step backwards through the submitted changes to identify the file which was responsible for breaking your game.
When it comes to deciding which VCS to use for your CryENGINE project, your decision will be determined by your budget, the scale of your project, and possibly your personal preference.
You will have to choose between a centralized and distributed VCS. While a centralized VCS keeps all files on a central server, a distributed VCS mirrors the whole repository on each client. Both systems come with different upsides and downsides, but for CryENGINE, it makes no difference which type of system is used.
There are many VCSs available today, and they come in many flavors. Most commonly used VCSs for CryENGINE projects are as follows:
Perforce: This is sometimes also called P4 and is a professional centralized VCS, which mostly is the tool of choice for professional and larger size game teams. Perforce licenses are generally not free, but there are various license options which allow indie and mod teams to make use of the software without spending much money. CryENGINE has native support for Perforce and allows you to check in/out files directly from Sandbox.
SVN: This is also called Subversion and is a free, open source centralized VCS. It is widely used by smaller teams without a big budget, since it can be used without any cost.
Git: This is also a free to use open source VCS. It differs from Perforce and SVN by using a distributed architecture. In direct comparison to Perforce and SVN, Git can be quite difficult to use, especially for developers with a nontechnical background.
Once you have made your decision regarding which version control system to use for your project, it is time to set up your CryENGINE environment. Depending on your role in your game's production, certain aspects of this setup might be more or less interesting to you. For example, if you are a programmer, you might be less interested to learn about setting up your Photoshop or 3ds Max and skip ahead to the relevant coding topics.
Being able to check out levels, layers, or materials files directly from Sandbox without switching to your version control client is very comfortable and will speed up your workflow considerably.
Support for Perforce version control is integrated into the Sandbox editor. Sandbox will automatically check out the corresponding files when they are being modified.
When using SVN, Git, or any other system, files cannot be directly checked in/out from Sandbox. In this case, no further setup is necessary.
The first step to setting up Sandbox to work with Perforce is to enable version control. This is done in the Sandbox preferences as follows:

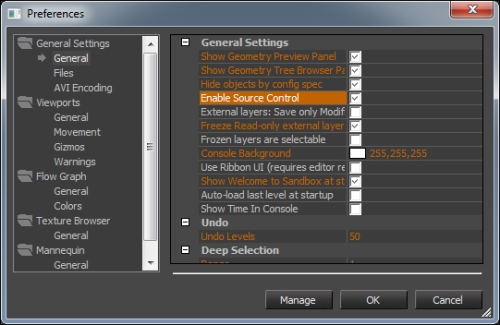
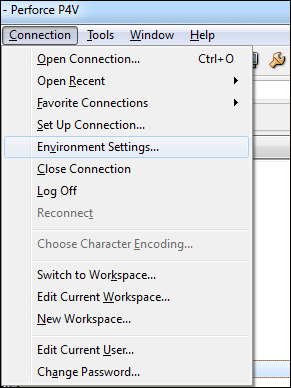
This will tell Sandbox to use version control for file operations. CryENGINE will get the Perforce server information from the Windows' environment settings and you don't need to set them up manually. To review these environment settings in Perforce, click on Environment Settings in the Connection menu as seen in the following screenshot:
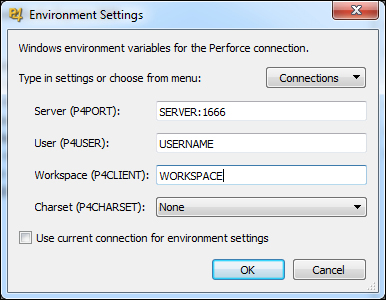
You can change the Server and Workspace settings here as seen in the following screenshot:
Once all your version control options are set up for CryENGINE, you will see a window as seen in the following screenshot when saving your level:
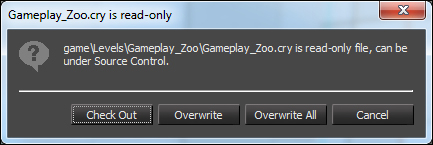
This is CryENGINE telling you that the level you are trying to save is write protected and probably version controlled. At this point, you have the choice to either overwrite your level files or check them out from Perforce.
When creating content for CryENGINE projects, you will most likely be using tools such as Photoshop, 3ds Max, or Maya to create 3D assets, animations, and textures.
While those tools are not directly connected to CryENGINE, it still makes sense to set them up to connect to the same version control system that is storing your code and level files.
There are a lot of plugins that exist for the various VCSs, which will allow you to check out files directly from Photoshop, Max, Maya, or XSI.
Perforce, for example, offers quite a comprehensive free set of plugins for all major tools on their website called Perforce Graphical Tools Plug-in (P4GT). This is basically a big collection of plugins for all kinds of tools and systems. You can find it at http://www.perforce.com/product/components/perforce-plugin-graphical-tools.
For SVN and Git, there are several plugins available on the internet as well.
If you will be modifying the source code of CryENGINE for your project, you will most likely be using Visual Studio to implement and compile your changes.
There is a Perforce add-on for all recent Visual Studio versions available. This plugin will automatically check out source files when modified, and add newly created files to the repository. This can save a lot of time when working with the source code.
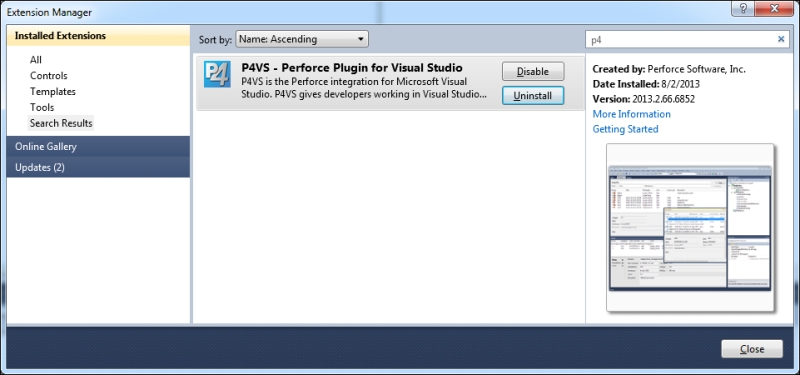
The plugin can be installed from within the GUI of Visual Studio. To do so, open the Extension Manager option from the Tools menu. The plugin is called P4VS. The fastest way to find it is to search for the term P4 in the online gallery.
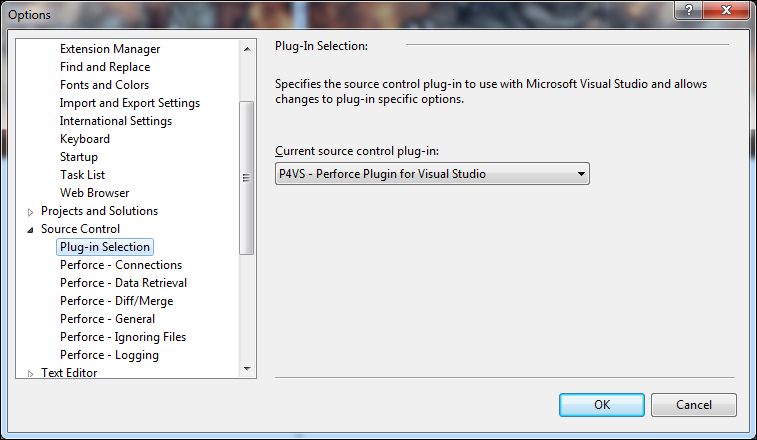
After installation, you have to activate the plugin in the Visual Studio options. In the menu Tools, choose Options. Then navigate to the section called Source Control. In the subsection Plug-in Selection, open the drop-down box and select P4VS. Then you can configure your connection settings.
When editing text files, such as XML or Lua files, you will likely use a text editor. We recommend Notepad++ or Microsoft XML Notepad 2007 as it has syntax highlighting and a range of helpful plugins, such as an XML syntax checker. There is also a plugin available for Perforce. When installed, this plugin will automatically check out files when you edit them and add them to the default change list in Perforce.
The plugin can be installed through the Plugin Manager in Notepad++. It can be opened via the Plugins menu. Choose the plugin called Perforce actions from the list of available plugins and select Install.
Just like CryENGINE, the plugin will work with the Perforce environment settings, which can be set up via the GUI as described in the section Setting up version control for CryENGINE.
Only because you are making use of a VCS, you do not need to add every single file of your CryENGINE project to the depot. Checking in files that should not be version controlled can actually be counterproductive to your workflow. It is important to know which type of files to keep out of your VCS. Generally, all files created during the build process should never be checked in.
Tip
To keep your build clean, you should avoid checking files into your VCS that are automatically generated during the build process.
The files which are usually never checked into a VCS are as follows:
.DDS files: These are generated automatically by the CryENGINE resource compiler. You should not create a
.DDSfile manually and check them into your VCS. The engine will take any existing.TIFfile found in your project and compile an optimized.DDStexture, which will be used during runtime. When those.DDSfiles are locked and write protected by a VCS, they cannot be overwritten by the resource compiler. When this happens, your build will start using.DDSfiles, which can cause rendering problems and graphical artifacts.Binaries: Usually, CryENGINE executable files such as the
GameSDK.exe,Editor.exe, and the various CryENGINE.DLLfiles are not checked into your VCS since they are regularly built by your project's coders, locally on their machines. While all source code files should always be checked in, those executables will normally be rebuilt every day and do not need to be checked in..GFX files: When Scaleform is being used in production,
.GFXfiles will be created by gfx-exporter. Those files should not be checked in but ought to be generated automatically during the build process. The gfx exporter might generate.DDSfiles as part of the.GFXexport process for certain files, hence this step should be done as part of the automated build process.