
Along your path of UI enlightenment, you'll encounter different types of views. You can simplify the categorization by thinking about a view as the atomic element of the user interface, where a view has its own specific properties and can be grouped with other views to create complex hierarchies.
UIView is the base class used to instantiate generic views and it can be subclassed to create custom views. Almost all the UI elements that you will use in your applications are inherited from this class, and in the next chapter, you'll learn a lot about some of the elements provided by Apple within the UIKit framework.
Note
Keep in mind that the UIWindow class too is a subclass of UIView. This is generally a cause of confusion considering that in a UI hierarchy, views are the children of a window and not the other way around.
A UIView instance has properties that you can use to change an aspect of the view. For example, the backgroundColor property accepts UIColor to define a tint for the view's background. The background of a view is transparent by default, and as you'll see later in this chapter, some views can seep through other views.
The alpha property is useful if your view and all the elements it contains need to be transparent. It accepts a value from 0.0 to 1.0, and depending on your settings, it gives the view a "see-through" effect. With the help of this property, you can hide or unhide a view using some interesting animations, as you will learn in Chapter 6, Layers and Core Animation.
Another way to change the visibility of a view is using the hidden property, which can be set to true or false.
It's important to note that when you hide a view using the hidden or alpha properties, you are not removing the view from the hierarchy and memory; the view can, in fact, still be reached, but the interaction with the user is automatically disabled until the view is visible again. This is a neat trick to temporarily remove a view from the screen, thus preventing any unintended interaction.
Sometimes, you might need to disable a view even if the drawing goes on (for example, you may want to be sure that the UI interactions are disabled while loading some external data). In this case, you may find the userInteractionEnabled property useful; setting this property to false tells the view to ignore user events.
The properties of some view's have only one role: defining how the view is drawn on screen. Before diving into a description of these properties, it's worth introducing the structures that are involved in the definition of the view geometry:
CGPoint: This is defined by two properties,xandy, and it represents a single pointCGSize: This is defined by two properties,widthandheight, and it represents a generic sizeCGRect: This is defined by two properties,origin(CGPoint) andsize(CGSize), and it represents a quadrilateral area
Note
When working with iOS, you will encounter different coordinate systems. With UIViews, the origin of the coordinate system (x:0, y:0) is on the upper-left side. The x value increases from left to right, and the y value increases from top to bottom.
The code needed to initialize these structures is straightforward, and there are a lot of functionalities provided by Apple that simplify our work with these structures.
The following code shows how to create the Rect, Size, and Point instances:
        // Define a point
        let point = CGPoint(x: 20, y: 10)

        // Define a size
        let size = CGSize(width: 20, height: 10)

        // Define a rect using size and point
        let rect_A = CGRect(origin: point, size: size)

        // Define a rect using x, y, width and height data
        let rect_B = CGRect(x: 15, y: 10, width: 100, height: 30)
The properties that define the view geometry are frame, bounds, and center and they are configured using the geometry structures you just saw.
Let's start with the
bounds property. It is a CGRect property that defines information (size and origin) locally to the view. This means that when we speak about bounds, we do not determine how the view is drawn in the UI hierarchy but how it's drawn in a decontextualized, local space. You'll read more about UI hierarchy later in this chapter; for now, just think about it as a structure that organizes trees of views, where a view can be either the child or parent of another view. That said, in most cases, the origin bound is (x:0, y:0), while the size property is the size of the view.
On the other hand, the
frame property defines how a view is placed inside the hierarchy. It's a CGRect property similar to bounds, but its origin value determines how the view is placed inside its parent view.
At this point, we might conclude that frame and bounds are similar; however, this is not always true. Take a look at the following images to better understand how they work together to define the view geometry:
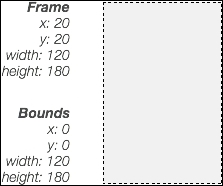
In this case, frame and
bounds have the same size, but the position values are different. Take a look at this image:
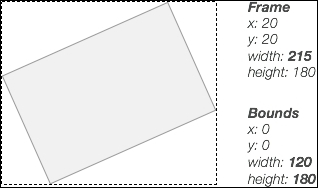
This indicates that after a rotation, the same view maintains the bounds, while the frame changes significantly, adapting its size in order to contain the rotated view.
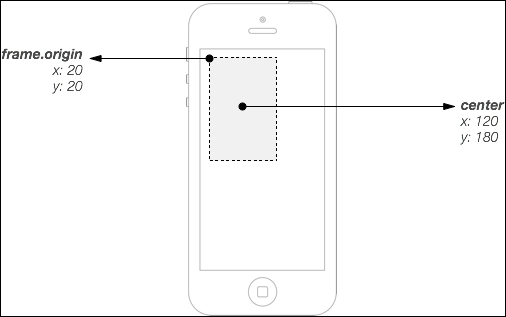
The center property works in relation to the UI hierarchy (as does the frame), and it's a handy way to define the view's position inside its parent. It differs from frame.origin in the way its position is calculated. With frame, the origin position is calculated using the upper-left corner of the view, while for the center, the anchor is the view's center, as you can see from the following image: