

In this section, we will learn how to add our penguin player to the game and how we can make her alive by writing scripts, applying physics, and adding colliders in it.
Before we do anything, we need a player Sprite or image. For our Perky Penguin game, we have designed a penguin sprite. The following figure shows the penguin that is included as the player sprite of the game:

Figure 1.35 Penguin Sprite
To import an image in to Unity, right-click on the Graphics folder in the Project Browser panel and click on Import New Asset..., as shown in the following screenshot:
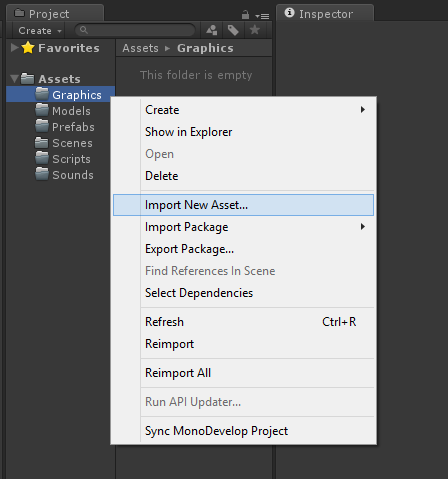
Figure 1.36 Import New Asset in Unity
These assets can be anything that is supported by Unity, such as images, audio files, 3D models, textures, materials, and scripts.
Note
Assets can also be imported by dragging image files from Explorer to Unity's project browser panel.
Unity shows all the images with nice previews. It must be noted here that if Unity is in 2D mode, then unity will show images as sprites and if mode is set to 3D mode it shows the images as textures. Figure 1.36 shows both scenarios. The following screenshot shows the image imported as sprite and the screenshot besides it shows image imported as texture:
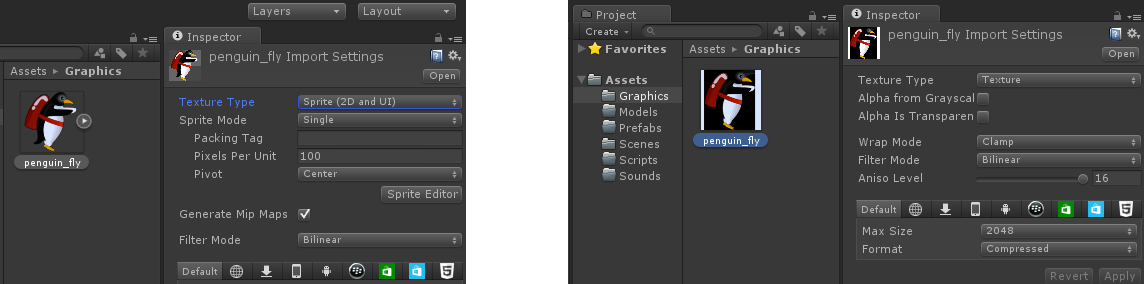
Figure 1.37 Images as Sprites (left) and Images as Textures (right)
If the penguin image is imported as texture, then there is nothing to worry about. Select the image from Project Browser panel, and in the inspector change the Texture Type to Sprite and click Apply. It is shown in the following figure:
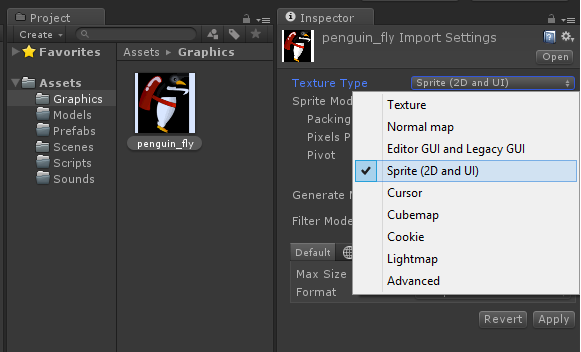
Figure 1.38 Change Texture Type of Image in Inspector Panel
After the assets are imported, which in our case is a single penguin image, we have to create a game object of player. Usually game objects are created by right-clicking in Hierarchy and selecting Create Empty as shows in the following figure:
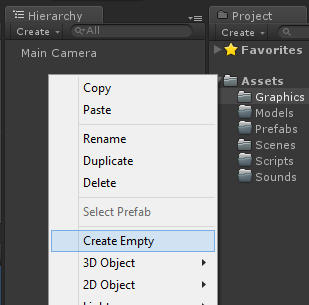
Figure 1.39 Creating Empty Game Object
But, in order to create sprites as game objects, simply drag sprites from the Project Browser panel to Hierarchy or Scene View panels and a game object will be created with the name of image file which is penguin_fly.png here. This is shown in the following figure:
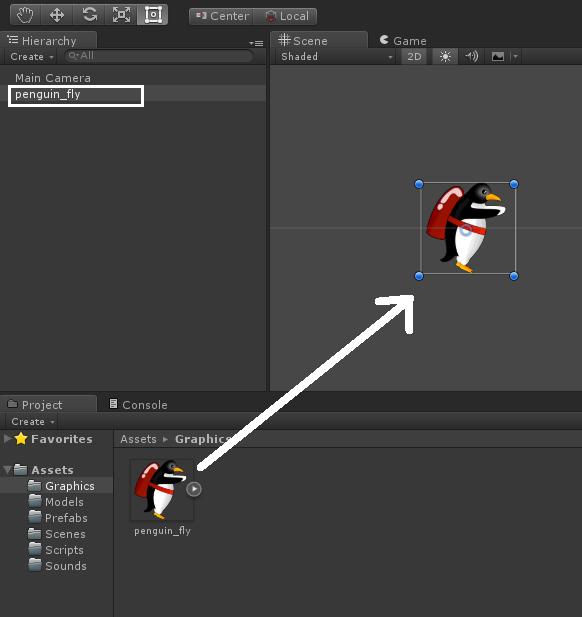
Figure 1.40 Creating Sprite Game Object
Now it's time to configure the penguin_fly game object of Hierarchy to get used in the game. Now select the penguin_fly object and make following changes in the Inspector panel.
- Change the game object's name to
penguin. - Set the position values to (0, 0, 0).
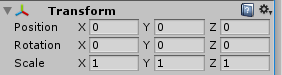
- To add a collider in the penguin, click
Add Componentin the inspector and selectCircle Collider 2DfromPhysics2Dmenu as shown in the following figure. More about Colliders can be read here https://docs.unity3d.com/ScriptReference/Collider.html:
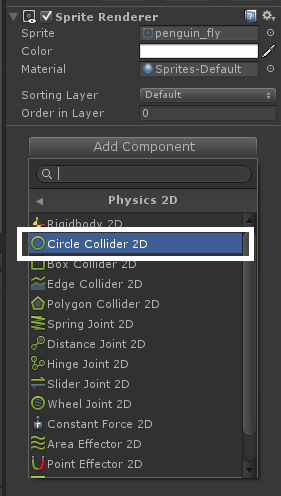
Figure 1.41 Adding Circle Collider 2D
- Set the value of
RadiusofCircle Collider 2Dto 0.6. - To make the penguin behave as a physical object, we have to add
Rigid Bodycomponent. To add it, clickAdd Componentin the Inspector panel and selectRigid Body 2DfromPhysics2Das shown in the following figure:
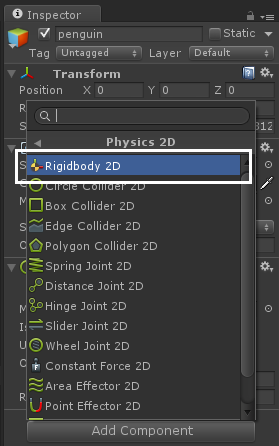
Figure 1.42 Adding Rigid Body 2D
- Set
Fixed Anglecheckbox state as checked on to avoid penguin to be rotated while falling or jumping due to physics dynamics.
The following figure below shows all the steps performed on the penguin game object:
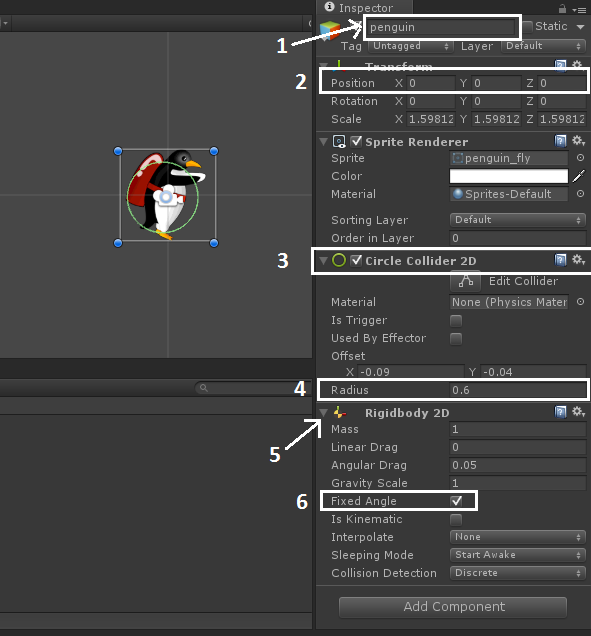
Figure 1.43 Penguin Inspector Settings
Starting from position, we have set the position to zero just for testing purposes. We will change it later when we put penguin at its initial position. The Sprite Renderer component is already added in the penguin game object because penguin game object was created from sprite by dragging it from Project Browser panel. The Sprite Renderer allows any game object to show an image on the screen from any sprite. In order to make any game object to react to physics collisions and get collided with each other, game object requires collider component in it. We have added Circle Collider 2D on the penguin object. You can choose any type of collider from the list. But it is recommended to choose the collider which is very light and fills the whole colliding area. The following figure shows the penguin with different colliders applied to it:
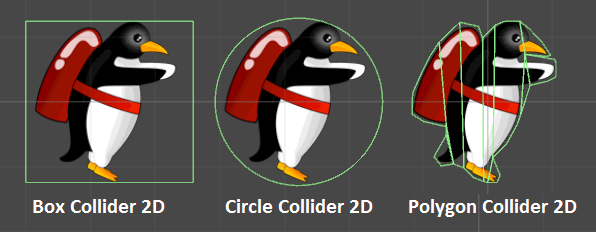
Figure 1.44 Penguins with Different Colliders
Using complex colliders like Polygon Collider 2D makes it harder to detect collision for the physics engine to detect collision, which in turn, creates a performance penalty. Finally, in order to apply gravity on the penguin, we have added Rigid Body 2D component. Rigid Body 2D allows any game objects to behave to the gravity, friction, physics kinematics and so on. We have check Fixed Angle to on state of the Rigid Body 2D. If this is set to off, then penguin will also rotate due to wind, friction, gravity, or any other force applied on it. So in order to avoid her to rotate while jumping, we have set Fixed Angle as checked.
Note
There are Physics components and Physics2D components. These both are very different in functionality and are used for very different purposes. You must be very careful when apply physics components on the game objects.
When you run the project, you will notice that penguin will fall down on the screen. It is because of the gravity is pulling penguin downwards and it goes off the screen. The Gravity Scale value, which is 1 by default, decides the gravity of the penguin. If we remove or disable Rigid Body 2D component, then penguin will never move. So, it must be noted that without rigid body no force and collision will be applied on the game object.
After setting physics components and position on penguin object, it's time to define some logic behavior of the penguin. The game's requirements are to let penguin fly through its jetpack when screen is touched by player and penguin will fall when touch is stopped. These kinds of logic are defined in Unity through scripts. Unity supports 2 kinds of scripts; C# and JavaScript. You can use any of these scripts. Even you can also use few files in C# and few other files in JavaScript in the same project. Throughout this book, we will do all the scripting through C#.
- We will start by creating a C# script file in Scripts folder in Assets by right-clicking on
Scriptsfolder and chooseC# ScriptfromCreatemenu as shown in the following figure:
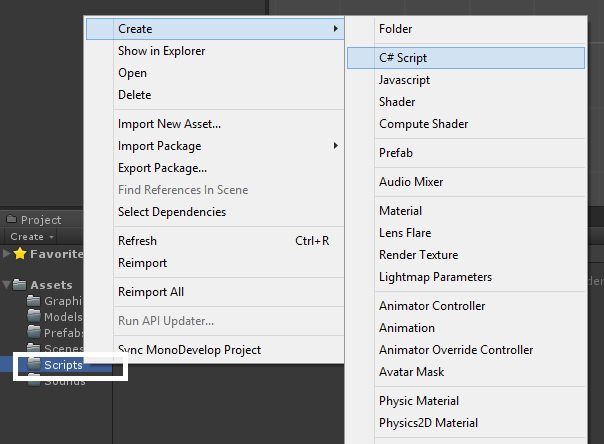
Figure 1.45 Adding a C# Script
- Let's call this script as
PenguinController.csand when you open it, the Unity's default Code Editor Visual Studio will start and open the newly created script file it as shown in the following figure.
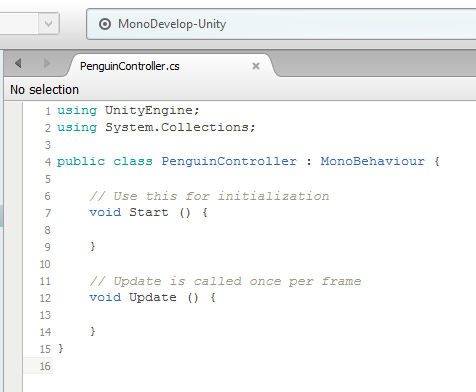
Figure 1.46 A C# Script File in MonoDevelop
- You might notice some code already written in this file. We will discuss about it in a while. Now a script has been created, but this script is not linked or connected to our penguin object or even the game. In order to apply it on the penguin object, select
penguingame object, click onAdd Componentin theInspectorpanel, and choosePenguinController.csfrom Scripts menu as shown in the following figure:
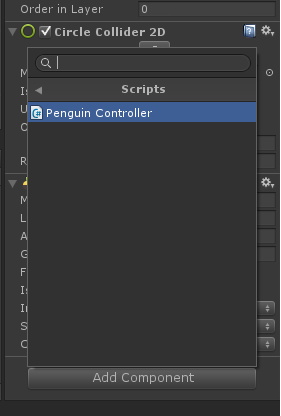
Figure 1.47 Adding C# Script on Penguin GameObject
Note
You can also apply script on the game object by directly dragging script file on the game object in hierarchy view.
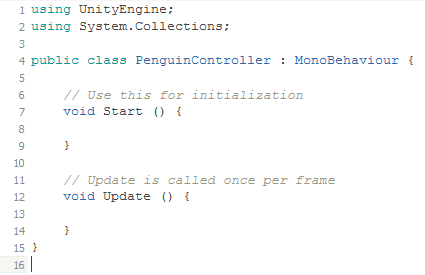
Now, as the script is applied on the penguin game object, let's write some logic and code to make the penguin fly. Open PenguinController.cs file from project browser panel by double-clicking it in MonoDevelop. The code which is already written looks like the following screenshot:
- The
PenguinControllerclass is inherited fromMonoBehaviourclass. Any script to be applied on any game object placed in the scene should be aMonoBehaviourclass and this is done by inheriting the class from it.MonoBehaviourclass provides some basic functionality for game objects such as its life cycle like when object is created, when it is active, when it is destroyed etc. Also it provides some functionality like interactions such as mouse down or mouse up etc. For now, we have only two methodsStart()andUpdate(). TheStart()method is called when the game object becomes first time active on the scene at runtime andUpdate()method is called on each frame if the game object is enabled or active.
Note
You can also use Visual Studio 2012 with Unity for C# scripts by installing Visual Studio Unity Tools and importing UnityVS packaging in the project.
- Now, let's start our logic for penguin. We will start from creating a variable
jetpackForcein the class like this:
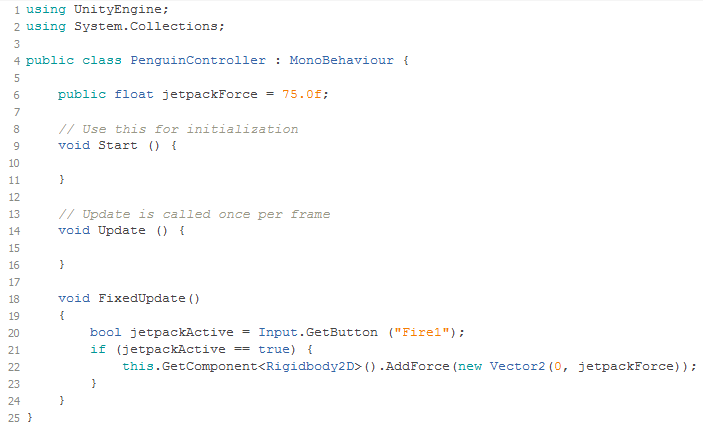
public float jetpackForce = 75.0f;
- We have set its initial float value to 75 and f letter is to make it float literal. There is an interesting thing about Unity that all the public fields in any class will be shown in game object's inspector component and can be altered or modified directly from the editor without opening the code file. The following shows the
jetpackForcevariable's field in the inspector panel:

Figure 1.48 The jetpackForce Field in the Inspector Panel
- Next is to use this
jetpackForce's value as the force to apply on penguin when touch is pressed. In order to detect touches, we have to useInput.GetButton()method. But this method is better used in eitherUpdate()orFixedUpdate()methods ofMonoBehaviourclass. TheFixedUpdate()method is called every fixed frame instead of every frame. Meaning that in FixedUpdate() if the FPS of the game is 60 then the FixedUpdate function will be called 60 times in a second. Irrespective if there are any changes to the scene. In comparison theRegular Update ()function gets doesn't stick to the 60 fps rule and will update when there is a change in the scene. This should be used when dealing withRigidBody. As our penguin is aRigidBody2D, so it's better to useFixedUpdate()method thanUpdate().ThePenguinController.csscript doesn't containFixedUpdate()method, so let's add the following code in the class now:
        void FixedUpdate()
        {
            bool jetpackkActive = Input.GetButton ("Fire1);
            if (jetpackActive = true) {
                this.GetComponent<Rigidbody>().AddForce(new Vector2(0,
                jetpackForce));
            }
        }
- There is nothing difficult here. We are polling for the input of Fire1 button which is a left-click in case of any PC, Linux, or MAC build and it changes to touch on Android, iPhone or other touch device. If the screen is touched, then
GetButton()will return true value, which in turn lets script add force by callingAddForce()method of theRigidBody2Dcomponent and passing thejetpackForcevalue in the y-direction.
Following is the whole PenguinController.cs file's code:
- Now, when you run the game the penguin will start falling. On clicking on screen, the penguin will rise up a little and will start falling again. The more frequently clicks are performed, the higher penguin will go up and it will easily be out of the screen within 2 or 3 clicks. Also it is falling very fast. In order to adjust its speed, either we decrease
Gravity ScalefromRigidBody2Dof the penguin object as shown in the following figure on left side or we decrease theGravityin thePhysics2Dsettings shown in the figure on right side.

Figure 1.49 Gravity Scale of Penguin (left) and Gravity of Physics2D (right)
We will change the Gravity value of Physics2D settings to -15. You can open Physics2D settings from Edit - Project Settings - Physics2D menu.
Now run the game, and you will notice the penguin will fall slower than before. On clicking many times, you might notice that penguin gets out of the screen. This kind of behavior in the games should be avoided. So, in order to limit the penguin within the screen bounds, we will add floor and ceiling in the game. Let's see how it's done in the next section.
Adding floor and ceiling is quite simpler job. We will create an empty object first. It should be noted that we are not importing any images or sprite assets in the scene, because we only need boundaries not the visuals of those about how these will look. Here is how we create our floor object.
- Create empty game object by choosing
GameObject - Create Emptymenu. - Select newly created empty game object in the
Hierarchypanel. - Rename it to
floor. - Set its
Positionto (0, -3.25, 0). - Set its
Scaleto (14.4, 1, 1). - Add
Box Collider 2Dcomponent by clicking onAdd Component, and selectingPhysics2D - Box Collider 2Doption.
Now you should be seeing a green rectangle on bottom of screen. This is the box collider of the floor and when you run the game, the penguin will never fall off the screen and it will stop when collided with the floor.
Note
We haven't added Rigid Body 2D on floor object because we don't want to apply gravity on the floor object due to its static nature.
Similarly, now add ceiling game object with the name ceiling and its position of (0, 3.25, 0) and its scale of (14.4, 1, 1). Apply Rigid Body 2D component on the ceiling object, and now run the project. You will observe that penguin now never leaves the screen and it is limited between the upper and lower parts of the screen.