

Make sure that you're signed up for the developer program; you will need to use the Keychain Access tool located in /Applications/Utilities so you can create a certificate request. A valid certificate must sign all iOS applications before they can be run on an Apple device in order to do any kind of testing.
Open Keychain Access | Certificate Assistant | Request a Certificate From a Certificate Authority.

In the User Email Address field, type in the e-mail address you used when you registered as an iOS developer. For Common Name, enter your name or team name. Make sure that the name entered matches the information that was submitted when you registered as an iOS developer. The CA Email Address field does not need to be filled in so you can leave it blank. We are not e-mailing the certificate to a Certificate Authority (CA). Check Saved to disk and Let me specify key pair information. When you click Continue, you will be asked to choose a save location. Save your file at a destination where you can locate it easily such as your desktop.

In the following window, make sure that 2048 bits is selected for the Key Size and RSA for the Algorithm, and then click Continue. This will generate the key and save it to the location you specified. Click Done in the next window.

Next, go to the Apple Developer website: http://developer.apple.com/, click on iOS Dev Center, and log in to your developer account. Select the iOS Provisioning Portal tab and navigate to Certificates on the left-hand column. Click on the Development tab if it's not already selected and then select the Add Certificate button on the right side of the page.

Click on the Choose File button, locate your certificate file that you saved to your desktop, and click on the Submit button.
Upon pressing the Submit button, you will get an e-mail notification you specified in the Certificate Authority (CA) request form from Keychain Access. The person who created the certificate will receive this e-mail and can approve the request by pressing the Approve button. You can download the certificate once it has been approved.

Click on the Download button and save the certificate to a location that is easy to find. Once this is completed, double-click on the file and you will see the following dialog:

Click OK. This will install your iPhone Development Certificate in your Keychain.
We now have a valid certificate for iOS devices. The iOS Development Certificate is used for development purposes only and is valid for about a year. The key pair is made up of your public and private keys. The private key is what allows Xcode to sign iOS applications. Private keys are available only to the key-pair creator and are stored in the system keychain of the creator's machine. The following are other websites you can refer to to create valid certificates:
Building for devices on the Ansca website: http://developer.anscamobile.com/content/building-devices-iphoneipad
iPhone provisioning setup and App Store submission (created by an Ansca engineer): http://www.authorstream.com/Presentation/anscamobile-509082-iphone-provisioning-setup-and-app-store-submission/
The AppCode blog: http://www.theappcodeblog.com/2011/04/28/getting-an-apple-developer-certificate/
You are allowed to assign up to 100 devices for development and testing purposes in the iPhone Developer program. To register a device, you will need the Unique Device Identification (UDID) number. You can find this in iTunes and Xcode.
To find out your device's UDID, connect your device to your Mac and open Xcode. In Xcode, navigate to the menu bar and select Window and click on Organizer. The 40 hex character string in the Identifier field is your device's UDID. Once the Organizer window is open, you should see the name of your device in the Devices list on the left. Click on it and select the identifier with your mouse, copying it to the clipboard:
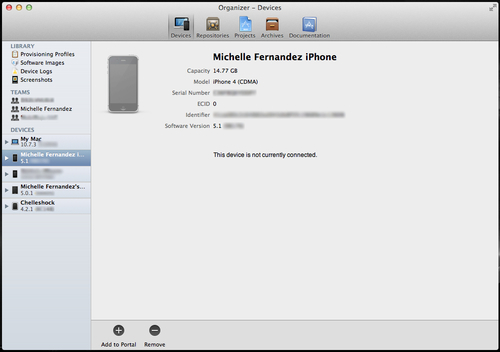
Usually when you connect a device to the Organizer for the first time, you'll receive a button notification that says Use for Development. Select it and Xcode will do most of the provisioning work for your device in the iOS Provisioning Portal.
