Book Image

Unity 2017 2D Game Development Projects

By : Francesco Sapio, Lauren S. Ferro
Book Image

Unity 2017 2D Game Development Projects

By: Francesco Sapio, Lauren S. Ferro

Overview of this book

<p>2D games are everywhere! Timeless and popular, 2D games represent a substantial segment of the games market. The Unity engine has revolutionized the gaming industry, by making it easier for game developers to create quality games on a budget. If you are looking for a guide to create 2D games using Unity 2017, look no further. With this book, you will learn all the essentials of 2D game development by creating three epic games in a step-by-step manner throughout the course of this book. </p><p> </p><p>The first game will have you collecting as many cakes as possible. The second will transport you to outer space to traverse as far as possible while avoiding enemy spaceships. The last game will have you running and jumping across platforms to collect coins and other exotic items. </p><p> </p><p>Throughout all these three games, you will create characters, make them move, and create some enemies. And then, of course, write code to destroy them!. After showing you the necessities of creating a game, this book will then help you to porting the game to a mobile platform, and provide a path to publish it on the stores. </p><p> </p><p>By the end of this book, you will not only have created three complete great games, but be able to apply your knowledge to create and deploy your own games.</p>
Table of Contents (14 chapters)

Changing level properties

With our level done, we have one last thing to complete before we're finished with Tiled. We need to now change the properties of our levels. To begin:

  1. Select the Terrain layer.
  2. Navigate to the Properties panel on the left-hand side of the screen.
  3. Add the following Custom Properties:
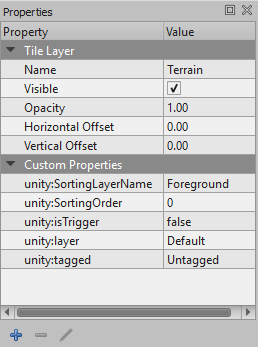
    • unity:SortingLayerName
    • unity:SortingOrder
    • unity:isTrigger
    • unity:layer
    • unity:tagged
The reason why we have added these custom properties is that later when you export the level with Tile2Unity, the software will read these custom properties to correctly import the map into Unity, with all the parameters you have specified. By doing this, you will avoid a lot of manual work in the later stages.

In the next screenshot, you can see an example of this along with the settings used for this project:

You will need to complete the above steps again for the Water layer if...