
Quality-first approach
You’ve probably heard of the saying, “garbage in, garbage out.” Well, this holds true in Photoshop as well. Just because an image looks fantastic on screen, it doesn’t guarantee it will when printed. Trust me – the last thing you want to experience is the horror of unboxing thousands of prints containing pixelated or blurred images.
PSD is by far the most powerful image format, offering tremendous flexibility within the application. The PSD format supports up to 250,000 layers in a single document, allowing you to scale, rotate, or reposition each component of your design with ease. Or, if you prefer, you can hide or even delete a layer without it affecting the rest of the composition.
Layers are a common facet of nearly all Adobe desktop applications and are especially critical to saving time. Because of the tight integration between other Adobe products, such as Illustrator, InDesign, Premiere, After Effects, Dreamweaver, and Adobe XD, you can directly import layered PSD files and preserve many of the Photoshop features. So, before you save your project artwork in a flattened JPEG format, which can only store a single background layer and no transparent background, consider using PSD instead.
This is a critical step to saving production time as you can edit and reuse the same document, rather than resaving an updated version in a different format each time you edit your artwork. Most applications will auto-update or prompt you to update your imported PSD rather than insist on importing again.
When saving a PSD and setting it to maximize file compatibility, it will include a composite version of a layered image so that it can be read by other applications, including previous versions of Photoshop.
Layered image files mean your text layers stay editable, and if you export from Illustrator, you can choose to create a layered PSD and keep text frames made in Illustrator editable in Photoshop too.
Common edits that you make to the color or brightness of your image, for example, can be stored in adjustment layers. They affect any layer below it in the stack and can be turned off/on and re-edited at any point by double left-clicking on the layer’s adjustment icon thumbnail in the Layers panel.
You can apply layer effects to specific layers to add a drop shadow or glow. Then, re-edit the effect at any time by double left-clicking on the effect name. If you wish to move the effect to a different layer, you can simply drag it from the source layer and onto the destination layer. Or, you could even create a duplicate by holding down the Alt/Option key as you drag and drop a layer effect.
Image quality
All digital photos are mosaics composed of tiles called pixels, an amalgamation of two words: picture and element. These tiny squares each contain just a single color. If you magnify an image in Photoshop beyond a zoom factor of 500%, those pixels become more apparent. But at first glance, at 100% magnification, they are indistinguishable, and our brains resolve those tiny patterns of color into a seamless representation of what the camera captured.
Resolution
Resolution has long been established and leveraged by artists over the centuries. Monet painted with short brush strokes known as daubs to create small clusters of colors. Standing close to the canvas, they have no apparent structure, but walk further back, and our eyes resolve these paint marks to create an image. Therefore, the distance and the size of the color marks are significant. This is as true for pixels as it is for paint.
Pixels per inch (PPI)
In industry, we refer to our formula as pixels per inch (PPI), a method for calculating image size in relation to the number of pixels in a given region, such as an inch. Magazines, read at a distance of 18 inches, require images with 300 pixels vertically and horizontally within every inch. A billboard ad viewed from several meters away requires only 30 PPI, while web graphics require in the region of 72 to 144 PPI to attain the appropriate quality.
Vector graphics
As with photographs, vector graphics are used in abundance in print, online, and on screen. When you see a logo, a road sign, or wayfinding graphics in a supermarket, those are almost certainly made from vector graphics. Unlike digital photographs, vectors typically contain a dozen or so colors and are composed of anchor points and segments that form shapes, not pixels. This means vector graphics are resolution-independent and capable of being used at any size capable of being printed and manufactured without losing quality.
Digital text is a form of vector art, but it could be simple shapes such as circles, rectangles, and lines. Photoshop provides a set of vector-editing tools and several shape libraries that can retain their vector quality. By storing vector art in its own shape layer, Photoshop can preserve the quality of the graphics, allowing them to be modified without losing quality:
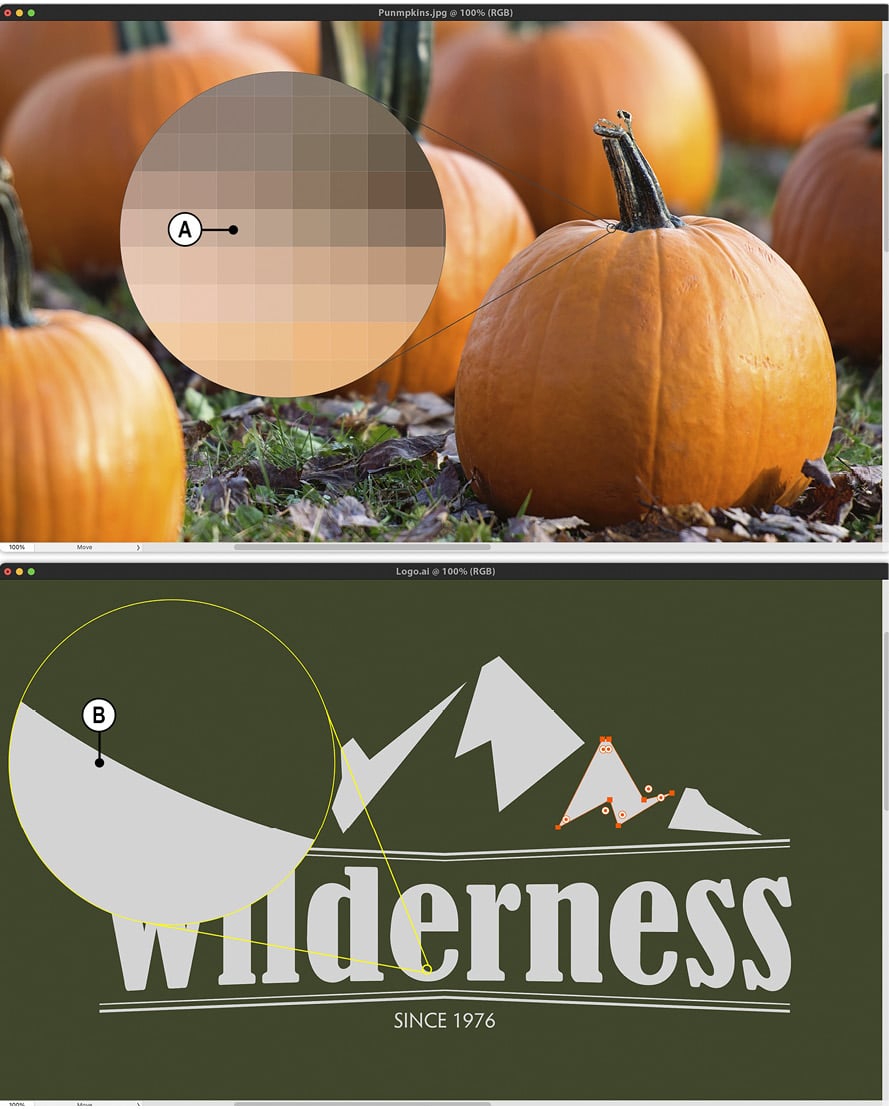
Figure 1.24: A comparison between pixel-based images (A) and vector graphics (B)
Calculating PPI in Photoshop
Image Size isn’t the most exciting Photoshop feature, but essential to determine the maximum size an image can be in print and on screen. Here’s how to use it:
- Go to Image → Image Size. When the dialog appears, set the Width and Height units to Millimeters (or whichever unit of measurement you are accustomed to) by clicking on the drop-down menu.
- Then, turn off the Resample checkbox (A) to create a link between not only the width and height of the image but also the resolution.
- It is normal that when you download an image from a stock site or your digital camera, it will possess a large width and height – for example, 2116 mm x 1411 mm – but a very low resolution of 72 PPI. With a link between the size of the image and the resolution, you can now simply enter the desired PPI into the Resolution setting. For professional print, this is 300 PPI. Click OK when done:
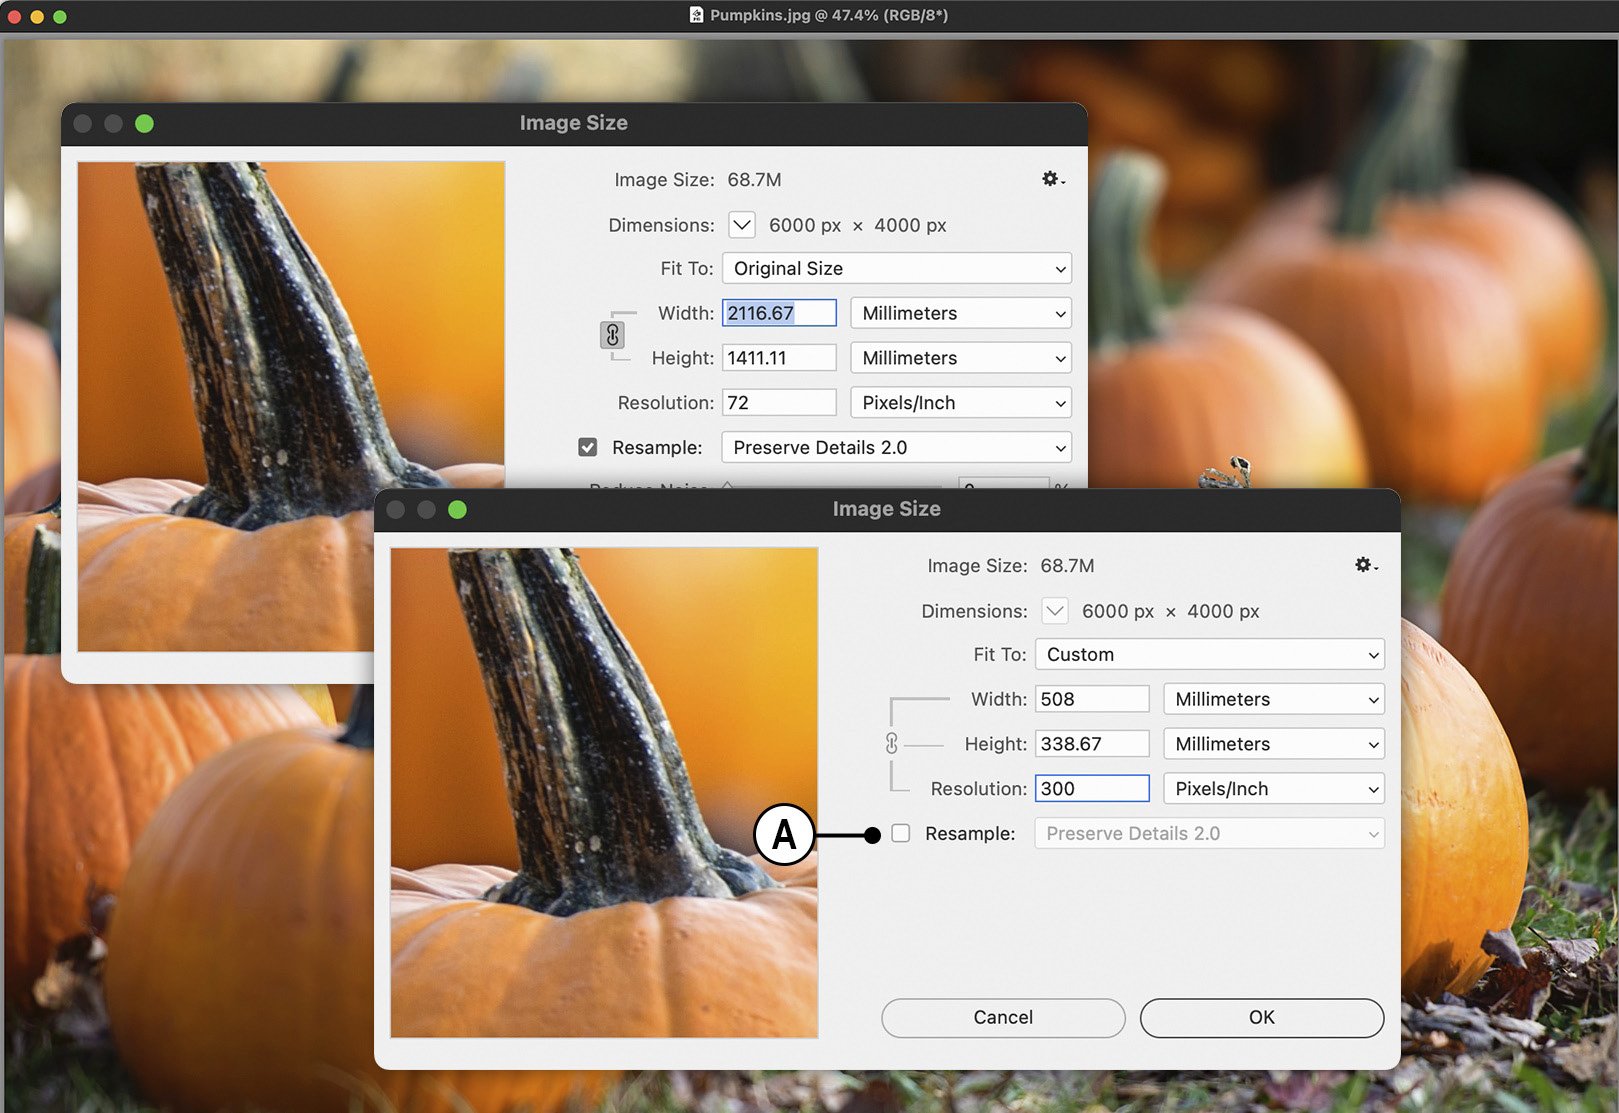
Figure 1.25: The Image Size dialog
In this section, we have learned the importance of defining quality from the outset by measuring the resolution of pixel-based images.