
AndEngine is an open source game engine and the sources are licensed under Apache License Version 2.0. This not only allows us to use AndEngine in both free and commercial games, but it also gives us a chance to inspect or alter the source code. The old way of adding AndEngine to an Android application was to add compiled Java ARchive (JAR) files to your app. This is no longer necessary as you can add AndEngine as a library project.
The author of AndEngine, Nicolas Gramlich, decided to store the whole engine inside GitHub. Git is a version control system (VCS) for source codes and GitHub is a hosting website for Git repositories. A VCS allows you to not only store your sources, but also to store every version of each file. This is of course useful when you need to see the history of your changes or collaborate with more people.
A repository is a logical unit. As a rule of thumb, one repository contains one project. A repository has its address and history separated from other repositories. A repository in GitHub can be forked (creates your own copy with your own history), cloned (creates a version on your machine linked with the repository), or zipped and downloaded locally.
Tip
For more general information about AndEngine, visit the official website at www.andengine.org.
Android uses OpenGL ES to display accelerated graphics. OpenGL ES is a free API for full-function 2D and 3D graphics on embedded systems. There are several versions of OpenGL ES, namely versions 1.x, 2.x, and recently 3.x.
A repository can also contain multiple branches. Think of a branch as an alternative version of the project. AndEngine is split into three branches. The GLES1 branch uses OpenGL ES 1.0 and it is the oldest. I don't recommend using it. GLES2 is newer and GLES2-AnchorCenter is the newest. They both use OpenGL ES 2. Use the GLES2-AnchorCenter branch if you haven't used AndEngine before. The GLES2-AnchorCenter branch's biggest difference from the GLES2 branch is the fact that point [0, 0] is now in the lower-left corner of the screen. This is the same as in OpenGL and that's why it's recommended.
For the purpose of this book, we are going to exclusively use the GLES2-AnchorCenter branch.
AndEngine is split into a main project simply called AndEngine and many extensions called, for example,
AndEngineMultiplayerExtension, which are dependent on the main project. Each project resides in its own repository.
For our game, we need the main AndEngine project and a 2D physics extension called
AndEnginePhysicsBox2DExtension. This extension adds a very popular 2D physics simulation framework called Box2D to AndEngine. A lot of popular games use this framework.
There is also a repository called
AndEngineExamples. It is not an extension but an application that includes all of the other AndEngine libraries and extensions and illustrates their use.
Tip
If you download all the extensions and the AndEngineExamples project, you can build the AndEngineExamples app and run it on your Android device. An older version is also available online on the Google Play store at https://play.google.com/store/apps/details?id=org.anddev.andengine.examples.
You can download the sources from Nicolas Gramlich's original repository at https://github.com/nicolasgramlich/.
However, there is a danger that the codes will be changed any time in the future. For that reason, I recommend to download the sources from my forked repository, which is guaranteed to work with the sources in this book.
The easiest way is to download the complete repository as a ZIP archive, which can be done with the help of the following steps:
Browse to https://github.com/sm4/, switch to the Repositories tab, and select AndEngine. Notice the drop-down menu titled branch. Make sure GLES2-AnchorCenter is selected. Alternatively, you can browse directly to the correct branch by going to https://github.com/sm4/AndEngine/tree/GLES2-AnchorCenter.
The following screenshot is what you should see now:

Click on the Download ZIP button. A file named
AndEngine-GLES2-AnchorCenter.zipwill be downloaded.Unpack it in the workspace directory you selected when configuring the Eclipse IDE. Note that the directory is called
AndEngine-GLES2-AnchorCenter. It contains the name of the project and the branch name as well. Rename the directory toAndEngine.Repeat the process for the
AndEnginePhysicsBox2DExtensionrepository. It can be downloaded from https://github.com/sm4/AndEnginePhysicsBox2DExtension/tree/GLES2-AnchorCenter.Don't forget to rename the directory to
AndEnginePhysicsBox2DExtensiononly. You should have two folders in your workspace directory:AndEngineandAndEnginePhysicsBox2DExtension.
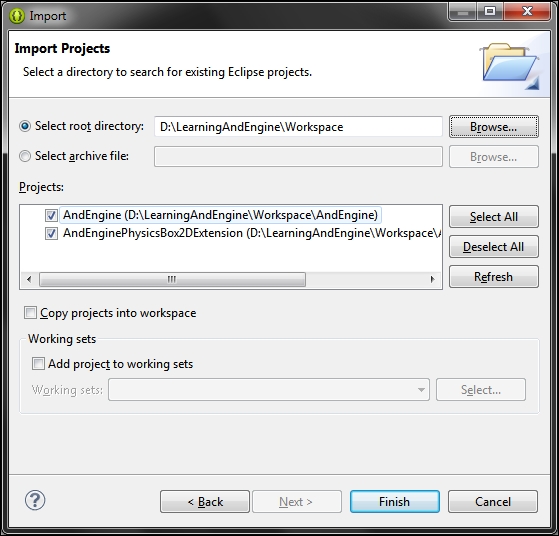
In Eclipse, navigate to File | Import and choose Existing Projects into Workspace (under the General folder). Browse to your workspace directory. You should see two projects. Check them both and import them by clicking on the Finish button. This is shown in the following screenshot:
If you have installed the ADT bundle with Android SDK 19, you should see no errors. In case there are errors, try cleaning and building all projects again. Simply click on the Project drop-down menu in Eclipse's main menu and select the Clean… option while having the Build Automatically option checked.
It is possible that when you were installing the ADT bundle, it contained a different SDK version from 19, or maybe you are, for some other reason, using a different version. In that case, you will see messages like the following in the console:
[2014-01-14 15:36:11 - AndEngine] Unable to resolve target 'android-19'
Right-click on the project, select the Properties option, and then choose the Android option. Make sure that the Android SDK version of your choice (or simply the latest) is selected. This is shown in the following screenshot. You will probably have to clean the project to make the error disappear. We have to do this because the project was saved with SDK 19 selected. Do it for both projects.
