Depending on the device platform you are targeting with your project, you will need to install additional software and development tools, as well as configure your Unity project with platform-specific settings.
If you are developing for Android ARCore, go to the Setting up for Android/ARCore Development section. If you are developing for Apple ARKit, go to the Setting Up for iOS/ARKit Development section. Finally, if you are developing for wearable AR devices, go to the Developing for wearable AR glasses section.
Setting up for Android/ARCore development
If you want to build and run your project on an Android device, there are a few extra steps in setting up your project for Android development and ARCore. I'll summarize the process here but naturally, things can change, and I recommend that you look at the documentation for the most current instructions, including Google's ARCore docs, in addition to the Unity Manual. Here is a list of some relevant links:
You may have already completed the first few steps for setting up for Android and ARCore development, but I'll repeat them here briefly:
- Build support modules: In Unity Hub, ensure you have installed the Android platform build support modules for the specific version of Unity you are using with your project.
In the Unity Hub Add Modules window, there's a > icon for unfolding Android Build Support. Ensure you have checked the checkboxes for both Android SDK & NDK Tools and OpenJDK.
Note that if you need to customize the location of either the Android SDK, NDK, or JDK libraries, use the Unity Preferences window in the Unity Editor, by navigating to Edit | Preferences | External Tools, and specify the paths for Unity to find where you installed these separately.
- Target Platform: In the Unity Editor, open the Build Settings window by selecting File | Build Settings. Within the Platforms panel, select the Android platform from the list. If it is not already selected, please click the Change Platform button. If it is disabled, go back to Step 1.
- XR Plugin: Ensure the ARCore plugin is currently installed and selected. Select Edit | Project Settings, and then select XR Plug-in Management from the side menu (initializing it if necessary). Click the Android icon to see the list of Android plugins and check the ARCore checkbox if it is not already checked.
- USB Debugging: The next step is to enable USB debugging on your Android device (phone or tablet). Open the device's Settings > About window and find the Build Number item. (Depending on the brand, you may need to drill down another level or find the Build Number item in a slightly different location.) The next thing you must do I think is very funny – perform a magical incantation by clicking the Build Number item seven times! Then, magically, a Developer Options menu option will appear. Select that and enable USB Debugging.
You can now connect your device to your development machine, and it should be recognized as an attached peripheral device.
The next thing to consider is the Android Player settings in your project. A review of these options can be found here: https://docs.unity3d.com/Manual/class-PlayerSettingsAndroid.html. Specific settings are required for AR projects targeting ARCore. Please double-check the current requirements, as can be found in the Configure Project Settings topic on the Quickstart ARCore page (https://developers.google.com/ar/develop/unity-arf/quickstart-android). Continuing from the previous steps, I suggest doing the following:
- Player Settings: In Unity, navigate to Edit | Project Settings | Player to open the Player Settings window. It contains many options, including tabs at the top to switch between platform-specific settings. Generally, you can keep the default settings unless otherwise advised, or when you're optimizing your project builds. Initialize the following settings:
- Other Settings | Rendering: Uncheck Auto Graphics API. If Vulkan is listed under Graphics APIs, remove it as Vulkan is not yet supported by ARCore. To do so, select Vulcan and press the - (minus) icon in the lower right. Also, uncheck Multithreaded Rendering as it's (currently) not compatible with ARCore.
- Other Settings | Package Name: Create a unique app ID using a Java package name format. Unity chooses a default based on your project name; for example,
com.DefaultCompany.MyARProject.
- Other Settings | Minimum API Level: If you are building an AR Required app, specify Android 7.0 'Nougat' (API Level 24) or higher. If you are building an AR Optional app, specify Android API Level 14 or higher.
Information – The Word "player" in Unity
The word "player" in Unity carries multiple meanings. The user of your application or game may be referred to as the player. In a game, the first-person GameObject (containing a camera controlled by the user) might also be referred to as the player. In a non-AR video game, the game controller might be called the player controller. However, in Project Settings, the player refers to the result of the build process; it is an executable program that is installed on your target device (along with other asset files and data) that "plays" your application. In this case, the word is akin to a media player, for example, that plays a music or video file. Player Settings in Unity configures how Unity is built and deployed to your target device.
Meanwhile, you also have the option to install additional capabilities provided by the ARCore Extensions package for Unity. This package extends AR Foundation to some more advanced features of ARCore that are currently not supported in AR Foundation. To install ARCore Extensions, perform the following steps:
- Download the latest
arcore-unity-extensions-*.tgz tarball from the GitHub releases page at https://github.com/google-ar/arcore-unity-extensions/releases/.
- Open the Package Manager using Window | Package Manager.
- In the top left of the window, click the + icon and choose Add package from tarball, as shown here:
Figure 1.13 – Adding a tarball package
- Locate the downloaded
arcore-unity-extensions-*.tgz tarball.
- Then, click Open. It may take a few moments to install the package and any dependencies.
Your project is now set up to target Android ARCore with AR Foundation. We'll verify your settings in the next chapter, Chapter 2, Your First AR Scene, when we create an AR scene, build it, and run it on your device.
Setting up for iOS/ARKit development
If you want to build and run your project on an Apple iOS device, there are a few extra steps in setting up your project for iOS development and ARKit. I'll summarize the process here, but naturally, things can change, and I recommend that you look at the necessary documentation for the most current instructions.
Developing for iOS requires a Mac computer running OSX. Then, you need to install the XCode development environment. It is also strongly recommended that you join the Apple Developer Program, which currently costs $99 (USD) per year for individuals. You can do some limited Unity development for iOS without becoming an Apple Developer but it's not practical, especially for AR, where you need to test your app on a physical device.
Here is a list of some relevant links:
- Apple Developer Program: https://developer.apple.com/programs/
- Unity Manual – Getting Started with iOS Development: https://docs.unity3d.com/Manual/iphone-GettingStarted.html
- Unity Manual – Building for iOS: https://docs.unity3d.com/Manual/UnityCloudBuildiOS.html
- Unity ARKit Plugin: https://docs.unity3d.com/Packages/[email protected]/manual/index.html (find the doc page for the version you are using)
Information – How to Develop for iOS Without a Mac
While iOS development requires a Mac computer running OSX, it's possible to work around this using Unity Cloud Builds. This process is not for beginners, nor those timid about DevOps procedures. You will still need access to a Mac development machine to set up your Apple license, provisioning profile, iOS certificate, and p12 file, but then you can use those to set up a Unity Cloud Build for iOS. See https://docs.unity3d.com/Manual/UnityCloudBuildiOS.html for more information. After each successful build, you'll download the built application's .ipa file to your iOS device. This does not lend itself to a rapid development cycle! If you're in this situation, my recommendation is to buy a used Android phone that supports ARCore. Then, develop your app using AR Foundation on your Windows PC targeting Android first, and then periodically run iOS/ARKit builds to test and verify it runs on that device. Unity Cloud Builds requires a Unity Plus or Pro license or a Unity Teams Advanced subscription.
Developing for iOS and ARKit requires performing the following steps. You may have completed some of these steps already:
- Apple Developer Program: This is your admission ticket for developing for iOS. Go to https://developer.apple.com/programs/ to learn more and enroll.
- Xcode: Download and install the current copy of Xcode, the development environment required to develop any Apple products. It's available on the Mac App Store: https://apps.apple.com/us/app/xcode/id497799835.
- Build support modules: In Unity Hub, ensure you have installed the iOS platform build support modules for the specific version of Unity you are using with your project.
- Target Platform: In the Unity Editor, open the Build Settings window by selecting File | Build Settings. Within the Platforms panel, select the iOS platform from the list. If it is not already selected, please click the Change Platform button. If it is disabled, go back to Step 1.
- XR Plugin: Ensure the ARKit plugin is currently installed and selected. Select Edit | Project Settings, and then select XR Plug-in Management from the side menu (initialize it if necessary). Click the iOS tab to see the list of iOS plugins, and check the ARKit checkbox if it is not already checked.
- Player Settings: In the Edit | Project Settings | Player Settings window, there are settings you may need to use, including checking the Requires ARKit checkbox, providing a text value for Camera Usage Description (such as
Required for augmented reality support), setting Target minimum iOS Version to 11, and Architecture | ARM64.
When Unity builds an iOS project, it does not actually build the app. Instead, it constructs an XCode project folder that is then opened in XCode, which, in turn, is used to build the app. One of the critical services XCode provides is ensuring you are authorized for development by provisioning your app, including the following:
- Installing a Development Provisioning Profile for each device where you plan to test your app. Follow the instructions at https://docs.unity3d.com/Manual/UnityCloudBuildiOS.html, under the Create a Certificate topic.
- Adding your Apple ID account to Xcode by going to Preferences | Accounts.
For more information on using Xcode and Unity, see the Unity Manual: Structure of a Unity Xcode Project (https://docs.unity3d.com/Manual/StructureOfXcodeProject.html) and other related pages.
This process can be confusing. Everyone who develops for iOS goes through a similar process, so you're certainly not alone, and there's a lot of answers to be found on the internet. Remember: "DuckDuckGo is your friend." And fortunately, you usually only need to do this once.
Note that you can also set your Signing Team ID in your Unity Player settings by navigating to Edit | Project Settings | Player | Identification.
Information – Apple's Own AR Development Tools
Upon reviewing the Apple web pages, you will discover that they provide their own AR development tools (https://developer.apple.com/augmented-reality/tools/) apart from Unity. Of course, I'm a big fan of Unity and AR Foundation, which give you device independence and all the other powerful features of Unity, but it's good to be aware of alternatives.
Your project has now been set up to target Apple ARKit with AR Foundation. We'll verify your settings in the next chapter, Chapter 2, Your First AR Scene, when we create an AR scene, build it, and run it on your device.
Developing for wearable AR glasses
AR Foundation supports not just handheld mobile AR devices using ARCore and ARKit, but also wearable AR glasses, including Microsoft HoloLens and Magic Leap. Likewise, targeting wearable AR devices may require configuring Unity to target a platform other than Android or iOS. Wearable AR glasses remain relatively expensive and outside the reach of the typical consumer as they're aimed at corporate or industrial applications. While this book can serve as a lovely starting point for developing these devices, and the projects can be adapted accordingly, it is outside the scope of this book to support wearable AR devices in the subsequent chapters.
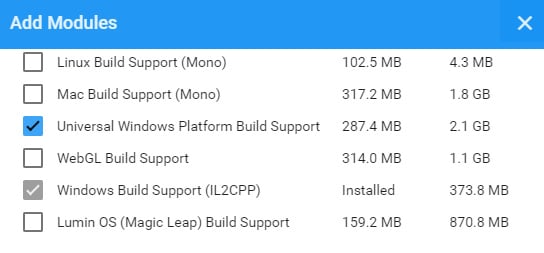
For Microsoft HoloLens, you must set up Unity to target Universal Windows Platform (UWP), beginning with installing the required module via Unity Hub, as shown in the following screenshot:
Figure 1.14 – Adding UWP build support for HoloLens
To set up for HoloLens development, you will need to use Visual Studio IDE and a compatible version of Windows 10 SDK. For additional information, here are some useful links:
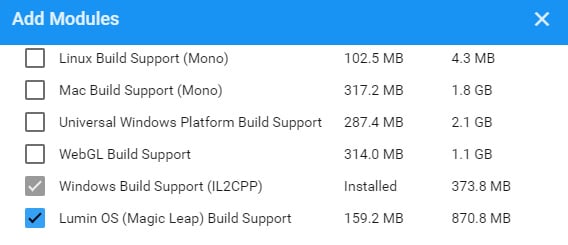
For the Magic Leap wearable AR products, you must set up Unity to target Lumen OS, beginning with installing the required module via Unity Hub, as shown in the following screenshot:
Figure 1.15 – Adding Lumen OS build support for Magic Leap
For additional information, here are some useful links:
Interestingly, Magic Leap provides a Unity Template that you can add to Unity Hub as a starting point for new projects (https://github.com/magicleap/UnityTemplate).
Now that you have a project set up for AR development on your target platform and device, let's build a test to make sure things are working so far.


 Free Chapter