

GXT windows are cool, they look great, and can be resized, dragged, maximized, and so on — we've seen how easy it is to achieve all this. Depending on your style and layout design, you probably use a lot of them in a GXT project. However, without a way to manage them, you'll soon become weary of their use.
A typical GXT app will have many windows; we want to build a system that can present them to us in a way (probably with a menu) so that we can elect to make use of a particular one, and if there are several already on screen, that one would be brought to the forefront. The system should allow us to hide and show them all with a single action, and also cascade them all (overlay them in a hierarchical fashion on the screen), so that you can see and identify the windows by their headings.
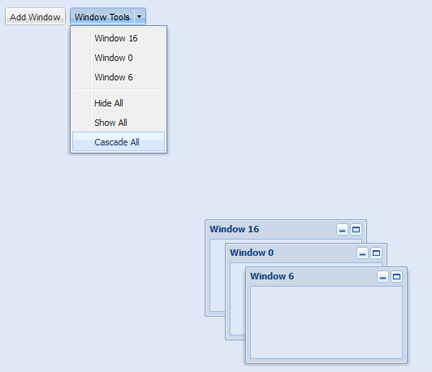
Finally, the system should allow us to minimize windows, as if saving them for future use. The previous screenshot shows a preview of our system in use. The Add Window button is used to create the windows for whom the ID and heading are set automatically with a randomly generated integer, thanks to the Random class from the com.google.gwt.user.client package. Once we have a set of windows to play with, we can apply our hide/show/cascade functionality on them. Note that each window that's created automatically has a menu entry inside the splitbutton; this is there so that you can click on any one at any time, to show that particular window and have it brought to the forefront.
Our code here is a little on the lengthy side but for obvious reasons, even at that, it's simple and straight to the point, once you get a hang of what it is doing.
@Override
public void onModuleLoad() {
// set up some "global" variables
final Menu toolMenu = new Menu();
ButtonBar buttonBar = new ButtonBar();
final WindowManager mgr = WindowManager.get();
final List<Window> windowList = new ArrayList<Window>();
final WindowListener windowListener = new WindowListener(){
@Override
public void windowMinimize(WindowEvent we) {
final Window window = we.getWindow();
// make a menu-item for this window,
// but only once, so we'll search first
boolean found = false;
Iterator<Component> it = toolMenu.getItems().iterator();
while (it.hasNext()) {
Component cmp = (Component) it.next();
if(cmp instanceof MenuItem){
MenuItem item = (MenuItem) cmp;
if(item.getText().equals(we.getWindow().getHeading())){
found = true;
break;
}
}
}
if(found == false){
toolMenu.insert(new MenuItem(we.getWindow().getHeading(), new SelectionListener<MenuEvent>() {
@Override
public void componentSelected(MenuEvent ce) {
if(!window.isVisible()){
window.show();
}
mgr.bringToFront(window);
}
}), 0);
}
window.hide();
}
};
// we'll use this to generate the windows
Button addWindowBtn = new Button("Add Window", new SelectionListener<ButtonEvent>() {
@Override
public void componentSelected(ButtonEvent evt) {
int randInt = Random.nextInt(20);
Window dummy = new Window();
dummy.setClosable(false);
dummy.setSize(200, 120);
dummy.setMinimizable(true);
dummy.setMaximizable(true);
dummy.setId("win_" + randInt);
dummy.setHeading("Window " + randInt);
dummy.setContainer(GxtCookBk.getCenterPanel().getElement());
dummy.addWindowListener(windowListener);
dummy.show();
windowList.add(dummy);
}
});
buttonBar.add(addWindowBtn);
toolMenu.add(new SeparatorMenuItem());
// add the menu-items to handle hide/show/cascade all
// hide-all is easy anyways
toolMenu.add(new MenuItem("Hide All", new SelectionListener<MenuEvent>() {
@Override
public void componentSelected(MenuEvent evt) {
mgr.hideAll();
}
}));
// show-all only works because we kept
// a local list of the windows we've made
toolMenu.add(new MenuItem("Show All", new SelectionListener<MenuEvent>() {
@Override
public void componentSelected(MenuEvent evt) {
// mgr.getWindows() || mgr.getStack() returns only visible windows
// so we always have an empty list after calling mgr.hideAll()
for(Window window : windowList){
if(window != null && !window.isVisible()){
window.show();
}
}
}
}));
// cascade is tricky, yeah.
// cascade is implemented by positioning
// the windows atop each other, but 25x29 pixels
// "more" from the last one
toolMenu.add(new MenuItem("Cascade All", new SelectionListener<MenuEvent>() {
@Override
public void componentSelected(MenuEvent evt) {
List<Window> windows = mgr.getWindows();
Window reference = null;
for (Window window : windows) {
window.show();
mgr.bringToFront(window);
window.center();
if(reference != null){
window.setPosition(reference.getPosition(true).x + 25, reference.getPosition(true).y + 29);
}
reference = window;
}
}
}));
// create a menu button and attach the menu to it
Button toolBtn = new Button("Window Tools"); // correct book from SplitButton to this
toolBtn.setMenu(toolMenu);
buttonBar.add(toolBtn);
centerPanel.add(buttonBar, new FlowData(10));
}
First, we set up some variables that we'll be using throughout this recipe. The first section does it for us; within those lines we create an instance toolMenu using the new Menu() method, this will contain items that we will click on, to execute actions on the windows. Secondly, an instance buttonBar is created using the new ButtonBar() method; this is just a bar to hold the buttons we'll be using — one button to create a new window when clicked and the other one to expose the menu made from the toolMenu instance. WindowManager.get() gives us the singleton WindowManager instance, with which we intend to do most of the interesting stuff in this recipe. We also instantiate a type-safe list of Window objects. Although the WindowManager class automatically keeps a register of windows internally, it usually contains only visible windows, so if we ever hide a window (we actually want you to easily hide all at once) we'll end up with no way to show them again; this is why we must keep our own list of the windows.
Next, we make an instance of WindowListener, to listen to and handle window events. Events are fired for every window-related action the user performs, whether it's a drag, resize, minimize, or maximize action. However, we are particularly interested in handling minimize gestures, so we'll only override the windowMinimize() method within our listener, which like all the other methods, will be called with a WindowEvent object, from where we can get a reference to the window that triggered the event and other context artifacts associated with it. These objects are created first because we will need them as the code progresses, and so you can get a grasp of the flow of the code easily.
In the windowMinimize() method of our WindowListener class (called when a window is minimized), first we obtain a reference to the minimized window and then we iterate over the menu items in toolMenu, investigating each to see if we can find a match between its text and the heading of the referenced window. If we find a match, we know that this window has been minimized before and a menu item already exists for it, with the heading of the window; if we don't find a match (found will remain false after the iteration), we know that the referenced window is being minimized for the first time, so we make a menu item for it by passing the referenced window's heading (as its label) and a SelectionListener instance. This will show up the referenced window and bring it to the front of other windows (if any), when the menu item is clicked/selected.
With our variables and WindowListener out of the way, we proceed to create an addWindow button, passing Add Window (as the label) and an anonymous SelectionListener instance, to handle click actions on it. Within the listener, we make a closable and maximizeable window using Random.nextInt(20); we set its ID and heading automatically to a random integer not exceeding 20. We also set the listener of this window to the one created previously and make it minimizeable with setMinimizable(true).
Recall that our windowListener instance is where we actually implement the minimize functionality (by hiding the window, having made a menu item for it), else we get nothing when the window is minimized. Once the window is created and shown, windowList.add(dummy) adds it to our register of windows; this is important if we want to implement a show-all feature.
At this point, the addWindowBtn button is all set up; we can now add it to the button bar, which is done with a call to buttonBar.add(addWindowBtn).
The next code segment implements the hide all feature by adding a simple menu item to toolMenu and passing an anonymous SelectionListener instance; this newly added menu item calls hideAll() on our WindowManager object (mgr.hideAll()) to hide all visible windows. The show all feature is a little more involved, because there's no showAll() method (or anything similar) to call from the WindowManager object. Also, its internal list of windows only references windows that have not been previously hidden or closed. Hence, we iterate over our own list of windows kept in the final ArrayList<Window> windowList variable, conditionally calling show() on each.
So far, we've done everything except cascade all, which is intended to overlay the windows over each other in a hierarchy that allows us see their headings so that we can identify them. We do this by iterating over the list of windows from our WindowManager object; when we get a handle to a window from the list, we show it with window.show(). Then, we bring it to the forefront with mgr.bringToFront(window), and next, center it with window.center(). If this is not the first window to be cascaded from the list, in which case reference != null will be true, we position it 25 pixels farther and 29 pixels lower than the previously cascaded window, which we are storing with the reference variable.
Now, what's left is to make our SplitButton button, attach the toolMenu instance to it, and then attach the button to the button bar from where it's available foruser interaction.