
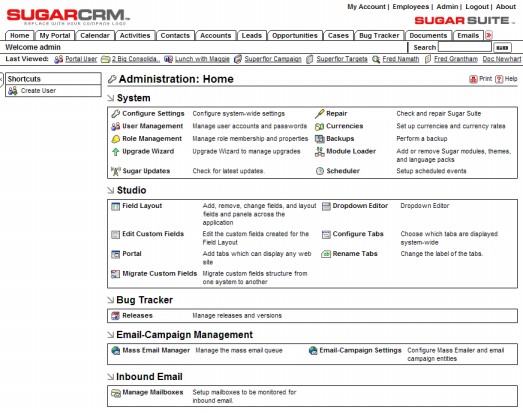
The figure overleaf shows the top-level Administration screen. The administration capabilities referred to below can all be accessed from this screen.
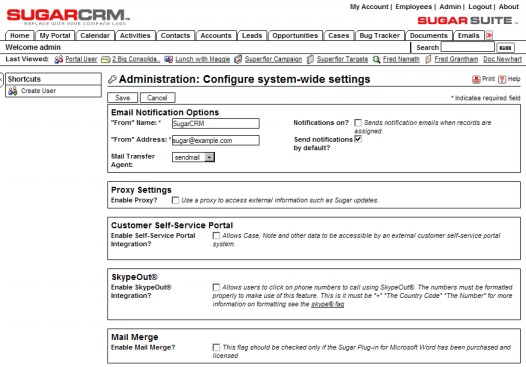
Configure Settings has five sections:
The first section is used to define the Email Notification Options associated with the emails that Sugar Open Source can send to Users when they are assigned new responsibilities. Email notification settings include the subject line of the email to be sent, the user name and email address from which the email will be sent, as well as the Mail Transfer Agent (MTA) to be used. Note that the SMTP (Simple Mail Transfer Protocol) MTA should be selected if your system is running Windows. If your system is running Linux, either the SMTP or sendmail MTA may be selected, depending upon how your server is configured. If the SMTP MTA is selected, you must also specify the SMTP server name, and port number (default is 25) used to communicate with SMTP. If SMTP Authentication is selected via the checkbox provided, the SMTP User Name and Password to be used must also be provided. Configure Settings can also be used to enable and disable the email notification system, and establishes the default notification setting for new users.
The second section is used to enable a proxy connection by which the Sugar server will access external information such as Sugar updates. If it is enabled, the user will also have to define settings for the proxy host and port number, and if authentication is checked, then a username and password must also be entered.
The third section is used to enable or disable the ability of Sugar Open Source to integrate data (such as Cases and Notes) with a Customer Self-Service portal. The initial implementation of this has been created using the Mambo portal.
The fourth section is used to enable or disable integration with SkypeOut—which enables users to click on phone numbers within the system to place outbound phone calls via the Internet.
The fifth section is used to enable the Sugar Mail Merge option—and should be checked only if the system is using a licensed copy of the Sugar Plug-in for Microsoft Word.
The Currencies screen is used to define currencies other than the US dollar. For each new currency defined, the name, symbol (for example $), exchange rate to the US$, and code (such as CAN for the Canadian dollar) must be entered. Note that each user can select his or her default currency in the User Management screen.
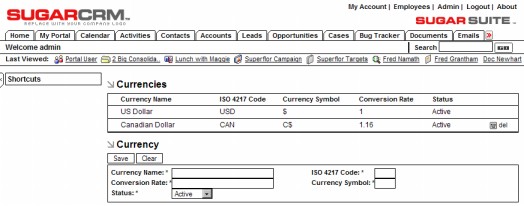
The Currencies Screen
Roles within SugarCRM serve the purpose of limiting the access of certain users within the system. When you select the Roles option from within the administration area, you will see the Roles List view screen. It lists the roles defined within the system, and also offers shortcuts to create a new role, or list roles by user.
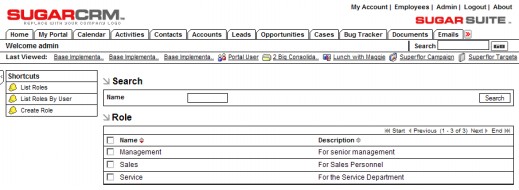
Roles List View
You can define roles for groups of users to specify which modules those users should have access to. For example—sales staff will want access to the opportunities and dashboard modules—marketing staff will want access to the campaigns module but not all staff will need access to these modules. As you can see in the figure overleaf, each role defines the modules which will be visible to the users assigned to the role, as well as the capabilities the user will have within each module.
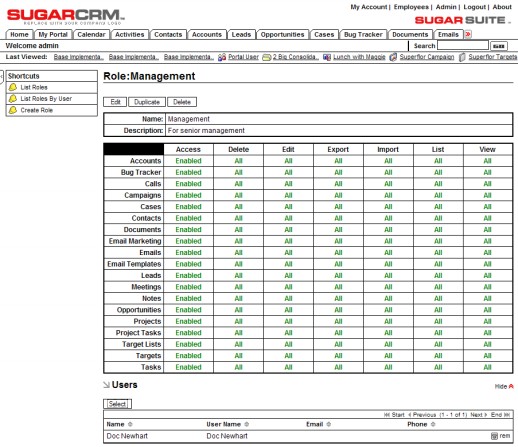
Role Detail View
To create a role, click the Create Role shortcut, type a name and a description for the role, adjust the modules the role can access and the functions that may be performed within each module, and then save the role. To assign users to a role, use the detail view for that role. In the Users sub-panel, click the Select button to display a list of users. You can check the user names that you want to assign to this role. Note that when a module is excluded from a role, access is also removed to the sub-panels in other modules that relate to the excluded module. Also note that if a user belongs to multiple roles, their access in each module is defined by the most restrictive access any of their roles are assigned.
Both system administrators and users can easily configure which tabs appear at the top of the application. In the Configure Tabs administration option, administrators can define which menu tabs will be available for all users, and which will effectively not be part of the installation.
Users can then modify their own personal tab settings in the My Account screen. Any tabs that an administrator removes cannot be added back by a user.
The Releases administration function is used to maintain the set of options available as selections on the Release drop-down box offered to users when reporting a new bug in the Bug Tracker module.
Each release entry consists of a release version, a status (Active or Inactive, where Inactive will remove it from drop-down lists) and the order in which it is to appear in the Release drop-down list.
To add new users to the system, or to edit user settings, select User Management from the main Administration screen. Note that system users may not be deleted. They may be made Inactive, or be recycled into a new user record, but not deleted. This system is designed this way principally to avoid having data in the system that is associated to a user that does not exist.
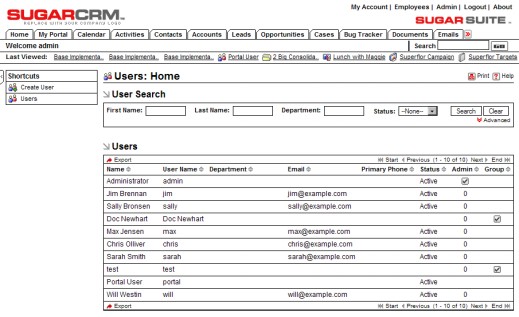
User Management Screen
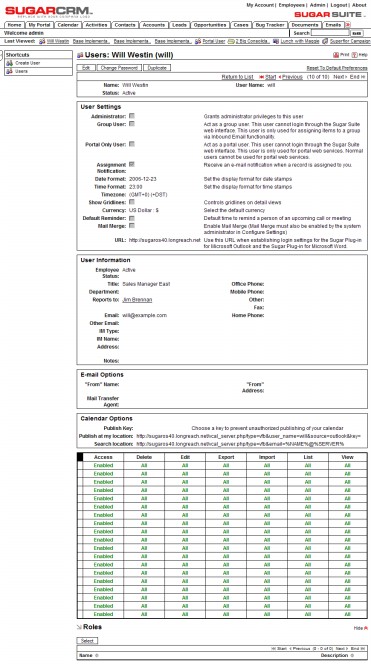
Use the Create User shortcut to define a new user. Once a new user has been defined, with all the information shown in the screen below, then a new password must be defined for that user, using the Change Password button on the User Detail screen. Then you should send an email to the user giving them the full login information—what URL to use, and their new user name and password. It is also a good idea to tell the user how to change their password, and the procedure to follow when they forget their user name or password.
The Administration home page shows a number of tools grouped together as the Sugar Studio. They include:
Field layout editor
Dropdown editor
Edit Custom fields
Configure tabs
Rename tabs
These tools collectively enable administrative users to perform a broad range of customization tasks, reducing the need for custom software development. For more information on these tools, see Chapter 5, which discusses these SugarCRM customization issues in detail.
The system administrator can manage mass email campaigns that have been created in the Campaigns module. Within SugarCRM, users may create email campaigns targeting large numbers of prospects utilizing an email template. Depending on the send date the creator assigns to the email campaign, the emails then wait in the email queue to be sent at the particular date and time.
As an administrator you can monitor these emails as they are sent. You can also delete emails that are waiting to be sent. You can view information on each email such as Campaign, Recipient Name, Recipient Email, From Name, From Address, User Name sending the email, Send On date, Send Attempts, and In Progress status.
You should note that the Mass Emailing Queue Manager only displays emails created through email campaigns, not emails created using the Email module.
To delete an email that is waiting to be sent, click the checkbox next to the email and click the Delete button. Click Check All to select all the emails in the list.
The mass email queue manager processes emails that are scheduled to be sent from within Campaigns. The templated emails are sent to their recipients by a PHP script that must be run on regular intervals to send out the emails at the appropriate time. The user specifies the email template in the Campaigns module, as well as the sender name, sender email address (recommended to be no-reply@<your company.com> or something similar), and the time and date to send the email.
When an email is processed, a link is appended to the end of the email for recipients to opt out of receiving emails. This will link back to a page on the same machine as your Sugar instance.
To use the mass email queue manager, you must first correctly configure the email settings covered in the administration section Configure System Settings. The mass email queue manager uses the same email server connection settings. Notifications do not necessarily have to be turned on, but the settings must be properly configured for recipients to properly receive emails.
As well, the system administrator must also use the Mass Emailer Campaign Settings option to set how many emails may be sent per batch, and the location of the campaign tracking files.
To use email campaigns within SugarCRM, the administrator must first enable the System Scheduler, and configure the Schedule list within the Scheduler option of System section of the administration home page.
The System Scheduler is enabled in two different ways—one for a Linux server, and another for a Windows server. For Microsoft Windows, you can use the Task Scheduler. For Linux, you can use cron.
For Linux, as a root user, type the following command at the shell prompt, replacing the path-to-sugar with your own path to the Sugar installation directory and replacing the apache with the proper username that the web server runs as (usually defaults to apache or wwwrun):
/echo “0,10,20,30,40,50 * * * * cd /<path-to-sugar>;
<path-to-php> ./scheduler.php” | crontab -u apache/
This will setup a cron job to check every 10 minutes whether any emails need to be sent out. If any do, the mass email queue manager will process the template and send an email out immediately to the recipient.
For Windows, as a user with Administrator privileges, go to Start > Settings > Control Panel > Scheduled Tasks. Double-click on Add Scheduled Task. When the Scheduled Task Wizard asks you for the program you want Windows to run, browse for the scheduler.php file under your path-to-sugar directory. Continue with the rest of the Wizard, making sure you click on the Daily option when asked when to perform this task.
Before you click on the Finish button for the Scheduled Task Wizard, check the box that says, Open advanced properties for this task when I click Finish. A new dialog box displays after you click Finish. Click on the Schedule tab, and then on the Advanced button. Check the box for Repeat task and specify every 10 minutes with duration of 24 hours.