

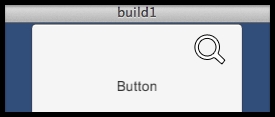
Cursor icons are often used to indicate the nature of the interaction that can be done with the mouse. Zooming, for instance, might be illustrated by a magnifying glass. Shooting, on the other hand, is usually represented by a stylized target. In this recipe, we will learn how to implement custom mouse cursor icons to better illustrate your gameplay—or just to escape the Windows, OSX, and Linux default GUI. The following screenshot shows a custom magnifying glass mouse cursor when the use's mouse pointer hovers over a Button:
For this recipe, we have prepared the images that you'll need in a folder named IconsCursors in the 1362_01_13 folder.
To make a custom cursor appear when the mouse is over a GameObject, follow these steps:
Add a Directional Light item to the scene by navigating to Create | Light | Directional light.
Add a 3D Cube to the scene, scaled to (5, 5, 5). Because it was created as a 2D project the cube will appear as a grey square in the Game panel (2D projects have an orthographic camera, so we won't see perspective effects).
Import the provided folder called
IconsCursors.Create a C# script class called
CustomCursorPointer, containing the following code, and add an instance as a scripted component to the Cube GameObject:using UnityEngine; using System.Collections; public class CustomCursorPointer : MonoBehaviour { public Texture2D cursorTexture2D; private CursorMode cursorMode = CursorMode.Auto; private Vector2 hotSpot = Vector2.zero; public void OnMouseEnter() { SetCustomCursor(cursorTexture2D); } public void OnMouseExit() { SetCustomCursor(null); } private void SetCustomCursor(Texture2D curText){ Cursor.SetCursor(curText, hotSpot, cursorMode); } }With the Cube item selected in the Hierarchy panel, drag the
CursorTargetimage into the public Cursor Texture 2D variable slot in the Inspector panel for the Customer Cursor Pointer (Script) component.Save the current scene, and add it to the Build.
Build your project. Now, run your built application, and when the mouse pointer moves over the grey square of the Cube, it will change to the custom
CursorTargetimage that you chose.
You have added a scripted object to a cube that will tell Unity to change the mouse pointer when an OnMouseEnter message is received—that is, when the user's mouse pointer moves over the part of the screen where the cube is being rendered. When an OnMouseExit event is received (the users mouse pointer is no longer over the cube part of the screen), the system is told to go back to the operating system default cursor. This event should be received within a few milliseconds of the user's mouse exiting from the collider.
There are some details that you don't want to miss.
Unity 5 UI controls do not receive the OnMouseEnter and OnMouseExit events. They can respond to the PointerEnter/Exit events, but this requires adding the Event Trigger components. To change the mouse pointer when the mouse moves over a UI element, do the following:
Add a UI Button to the scene.
Add an instance of the C# script class called
CustomCursorPointerto the button.With Button selected in the Hierarchy panel, drag the
CursorZoomimage into the public Cursor Texture 2D variable slot in the Inspector panel for the Customer Cursor Pointer (Script) component.In the Inspector view, add an Event Triggers component to the Button. Choose menu: Add Component | Event | Event Trigger.
Add a Pointer Enter event to your Event Trigger component, click on the plus (+) button to add an event handler slot, and drag the Button GameObject into the Object slot.
From the Function drop-down menu, choose CustomCursorPointer and then choose the OnMouseEnter method.
Add a Pointer Exit event to your Event Trigger component, and make it call the
OnMouseExit()method from CustomCursorPointer when this event is received.Save the current scene.
Build your project. Now, run your built application and when the mouse pointer moves over the Button, it will change to the custom
CursorZoomimage that you chose.