

Networking is a broad subject that would take more than this chapter to cover in full detail. Since you can learn Java networking from the official Java tutorials, let's focus on jMonkeyEngine-specific networking advice here in this appendix.
This is a common question asked by developers who design their first network game: How do I best separate the code between client and server?
In general, the server generates game events, such as a swarm of enemy NPCs spawning, random encounters, or quest masters handing out missions. To keep track of the game world, the server centrally maintains all data about objects and characters—these are your game entities. If the game uses JME physics, the server also maintains a master scene graph, but it does not render it. Rendering is the client's job.
The client receives and stores updates from the server. Each client renders its own scene graph from the point of view of its player. Design your game so that the code treats all characters as abstract remote players—this includes the local player too. Some characters are remote-controlled by the server, others by other clients––and one of them happens to be controlled by the local user's input. The only difference between them is that the client's camera follows the player-controlled character.
The server does not care what visual and auditory feedback are like. The server merely broadcasts that a certain event has occurred. It's the client's job to change icons, to play sounds, animations, or particle effects—whatever feedback is needed to convey the event to the player.
Similarly, each client deals with local user options, such as input trigger settings. The client resolves the trigger mapping and sends only the mapping name of the action back to the server. The server does not care at all about the actual input triggers (which depend on the local player's keyboard layout or personal preference).
Each client renders the scene according to their user's settings. This means that different users can play the same game over the same server with different video/audio settings. Remember, the server doesn't care; it only broadcasts the game state—only the client renders the game state from the point of view of its user. For example, you can let users with old hardware switch to the SimpleWaterProcessor, instead of using the full-featured WaterFilter effect.
Contrast these local settings with global settings such as the selected map, team contest type, or dungeon difficulty. In multiplayer games, game-wide settings are not user options, but server session settings. For example, the player hosting the game server specifies session settings, globally for all clients, before the game starts.
Certain application states are relevant only to the client. For example, when a player toggles to the SettingsScreenState, this client is simply idle from the point of view of the server. Application states that manage loading the world and implementing gameplay, on the other hand, are relevant only to the server.
Similarly, some custom controls are relevant only to the client. Think of a HudControl or AnimationControl. The server must know whether an avatar walks, jumps, or stands––but it does not care what the avatar or HUD looks like while doing that. Other controls may be relevant only to the server. Examples include pathfinding controls for computer-controlled enemies.
Imagine a network game where each client runs its own physics simulation. One player jumps and the client broadcasts this action to the server, which passes it on. A few fractions of a second later, other clients begin to calculate the jumper's trajectory. In their copy of the world state, however, this player walked a fraction of a meter farther before jumping. Their trajectories begin at different spots with a different speed. You can easily guess that in such a setting, the clients' states will divert quickly.
There are three ways how you can keep your physics simulation synchronized in a network game:
Centralized physics: The clients send all user input to the server. The server calculates a scene graph with dynamic, static, and kinematic nodes and simulates physics centrally. The server continuously broadcasts new locations to the clients. Each client maintains its own non-physical (kinematic) scene graph to display the state.
Decentralized physics: Server and clients each take on part of the physics simulation.
In the client's scene graph, the local player is represented as a dynamic node, and all other players and NPCs are kinematic nodes. The kinematic nodes are controlled by broadcast messages from the server. The client sends the location of its dynamic player to the server, which broadcasts it to all other clients.
In the server's scene graph, conversely, NPCs are represented as dynamic nodes, and all players are kinematic nodes. A kinematic player's transformation is updated on the server every time its client sends a new location message.
Hybrid physics: Physics run in full mode on both the client and server, and they synchronize every so often. This way you get fast simulations on the client, independent of network lag. The downside of this approach is that you must force regular synchronization to ensure that the server remains authoritative over the player's location. If you don't find a smooth synchronization strategy, this can result in annoying jerks and jumps for player characters.
Tip
Decentralized physics has its advantages, but it makes hacking the game very easy, because the server has to trust the clients. If players are authoritative over their location, they can essentially teleport to any location in the world. However, it depends on your game type whether that is an unfair advantage—or an irrelevant fun trick.
Every networked game has one host that runs the server. The host can either be a dedicated public machine, or you can allow players to host games locally. Here are your options:
Dedicated server: A company provides a machine or cluster that can handle a large amount of connections. All players play on the same host together. The game world on the central host is typically persisted in an entity database.
LAN server (also called listen server): The player with the fastest hardware and connection volunteers to run a game server in addition to running his game client. In this setup, many smaller groups of players play their own instances of the game in their LAN (local area network). These temporary instances of the game world often last only one round; characters may or may not be persisted.
If you choose to maintain one central server, you can configure each client to connect to the server address directly. Typically, you would implement this as a "Connect" button on the start screen. If your game has several dedicated servers, your user interface should present the player with a list of servers to choose from.
When you write a multiplayer game that lets users run LAN servers, you should design a user interface to negotiate local games. In the typical LAN game, all players first start their clients. One player presses a "Create network game" or "Host multiplayer game" (or similar) button, which starts the server. The others then click on a "Join network game" or "Join multiplayer game" button and connect to this server. It's a nice feature to make the host broadcast its address to the LAN so clients can connect to the server immediately. Alternatively, provide a login screen where players can type in the host's address manually.
Other network games offer a meet-up server. A player's game server connects to the meet-up server and publishes its address and port there. Players start their clients and connect to the meet-up server to get a list of available game servers. Clients pick a host from the meet-up board and the game starts when enough players are present. In this setting, the meet-up server does not simulate any gameplay, it just maintains the list of active game servers.
Designing a networked game is a lot of work. There will always be hackers who enjoy the challenge of reverse-engineering your client-server communication. The catch is, if you can remote-control the game world by sending messages, then—theoretically—everyone can.
If the message is formed correctly, the server cannot tell whether it was sent by a legal or illegal source. Griefers fabricate messages that waste game resources and disrupt their fellow players. Cheaters fabricate messages that make their own characters rich, strong, invincible, and (of course) handsome.
The most reliable way to prevent cheating and griefing is to centralize all authority. Ideally, the client sends only plain user actions to the server. The server simulates all gameplay and tracks the score. Then, the server broadcasts to all clients what they should see. Even if cheaters send a flood of messages pretending to perform tasks at super-human speed, you can write heuristic tests that detect and ignore messages that are implausible.
It is often easier to learn complex concepts such as networking from actual code. This is why the jMonkeyEngine team has created MonkeyZone, a proof-of-concept demo of a network game. MonkeyZone loads a simple wireframe scene where players and NPCs interact. Players can shoot, drive a vehicle, and prompt an NPC to follow or walk away. Several players can connect to the same interactive world. Each player gets paired up with an NPC character.
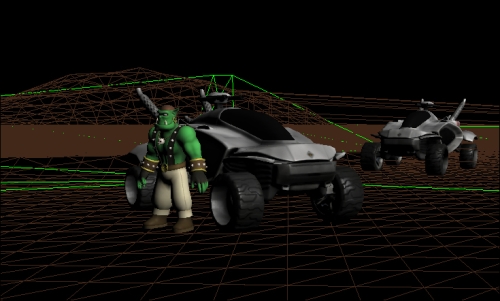
When a human player presses a button, or an NPC performs a game action, this action is sent to the server. The server calculates the game logic, determines the new state, and broadcasts the results to all clients. The AI code that determines when an NPC acts and where it goes is executed on the client, and the results are sent up to the server. Both clients and server run parts of the physics simulation. The server sends regular authoritative synchronization messages to prevent drifting.
Let's see how much effort is needed. An experienced Java developer wrote this demo in a week using the jMonkeyEngine SDK and the BasicGame project template. The open source code follows best practices and showcases synchronization between jBullet Physics and the SpiderMonkey API. The project design makes it possible to edit maps, vehicles, and so on, in the jMonkeyEngine SDK. This allows model designers to contribute artwork more easily without having to change any code.
The MonkeyZone source code is available from our GoogleCode Subversion repository. You can check out a copy using any Subversion client. The following example uses the Subversion integration in the jMonkeyEngine SDK.
Choose Team | Subversion | Checkout from the menu.
Enter the SVN URL https://monkeyzone.googlecode.com/svn/trunk/.
Wait for the project to download and open it in the SDK when prompted.
Right-click the project node to build the project.
Run the server first (
com.jme3.monkeyzone.ServerMain), and then one or more clients (com.jme3.monkeyzone.ClientMain).
Feel free to look at the code and re-use it for your own multiplayer games!