

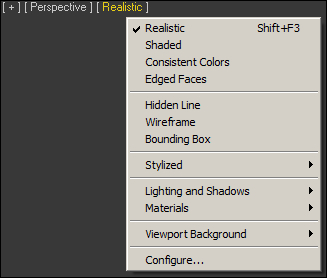
There are several viewport display modes that can be accessed by the label in each viewport, shown in the following screenshot:
If you open a scene such as Packt3dsmax\Chapter 1\Begin.max, you usually see four views and the orthographic views are shaded differently to the Perspective view. This can be changed. Press F3 in the Perspective view. The view changes to Wireframe. Press it again; the view changes back to Shaded mode. In Shaded mode, press F4 to turn on and off Edged Faces. The following screenshot shows clockwise: Hidden Line, Wireframe, Shaded, and Realistic.
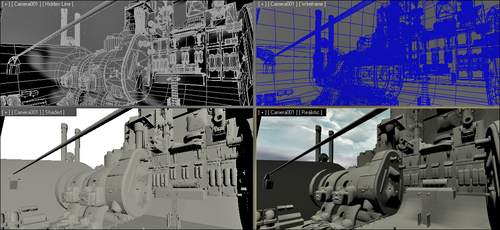
There are several intermediate ways to shade the view, including Hidden Line, which shows only the Wireframe directly facing the camera, culling the rest; and Flat Shaded, which removes any surface smoothing (so a Sphere's facets would all appear flat or faceted instead of round).
3ds Max 2012 introduced a Realistic shading mode that supersedes the Shaded shading mode in earlier versions. This is a technology update that allows faster shadow computation; therefore, faster view spinning, better texture resolution, and better lighting.
By default, views are lit using virtual, hidden lights you can't edit. Once you add your own lights (and in this scene there is a Daylight System), you can set the view to render those, which helps you design shadow casting and so on. To adjust this, go to the View menu and choose Viewport Configuration where the Visual Style & Appearance tab should be displayed (or you can swap to it). Look on the right-hand side to the Lighting and Shadows section. For the Illuminate with option, click on the Scene Lights radio button.
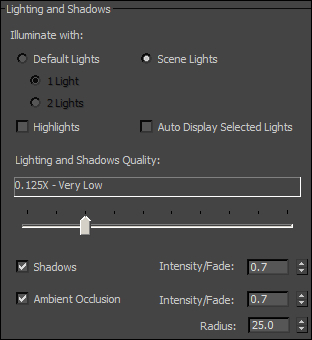
Here you have a few additional options. Turning off Highlights will prevent glare from glossy surfaces, so you can always see the edged faces on a surface. Sometimes it is nice to model with a glossy surface to help view the form changes, but often it means you'll not be able to tell what you are doing as the highlight eclipses the mesh wireframe. You can raise or lower the Lighting and Shadows Quality, where lower values calculate faster (often without an apparent drop in visual quality). You can also tick on Shadows and Ambient Occlusion checkboxes, and set their Intensity/Fade, which works well around 0.7 so that shadows are not black.
Neutral, consistent colors tend to be the easiest to look at when viewing un-textured models. By default, 3ds Max applies random colors to each new model. The shaded surface and wireframe share this color. Sometimes, the viewport lighting causes surface shine to obscure some of the mesh edges, as shown in the following screenshot on the left-hand side:
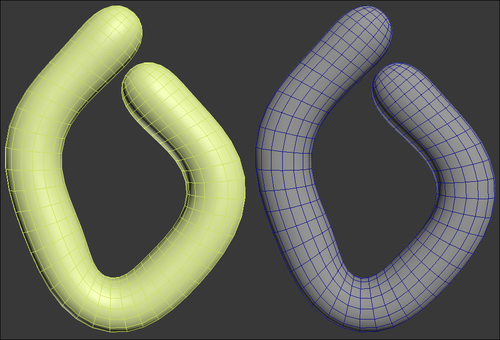
In this section, we'll change this so all models get the same wireframe color and have a neutral gray material, as shown on the right-hand side in the preceding screenshot:
Open the Material Editor (M). In 3ds Max 2012, you should see a version of the Material Editor called Slate. The legacy Compact Material Editor is still available, but for now Slate will do fine. Right-click in the Slate View1 canvas and choose Materials | Mental Ray | Autodesk Generic. This assumes you have iRay set as your renderer, which is also the installation default. If not, you can set a Standard Material instead.
The Autodesk Generic Material defaults to a dark gray color, which is possibly a bit heavy. To change this, double-click on the Material node and notice that on the right the Default Generic properties display. In the Generic section, under Color | Use Color, there is a color picker and you can adjust it to a mid-gray: Hue=
0, Sat=0, and Value=0.5. Click on OK.Now you can assign the Material Model to objects in the scene when you press Ctrl + A in the scene, then right-click on the Material node and choose Assign Material to Selection or press the icon
 in the editor icon row. Materials that are assigned to a selected object are displayed in the Material Editor with white corners around the sample preview, as shown in the following screenshot:
In 3ds Max 2013, dotted white edges appear around a node that is showing its parameters in the Parameter Editor panel on the right-hand of the Material Editor.
At the top of the Material properties panel, you can name this material
Modelin the text field. We'll discuss more about the Material Editor later in Chapter 3, The Base Model – A Solid Foundation in Polygon Modeling.Although this material is a neutral gray, it doesn't affect the wireframe displayed; it can if you access the Display tab of Command Panel and choose Display Color | Wireframe | Material Color. A better way to display the model, however, is to have the surface shaded with the Material color and the Wireframe set to the Object Color.

Click on the color picker to the right-hand of the object name, which is
Box001, and the following dialog will pop up:
Choose a dark color, such as the blue color, as shown in the preceding screenshot, in the Current Color slot. A light color may reflect scene light and make it difficult to tell what is going on, especially when you are zoomed in on a model.
Uncheck the checkbox for Assign Random Colors, so that each newly created object gets the same color.
You can still change colors, but do so in a logical way. Set your own classifying criteria, such as all animated objects are dark green and all static objects are blue. This is easiest to set after creation.