

Gameplay
The game will start with the player in the center of the game world. The Hero, controlled by the player, will need to defend the Base from the Enemies. To fend off the Enemies, the Hero will have a starting number of bullets. The goal is to defeat all the Enemies before the Base is completely destroyed by them.
Let's look at how we will make all this happen. The following gameplay components are covered in this section:
- Game-world layout
- Starting condition
- Ending condition
- Point system
- Heads-up display (HUD)
We will cover each of the preceding components and discuss how they change the game experience. Let's start by talking about how the game world will be designed.
Game-world layout
We will create our base environment, which consists of large metallic floor tiles, walls, doors where the enemies will be spawning, and our base building at the bottom part of the screen, where the enemies need to reach to start attacking it.
Here is a mock-up of the shape our game world will take:
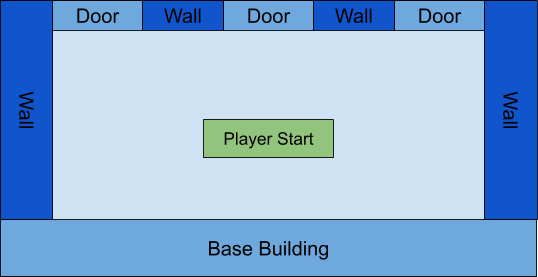
Figure 1.4 – Base layout
There are four basic things illustrated in the preceding mock-up, listed as follows:
- Wall: Impenetrable barriers that prevent the player from going outside the play area.
- Door: Impenetrable as the walls but will also serve as the Spawn Position of the Enemies. The Enemies will spawn behind them and can penetrate them to enter our Base Area.
- Player Start: Start Hero position.
- Base Building: Our Base. The enemies must be close enough to attack it.
With our base level design finished, let's discuss how the player will enter that world in a gentle way.
Starting condition
When our game is first launched, we will have several starting conditions set. Here is a list of those conditions:
- Number and placement of Enemies' Spawn Points (doors)
- Number of bullets held by the Hero
- Placement of the Base
Let's look at each of these starting conditions:
- The first starting condition is where to spawn Enemies. As you saw in our earlier mock-up, there will be several possible spawn points in the game (the doors). We will write a script to spawn waves of the enemies in random spots each time. Each wave will increase the number of enemies to increase the difficulty.
- The number of bullets held by the player must be carefully thought through. It needs to be big enough to defeat an enemy before they run out.
- Our third and final starting condition is the base placement. As you can see from the preceding screenshot, this is placed on the opposite side of the doors—so, the enemy must traverse the whole empty space between them, giving the player a chance to attack them.
We have defined the enemy spawning rules and how the player can play the game. Now, let's talk about how the game will end, looking at the exact implementation of this.
Ending condition
So far, we have established that we will track several components in the game. Let's remember them—they are as follows:
- Remaining Waves
- Base Health
- Player Health
Based on what we decided earlier regarding the end-of-game condition, we can apply the following mathematical checks to determine whether the game has ended and what the outcome is. Each end-of-game condition is listed in the following table, along with the outcome:
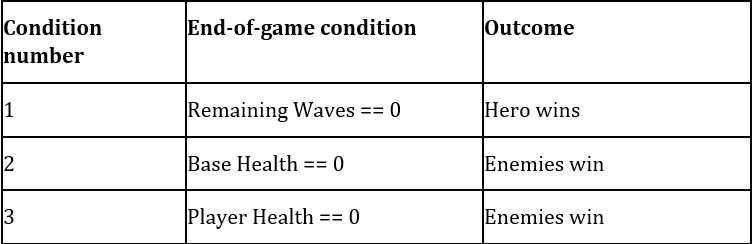
Figure 1.5 – End-of-game conditions
In order to implement these three end-of-game conditions, we know we must track the number of waves, the player health, and the base health. This is mandatory.
Now that we have a full game, let's think about how we can make it more rewarding, by implementing a classic point system.
Point system
Since we are tracking key information that involves numbers, it makes it easy for us to implement a point system. We could, for example, give the player 50 points each time an Enemy is exterminated or we could also take away points each time an Enemy damages the base. In our case we will settle with just giving points when Enemies are killed, but you can feel free to expand this area if you want to.
Now, we have several systems that the player needs to be aware of, but right now, the player hasn't any way to make informed decisions about those. So, let's see how we can improve that, using an HUD.
HUD
We have decided to keep track of information during gameplay that has value beyond calculating points and the end of the game. The player will want to see this information as it tends to provide motivation and adds to the fun of the game. So, we will create an HUD for the player, and dynamically update the data in the game.
Information Box:
An HUD is a visual layer of information that is always present on the screen.
Here is a mock-up of what our HUD will look like in our Super Shooter game:
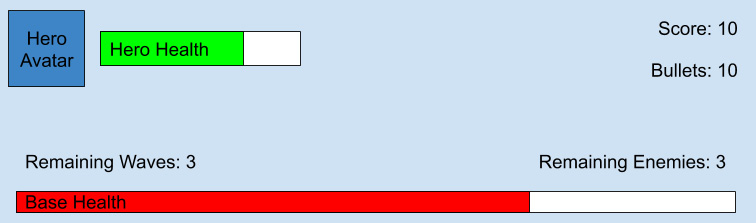
Figure 1.6 – UI layout
As you can see, there are several components to our HUD, as follows:
- Hero Health: A classic health bar that allows us to see visually the amount of life left. We choose a bar instead of a number because it is easier to see in the middle of an intense fight, instead of reading a number.
- Hero Avatar: An image next to the health bar just to show our Hero's face.
- Score: The number of points we have gathered.
- Bullets: The number of bullets remaining. The player must check this number frequently to avoid running out of bullets.
- Remaining Waves/Enemies: Info about the current state of the wave and game, just to let the player know when the game is going to end, putting some pressure on them in the process.
- Base Health: Another important piece of information. It's of sufficient size to let the player notice when the base is being attacked, and take action in that case.
Finally, we have a fully fledged game with lots of rules and specifications about how it will behave, and we can start creating our game right now. However, there's a good practice that it's never too soon to implement: balancing the game.