
We are now going to place some objects in the layout and modify their properties.
1. Open your blank game project from last time, or if you feel like getting some more practice, create a new one.
2. Right-click inside the layout editor, and click the Insert an object option shown in the following screenshot. This can also be done by double-clicking on a blank space of the layout.

3. We now have the following object creation box where we can see all the types of objects we can insert into the layout. These are pre-programmed objects created in C++. Select the Sprite object and click on Insert. This can also be performed by double-clicking the Sprite object. Now, we can click inside the layout to place the sprite object.

4. We are then shown an image editor for our sprite. For now, we will make a simple square graphic as shown in the following screenshot. To do this, click the paint bucket, choose a color, and then click an empty space in the graphic space.

5. Now, click the x button to return to the layout editor. Click on Yes when asked to save, and we will now have a sprite in our layout as shown in the following screenshot:

6. We can use the white box in the middle to change the angle of our sprite and the boxes on the edge of the sprite to change its size. Try matching the following shape:

7. Now, open the Properties box on the left side, and scroll down to the option Make 1:1 in the Properties group. Clicking on this will make our sprite return to normal size again, as in the following screenshot:

8. We now know how to resize and rotate the sprite object. We can also do this by modifying the values in the Common group. Open this group and try changing the X, Y, Width, Height, Angle, and Opacity fields to see what they change. It is worth noting that a lower opacity value makes the sprite object more transparent, and recently changed values will be shown in bold.

9. We can also give our sprite object a name just by changing the Name box. This is useful, as later we will be using many different sprite objects to create our games. For now, scroll down in the Properties box to view another group called Appearance; toying around with the values Skew X and Skew Y produces distortions, shown in the following screenshot. Notice that the selection box for the sprite does not skew with the sprite itself.

10. We can also tick the Invisible on start checkbox. This lets the graphic be shown in the editor, but hidden when the game is run. This is good for making invisible walls and other such objects.
We have now just learned to create objects such as sprites, move them around, and modify their appearance using the editor. Let's look at the different subtasks we went through to do this.
We learned how to bring up the object creation box and then insert a sprite into our layout. Every object we put into a layout is available in this dialog box.
Although we only had a quick interaction with the graphic editor, we saw where our graphic files are drawn and modified. If we wanted, we could even copy-and-paste graphics from other drawing programs into the editor. It's worth noting that some painting programs may copy images differently than Construct Classic expects. Should this happen, pasting into Microsoft Paint first and then transferring that image to Construct will avoid these problems, but will not keep alpha levels.
Each drawing tool that we can use in Construct Classic has a brief informative message in the bottom-left corner of the graphic editor to explain its purpose. However, let's take a look at some of the other controls used to draw graphics in Construct:
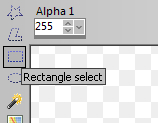
The Rectangle select tool, as shown in the previous screenshot, is used to drag-and-select rectangular chunks of our graphics to move, rotate, scale, cut/delete, copy, paste, change the color of, and flip.

The Wand tool, as shown in the previous screenshot, is used to automatically select parts of the graphic that touch and have similar colors. Holding Shift and clicking will select all parts of the graphic with similar colors regardless of whether or not they are touching.

The Pen Tool, as shown in the previous screenshot, lets us draw on our graphic as if we were using a pencil.

The Brush tool, as shown in the previous screenshot, is similar to the Pen tool, except it has a much larger amount of options that can be changed using the sliders.

The Erasor Tool, as shown in the previous screenshot, is used to erase and has the same options as the Brush Tool.

The Mirror tool, found at the top of the window, as shown in the previous screenshot, is used to flip an image or selection horizontally.

The Flip tool is used to vertically flip the image or selection.

The Rotate tool, as shown in the previous screenshot, provides a choice of angles for the image or selection to be rotated.

The Crop tool is used to shrink the editable region of the graphic (the canvas) to fit the graphic. Use this if you draw something smaller than the boundaries.

The Resize Canvas tool, as shown in the previous screenshot, is used to increase or decrease the size of the canvas by showing a pop-up box that lets you input a new height and width for the canvas. The drawing itself is not resized, however.
We then learned how to modify our sprite using stretches, skews, and rotations. Changes we made here are shown when we run the game.
Now that we have gone through the process to create a sprite, try adding some more to form a picture from them. If you are stuck thinking of ideas, then try some of these:
A house made up of separate sprites for the roof, base, windows, and door
A magician with additional sprites for a staff and a wizard hat
A car with sprites for the tires and a body sprite