
Navigating in SketchUp Pro
Navigation is required in all steps of a SketchUp workflow, from drawing and editing to visualizing the model. The primary navigation tools can be found on the Getting Started Toolbar, and these are the Orbit, Pan, and Zoom tools. While we will discuss how to use these tools, we will also discuss the relevant keyboard and mouse shortcuts that can be used to activate these tools. Using the keyboard and mouse shortcuts will drastically increase modeling productivity for all tools, but especially for the navigation tools.
We will also explore some other ways of navigating through SketchUp, which includes introducing the Views Toolbar, Zoom Extents, Zoom Window, and Zoom Previous. While these options are used far less than Orbit, Pan, and Zoom, they all have unique use cases that you could find helpful as you navigate your SketchUp models.
Note
The Orbit, Pan, and Zoom tools all use the scroll wheel on a 3-button mouse. Please make sure that you are using a 3-button mouse while using SketchUp Pro. When the tools are described, “scroll” means to roll the scroll wheel, and “press” means to click down and hold the scroll wheel to use it like a button.
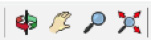
Figure 1.13: Orbit, Pan, Zoom, and Zoom Extents on the Getting Started Toolbar
Orbit
The Orbit tool is the most essential tool for working effectively in SketchUp. SketchUp requires that the drawing area camera be placed at specific angles to create and edit geometry, and orbiting the camera is a quick way to align your view with the desired modeling result.
The Orbit tool button looks like a vertical black line being “orbited” by red and green arrows:

Figure 1.14: Orbit Tool Button
The Orbit tool can be activated by doing the following:
- Clicking the orbit button
- Pressing the left mouse button
- Moving the mouse
Or, at any time (including while using any other tool), the Orbit tool can be activated by doing the following:
- Pressing the scroll wheel
- Moving the mouse
Pressing and dragging using the middle mouse wheel is the most common and effective way of using the Orbit tool!
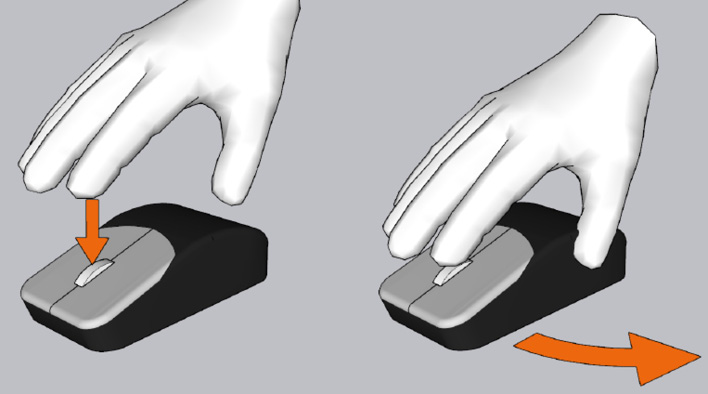
Figure 1.15: Orbit Tool Reference Guide for 3-Button Mouse
Tip
Try moving the camera with the Orbit tool! It will take some practice. Orbit will always rotate the camera around the middle of the screen, so it is best to practice using Orbit alongside the Pan and Zoom tools.
Pan
The Pan tool is a perfect companion to the Orbit tool. While the orbit tool rotates the camera, the Pan tool moves the camera laterally from side to side or up and down. This means that you will always face the same direction when using the Pan tool while the camera slides around the 3D environment.
The Pan tool button is an open hand:

Figure 1.16: Pan Tool Button
Just like the Orbit tool, the Pan tool can be activated by doing the following:
- Clicking the Pan button
- Pressing the left mouse button
- Moving the mouse
Or, at any time (including while using any other tool), the Pan tool can be activated by doing the following:
- Pressing the scroll wheel
- Pressing Shift at the same time
- Moving the mouse
Just make sure that you hold down Shift at the same time as the mouse scroll wheel while you move the mouse to pan!
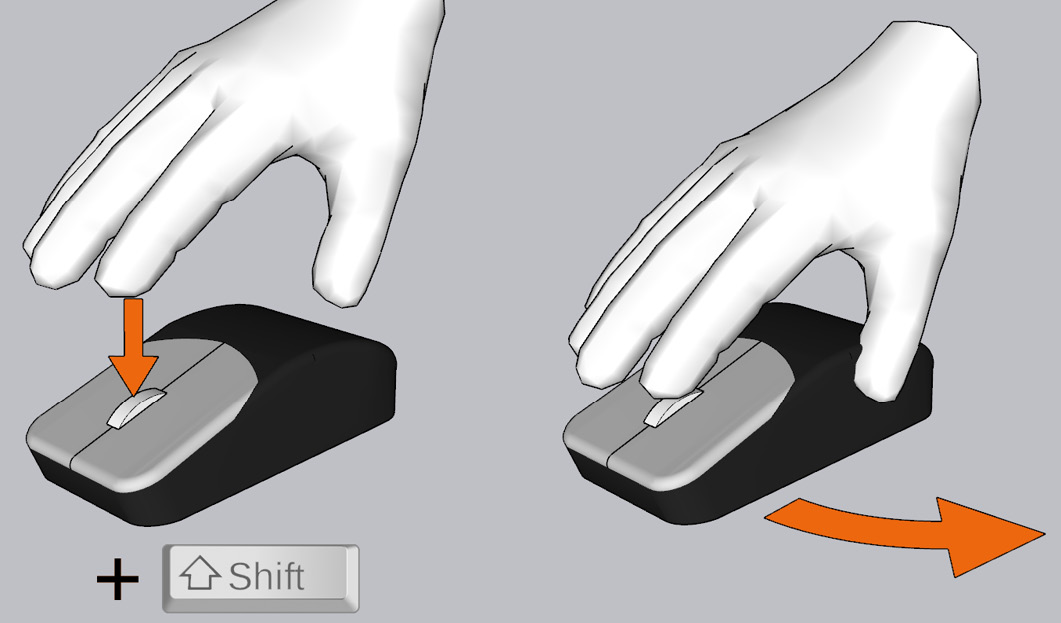
Figure 1.17: Pan Tool Reference Guide for 3-Button Mouse
Tip
The Pan tool and the Orbit tool work the same way with the 3-button mouse; just add Shift to activate the Pan tool! You can even try holding the scroll wheel and alternating between pressing Shift and releasing Shift to switch back and forth between Orbit and Pan. Note, however, that this method is not commonly used in professional workflows.
Zoom
The Zoom tool is the third primary navigation tool alongside the Orbit and Pan tools. While Pan and Orbit move the camera side to side, up and down, and around objects in the drawing area, the Zoom tool moves the camera in and out. The Zoom tool is not moving the objects – it is sliding the camera!
The Zoom tool button is a magnifying glass. There are other zoom tools, and these also have a magnifying glass, but the Zoom tool is the tool with only the magnifying glass:

Figure 1.18: Zoom Tool Button
The Zoom tool is easy to use! The Zoom tool can be activated by doing the following:
- Clicking on the button
- Pressing the left mouse button
- Move the mouse up and down
Or, at any time (including while using any other tool), the Pan tool can be activated by scrolling the mouse scroll wheel:
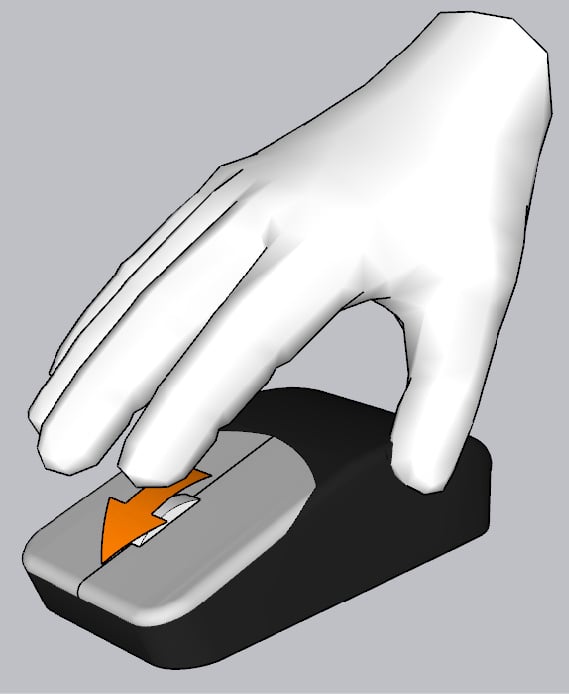
Figure 1.19: Zoom Tool Reference Guide for 3-Button Mouse
Tip
Scrolling the wheel “up” will zoom in and scrolling the wheel “down” will zoom out. Pointing the mouse button at Geometry on the screen will make SketchUp zoom quickly, and pointing the mouse at empty space will make SketchUp zoom slowly. Try this for yourself!
Field of View
The camera in SketchUp Pro has a default Field of View value of 35.00. When activating the Zoom tool, you will see the Measurements Box update to have a Field of View value.
The Field of View can be changed by using the Field of View tool in the Menu Bar under the camera. In SketchUp Pro 2023 a Field of View button was added to the Large Tool Set Toolbar:

Figure 1.20 Field of View Button on the Large Tool Set Toolbar
The Field of View can be adjusted by pressing and holding the Left mouse button and dragging up or down to change the field of view.
Alternatively, the Zoom tool can activate the Field of View tool. Do the following:
- Pressing and holding Shift
- Pressing and holding the left mouse button
- Moving the mouse
Field of View can be changed at any time while you are modeling, but it is not recommended to do so unless it is necessary for the project.
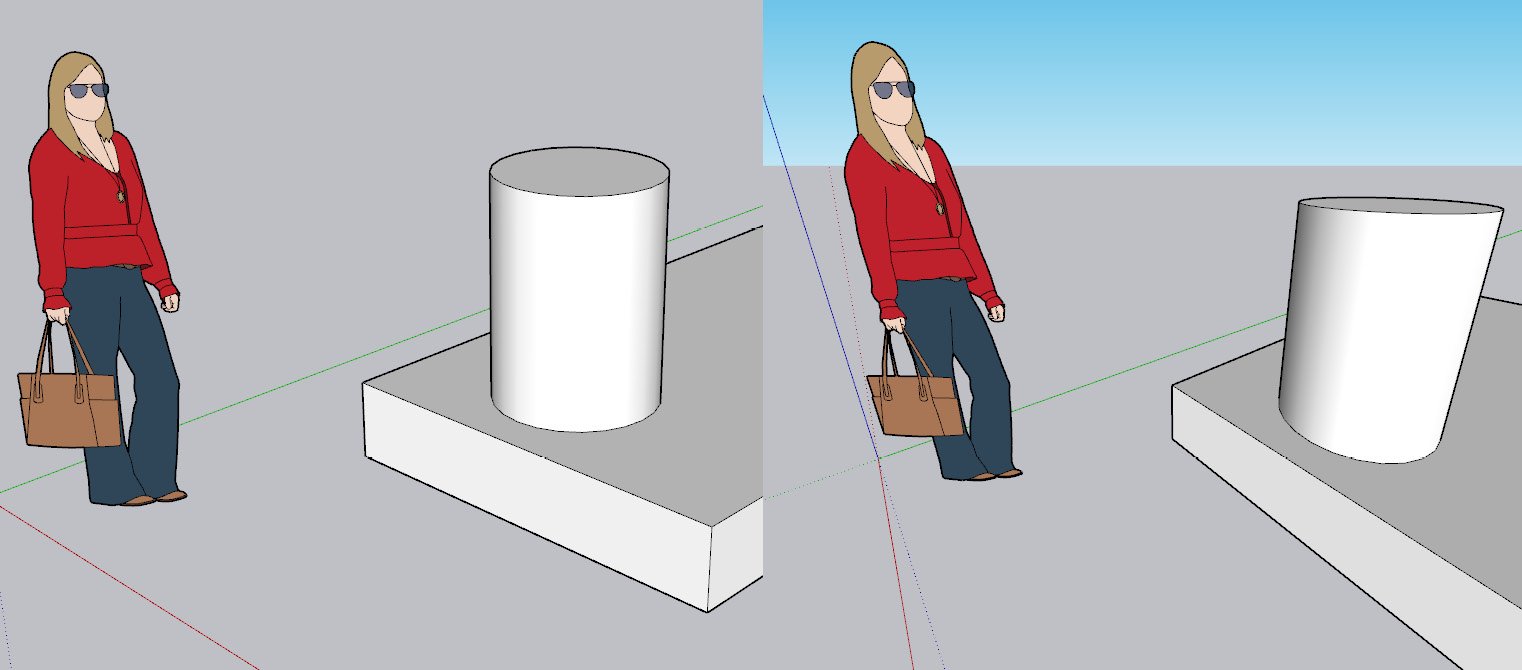
Figure 1.21: Standard Field of View of 35.00 (Left) and Extreme Field of View of 100.00 (Right)
Note
SketchUp workflows will often involve getting the right camera angle for a tool or process. Using Orbit, Pan, and Zoom in concert will allow you to set up your camera view for each workflow. This takes patience and practice!
Zoom Extents
Zoom Extents is a fast way to automatically adjust Zoom and Pan to fill the drawing area with all visible geometry. This means that you will see your whole model very quickly! The camera view will not be orbited when using Zoom Extents.
The Zoom Extents tool button looks like a magnifying glass with three red arrows:

Figure 1.22: Zoom Extents Button
Zoom Extents has a slightly more complicated keyboard shortcut, Ctrl + Shift + E, so it is suggested to use the toolbar button to activate this zoom option.
Views Toolbar
The Views toolbar includes six tools, Iso (Isometric), Top, Front, Right, Back, Left, and Bottom:
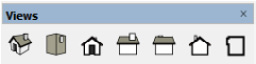
Figure 1.23: Views Toolbar
These tools change the camera view like Zoom Extents. The updated view will change the zoom level slightly, but it will also orbit the camera view to align with the original drawing coordinates. These standard views may be helpful when modeling, as they will quickly zoom to show all geometry, and move the camera around to different angles:

Figure 1.24: Model Shown at a Random Angle (Left) and Model at Front View (Right)
Note
Zoom Extents and Views are not the same tool, but they are very similar! You may never need to use the standard Views while modeling, but it is suggested to try to use Views and Zoom Extents. We will discuss more views and camera options in Chapter 5.
Other Zoom Tools
Two additional Zoom tools can be found on the Large Tool Set. These are Zoom Window and Zoom Previous Tools. Zoom Window will allow you to drag a window to zoom into a specific section of your model. Zoom Previous can be clicked to move back through your recent camera views. This can be very helpful when setting up Scenes.

Figure 1.25: Zoom Window (Top) and Zoom Previous (Bottom)
Active Tools while using Navigation
SketchUp allows for all navigation tools to be used while in the middle of using any other tool. This includes when you are drawing or editing geometry in the model! All six tools, Orbit, Pan, Zoom, Zoom Extents, Zoom Window, and Zoom Previous, can be used without interrupting the editing tools.
We will look at a few examples using the Push Pull Tool. You do not need to follow along with these examples; they are just provided for context. We will talk about the Push Pull Tool in more detail Chapter 4, Drawing Tools: We Begin Modeling!.
In this first example, we start with a circle drawn on a box. After activating the Push Pull Tool, we want to orbit the camera angle to see the geometry from a different angle. Using the 3-button mouse shortcut, the orbit tool is activated, and the camera angle is changed. When the 3-button mouse shortcut is released, SketchUp resumes the Push Pull tool.

Figure 1.26: Starting the Push Pull Tool (Left), Orbit (Middle), Pan, and Zoom (Right)
Note
In the example, the Push Pull tool was not cancelled while the view was changed with the navigation tools! You can even use the toolbar buttons, but you must click the same creation or editing tool to resume the workflow without canceling the tool.
In this second example, we are using Push Pull on the circle again. After activating Push Pull on a new camera angle, the Pan tool is selected from the toolbar. When the camera has been panned into the location that we want, Push Pull can be reactivated from the toolbar and the workflow will be resumed.
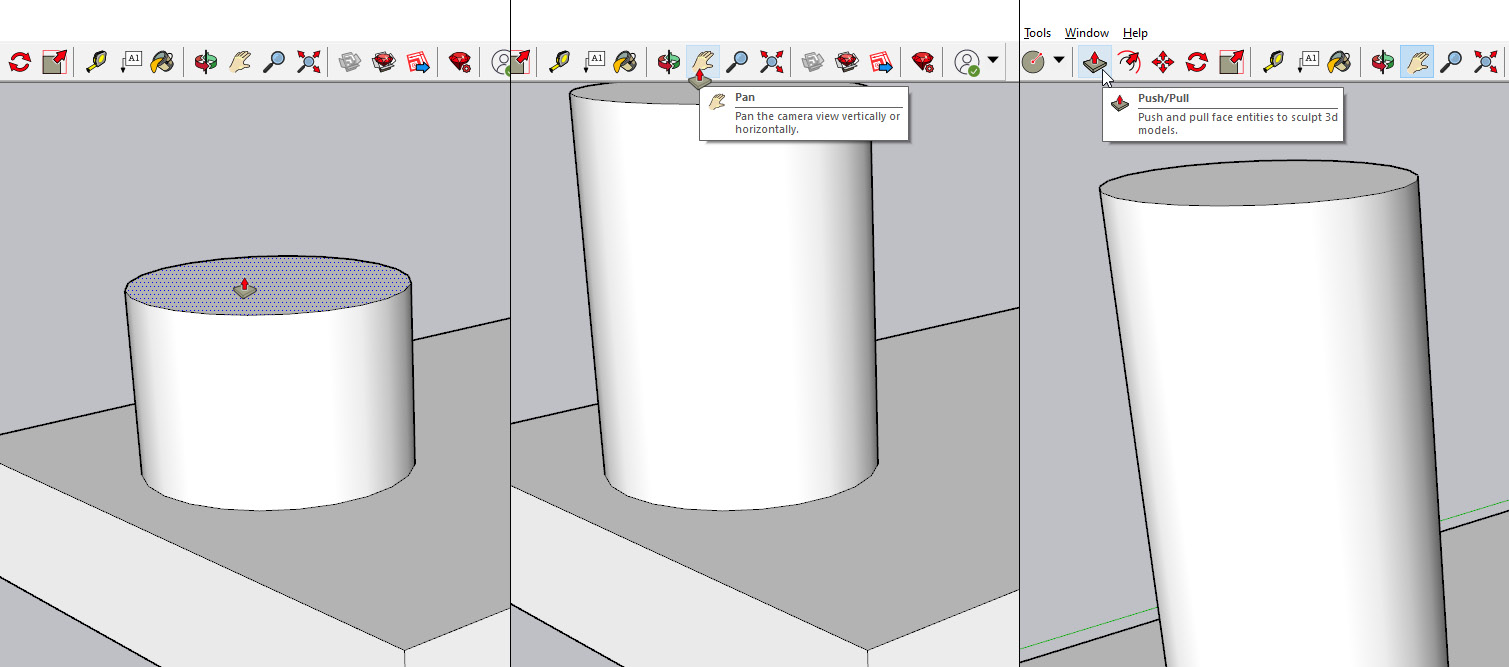
Figure 1.27: Push Pull, then Pan, then Push Pull, which resumes the previous Push Pull workflow
In this third example, we will see how a workflow can be canceled accidentally. Again, we are beginning with the Push Pull tool, then selecting the Pan tool from the toolbar. But in this case, after the pan is completed, the Select tool is chosen instead of Push Pull. Even though it appears as though the Push Pull tool created a cylinder of geometry, the workflow has not completed. When a different tool was chosen, the workflow was canceled, so no work was completed.
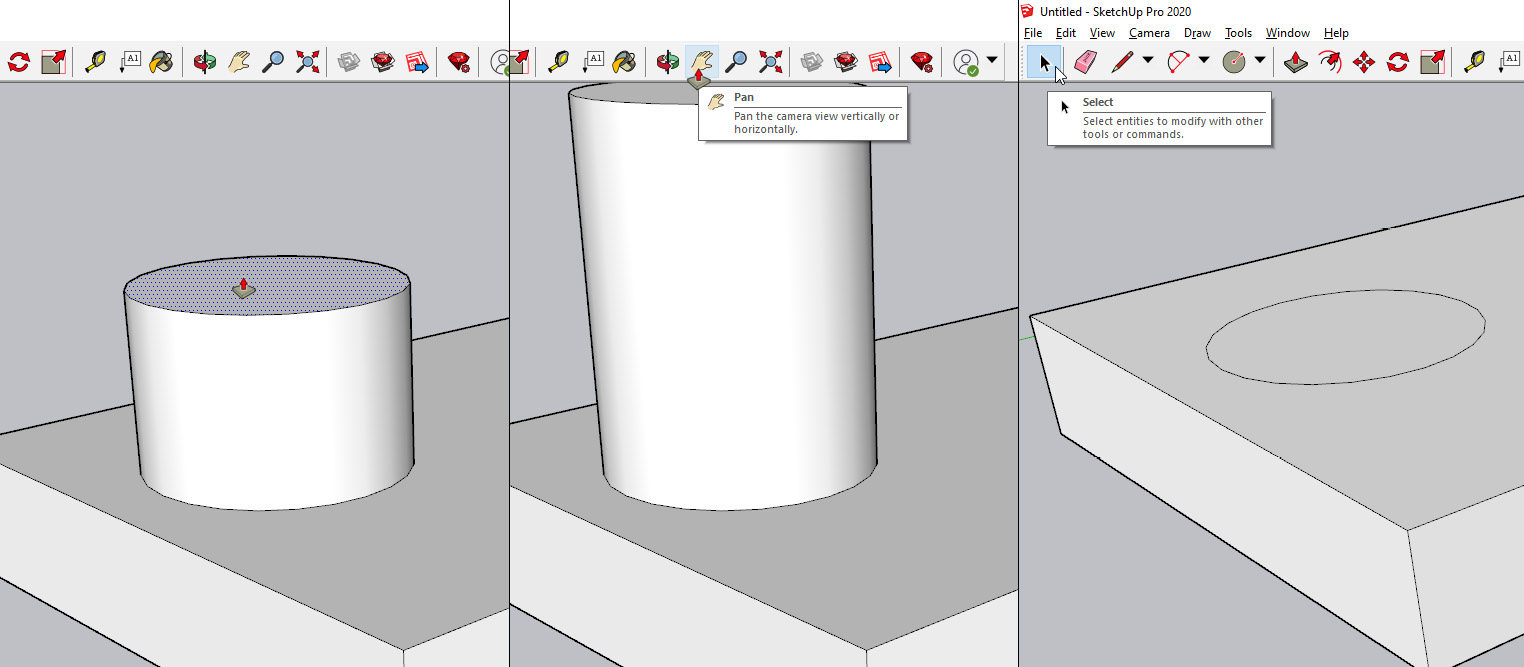
Figure 1.28: Push Pull, then Pan, then Select, which has canceled the workflow
It is so very helpful to understand how to use the 3-button mouse shortcuts while navigating in SketchUp. But even without a 3-button mouse, it is even more important to understand that you can continue working while navigating, even when clicking on the navigation tools in a toolbar.
I would highly suggest that you practice navigating in SketchUp, even if it is just around the default person component when you create a new file! Navigation takes time and practice, and it would be good to have some practice navigating before you begin to model. We will talk about modeling soon, but first, we want to look at some rules that govern SketchUp geometry.