
It might sound silly, but selecting and deselecting things is a task that we will be carrying out most of the time, so a solid and agile method of selection is a must if we want a fluid pipeline. Here I will show the basic and most practical selection methods in modo.
Look at your cursor. By default, it will show a custom shape in modo, showing a crosshair with two dots. Now press the spacebar key. The cursor changes its shape to a crosshair with a diagonal line. If you don't see a crosshair with two dots, make sure you're in the vertex mode by pressing 1 on the keyboard. Press the spacebar key one more time. Now the cursor is the same crosshair, but with a little square right next to it. What does it mean?
If you look at the top of the interface, you will see a toolbar as in the previous figure. Those five buttons change between selection modes. Depending on the selection mode you are working on, it will highlight to show you what mode you are in. We will focus on the first three modes (Vertices, Edges, and Polygons). You can click on them to change modes, but an easy shortcut is simply hitting the space key, as you just did, to cycle through them.

Needless to say, you will be working on different parts of the model depending on your selection mode. If you are in the Edges mode, you can only select and work on edges. The same goes for the vertex mode and the polygons mode.
Modo has got very useful and quick methods to make selections. These selection methods can be found in the top menu under Select. I will show the main quick selection methods I use:
Select connected polys: In the case you want to quickly select an entire mesh, the best and quicker solution is, in polygon selection mode, to double-click on a polygon. The selection will expand to every polygon connected to the first. In a practical sense, you double-click on a poly and the entire object gets selected.
Select loop of polys: There will be times when you need to select a loop of polys. To do that quickly, just select two adjacent polys in the loop and press L. The corresponding loop of polys gets selected automatically.
Select loop of edges: This is the same procedure as for selecting connected polys. If you want to select an entire loop of edges, just double-click on one of the edges and the corresponding loop will be selected.
Edge ring selection: Similar to the select loop, but mainly applied to edges. When you select an edge (or a group of edges), by pressing Alt + L, all the parallel edges placed into the original loops of polys containing the edge will be selected. You can see it clearly in the following figure:
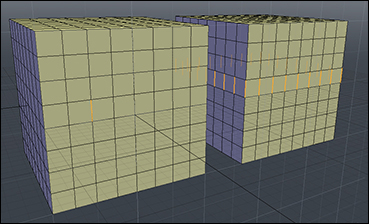
As you can see, if we first select an edge and make a ring selection, all the parallel edges of the same loop will be selected.
If you right-click and drag in the visor, you can draw a free-hand selection. When you release the mouse, everything inside that shape will be selected. This is what we call a lasso selection. It's a quick way to make selections manually:
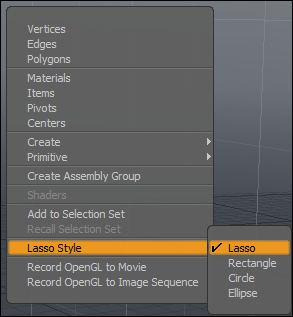
There will be cases when the lasso selection won't be the best approach to make a selection. You may want to select a square area or a circular one. In these cases, you will want to work with a different selection style than the lasso. Right-click on an empty area of the visor; a pop-up menu will appear. If you look at the bottom part of the menu, you will find an option called Lasso Style. This option lets us change the style of the lasso to other shapes: Rectangle, Circle, and Ellipse.
Isolating a selection can be a good idea when you have a very complex model and you want to focus on a specific part. You can do that in many ways, but for me, the best option is using the hide/unhide tool.
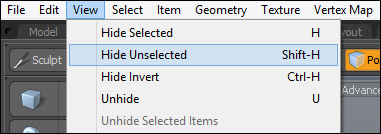
It is located under View in the upper menu. It's options are the following:
Hide selected: In case you want to make something disappear, just select it and use this option.
Hide unselected: This is the opposite case. If you want to isolate your selection, use this option, and the rest of the model will disappear.
Hide invert: You can use this option to switch the visibility between what is selected and what is not. This means that if you have a selection created and you click on Hide Unselected, you will isolate that selection. But if you click on Hide Invert, your selection will disappear and what was unselected will be what is now visible.
Unhide: Use this option to finish the isolation process. If you click on it, everything will be visible again.