Book Image

Mastering Adobe Captivate 2019 - Fifth Edition

By : Dr. Pooja Jaisingh, Damien Bruyndonckx
Book Image

Mastering Adobe Captivate 2019 - Fifth Edition

By: Dr. Pooja Jaisingh, Damien Bruyndonckx

Overview of this book

Adobe Captivate is used to create highly engaging, interactive, and responsive eLearning content. This book takes you through the production of a few pieces of eLearning content, covering all the project types and workflows of Adobe Captivate. First, you will learn how to create a typical interactive Captivate project. This will give you the opportunity to review all Captivate objects and uncover the application's main tools. Then, you will use the built-in capture engine of Captivate to create an interactive software simulation and a Video Demo that can be published as an MP4 video. Then, you will approach the advanced responsive features of Captivate to create a project that can be viewed on any device. And finally, you will immerse your learners in a 360o environment by creating Virtual Reality projects of Adobe Captivate. At the end of the book, you will empower your workflow and projects with the newer and most advanced features of the application, including variables, advanced actions, JavaScript, and using Captivate 2019 with other applications. If you want to produce high quality eLearning content using a wide variety of techniques, implement eLearning in your company, enable eLearning on any device, assess the effectiveness of the learning by using extensive Quizzing features, or are simply interested in eLearning, this book has you covered!
Table of Contents (17 chapters)
7
Working with Quizzes
14
Variables and Advanced Actions

Adding accessibility text for objects

After you have finished adding accessibility text to the slides, you can add accessibility text to the objects on the slide.

Let's begin adding accessibility text to the objects on slide 3:

  1. Select Jan's picture on the slide.
  2. In the Properties inspector, click the button on the right side of the Name field and select Accessibility.

This will open the Item Accessibility dialog. Notice that the Auto Label option that is selected by default and the Accessibility Name and Accessibility Description sections are grayed out. The Auto Label option will automatically label the objects based on their name in the Name field:

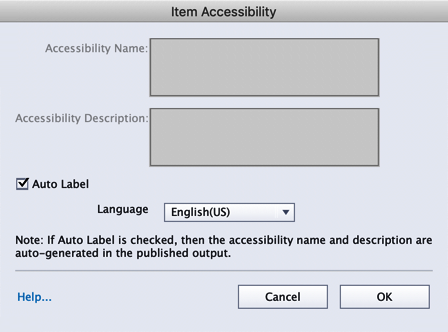
  1. Deselect the Auto Label option to add meaningful information regarding this image.
  2. This will allow you to add details in the Accessibility Name and Accessibility Description fields. Enter the name for the object and add the description. For this image, type Jan in the Accessibility Name field and Picture of Jan. in the Accessibility...