Book Image

Mastering Adobe Captivate 2019 - Fifth Edition

By : Dr. Pooja Jaisingh, Damien Bruyndonckx
Book Image

Mastering Adobe Captivate 2019 - Fifth Edition

By: Dr. Pooja Jaisingh, Damien Bruyndonckx

Overview of this book

Adobe Captivate is used to create highly engaging, interactive, and responsive eLearning content. This book takes you through the production of a few pieces of eLearning content, covering all the project types and workflows of Adobe Captivate. First, you will learn how to create a typical interactive Captivate project. This will give you the opportunity to review all Captivate objects and uncover the application's main tools. Then, you will use the built-in capture engine of Captivate to create an interactive software simulation and a Video Demo that can be published as an MP4 video. Then, you will approach the advanced responsive features of Captivate to create a project that can be viewed on any device. And finally, you will immerse your learners in a 360o environment by creating Virtual Reality projects of Adobe Captivate. At the end of the book, you will empower your workflow and projects with the newer and most advanced features of the application, including variables, advanced actions, JavaScript, and using Captivate 2019 with other applications. If you want to produce high quality eLearning content using a wide variety of techniques, implement eLearning in your company, enable eLearning on any device, assess the effectiveness of the learning by using extensive Quizzing features, or are simply interested in eLearning, this book has you covered!
Table of Contents (17 chapters)
7
Working with Quizzes
14
Variables and Advanced Actions

Inserting images in a Video Demo project

You will create the beginning and the ending of the video using an image that you will overlay on top of the video track. Use the following steps to insert an image into the Video Demo:

  1. Go to the Timeline panel. If it is not open, click the Timeline button at the bottom of the screen.
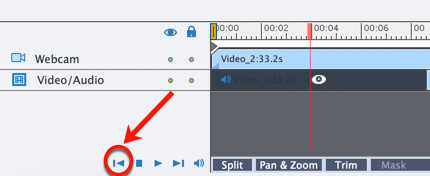
  1. In the Timeline panel, make sure that the playhead (the vertical red line) is at the very beginning of the project. If it is not at the beginning, click the Move the playhead to the beginning icon, as shown in the following screenshot:
  1. Play the video and then pause before you introduce the topic. If you are using the Chapter09/encoderVideo_Start.cpvc file, pause at 2.5 seconds on the Timeline.
  2. Use the Media | Image icon on the Toolbar to insert Chapter09/images/mftc-titleBkg_VideoDemo.png at the playhead position.

The imported Image appears in the Timeline panel, at the position of the playhead, as an extra layer on top of the Webcam layer.

    ...