Book Image

Mastering Adobe Captivate 2019 - Fifth Edition

By : Dr. Pooja Jaisingh, Damien Bruyndonckx
Book Image

Mastering Adobe Captivate 2019 - Fifth Edition

By: Dr. Pooja Jaisingh, Damien Bruyndonckx

Overview of this book

Adobe Captivate is used to create highly engaging, interactive, and responsive eLearning content. This book takes you through the production of a few pieces of eLearning content, covering all the project types and workflows of Adobe Captivate. First, you will learn how to create a typical interactive Captivate project. This will give you the opportunity to review all Captivate objects and uncover the application's main tools. Then, you will use the built-in capture engine of Captivate to create an interactive software simulation and a Video Demo that can be published as an MP4 video. Then, you will approach the advanced responsive features of Captivate to create a project that can be viewed on any device. And finally, you will immerse your learners in a 360o environment by creating Virtual Reality projects of Adobe Captivate. At the end of the book, you will empower your workflow and projects with the newer and most advanced features of the application, including variables, advanced actions, JavaScript, and using Captivate 2019 with other applications. If you want to produce high quality eLearning content using a wide variety of techniques, implement eLearning in your company, enable eLearning on any device, assess the effectiveness of the learning by using extensive Quizzing features, or are simply interested in eLearning, this book has you covered!
Table of Contents (17 chapters)
7
Working with Quizzes
14
Variables and Advanced Actions

Resizing the Responsive Project

The default maximum width and height of Responsive Projects in Captivate 2019 is set to 1024 x 627. You can increase or decrease this by re-scaling the project. Let's take a look at the steps required:

  1. Make sure you have Desktop selected in the Preview in drop-down list. If not, open the dropdown and select Desktop. Notice that the width and height of the project are set to 1024 x 627.
  2. To increase the width and/or height of the project, use the Modify | Rescale Project menu item.
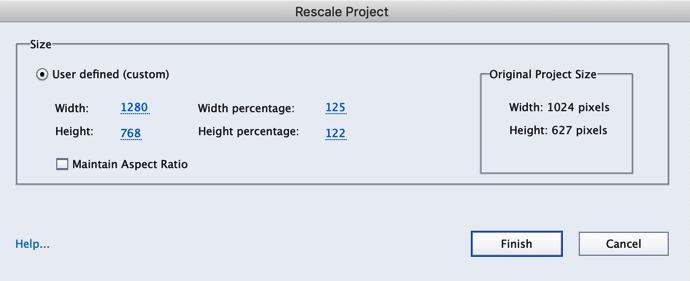
  3. In the Rescale Project dialog, deselect Maintain Aspect Ratio if needed.
  4. Enter the new width and height in pixels or as a percentage. Let's set the new width and height to 1280 x 768, which is a 16:10 ratio.
  5. Click Finish:
  1. You will see an alert that the resize project operation cannot be undone. Click OK to confirm.
  2. The maximum width and height of the project will now be changed to 1280 x 768. The new project height will automatically be reflected on the slide...