Book Image

Mastering Adobe Captivate 2019 - Fifth Edition

By : Dr. Pooja Jaisingh, Damien Bruyndonckx
Book Image

Mastering Adobe Captivate 2019 - Fifth Edition

By: Dr. Pooja Jaisingh, Damien Bruyndonckx

Overview of this book

Adobe Captivate is used to create highly engaging, interactive, and responsive eLearning content. This book takes you through the production of a few pieces of eLearning content, covering all the project types and workflows of Adobe Captivate. First, you will learn how to create a typical interactive Captivate project. This will give you the opportunity to review all Captivate objects and uncover the application's main tools. Then, you will use the built-in capture engine of Captivate to create an interactive software simulation and a Video Demo that can be published as an MP4 video. Then, you will approach the advanced responsive features of Captivate to create a project that can be viewed on any device. And finally, you will immerse your learners in a 360o environment by creating Virtual Reality projects of Adobe Captivate. At the end of the book, you will empower your workflow and projects with the newer and most advanced features of the application, including variables, advanced actions, JavaScript, and using Captivate 2019 with other applications. If you want to produce high quality eLearning content using a wide variety of techniques, implement eLearning in your company, enable eLearning on any device, assess the effectiveness of the learning by using extensive Quizzing features, or are simply interested in eLearning, this book has you covered!
Table of Contents (17 chapters)
7
Working with Quizzes
14
Variables and Advanced Actions

Step 1 Creating the Mute button

The first ingredient is the Mute button itself, which you will create using the following steps:

  1. Still in the Chapter14/takeTheTrain.cptx file, use the Filmstrip to return to the first slide of the project.
  2. Use the Shapes icon on the Toolbar to create a new oval anywhere on the slide.
  3. With the new shape selected, look at the Properties inspector.
  4. In the Options tab, deselect the Constrain proportions checkbox and give your oval a Width and Height of 35 px. This is the best way to ensure that the oval is actually a circle.
  5. In the Style tab, change the Fill type to Image Fill.
  6. Click the Fill button (1) and choose to use a custom image (2). This operation is illustrated in the following screenshot:
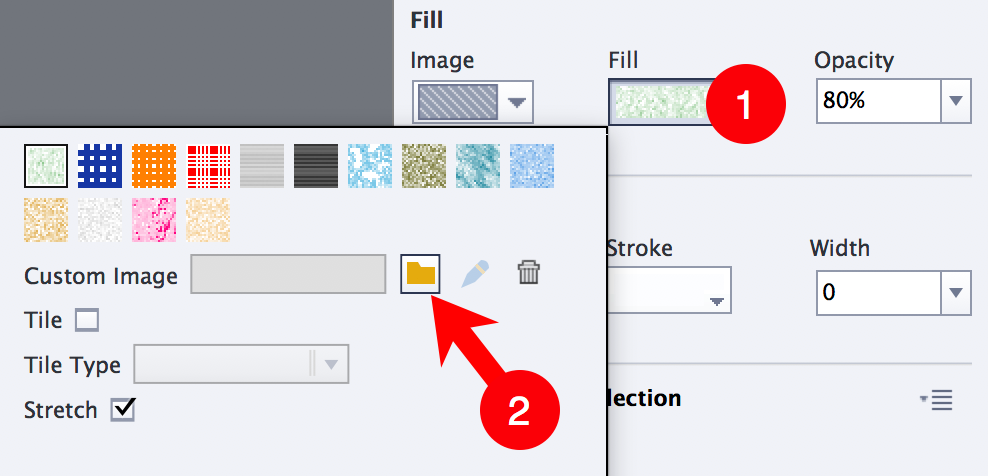
  1. In the Select Image/Audio from Library dialog, click the Import button.
  2. Navigate to the Chapter14/images/Mute_Button_up.png image file and use it as the image fill for the circle shape.
  3. At the top of the Properties inspector, select the Use as Button...