Book Image

Mastering Adobe Captivate 2019 - Fifth Edition

By : Dr. Pooja Jaisingh, Damien Bruyndonckx
Book Image

Mastering Adobe Captivate 2019 - Fifth Edition

By: Dr. Pooja Jaisingh, Damien Bruyndonckx

Overview of this book

Adobe Captivate is used to create highly engaging, interactive, and responsive eLearning content. This book takes you through the production of a few pieces of eLearning content, covering all the project types and workflows of Adobe Captivate. First, you will learn how to create a typical interactive Captivate project. This will give you the opportunity to review all Captivate objects and uncover the application's main tools. Then, you will use the built-in capture engine of Captivate to create an interactive software simulation and a Video Demo that can be published as an MP4 video. Then, you will approach the advanced responsive features of Captivate to create a project that can be viewed on any device. And finally, you will immerse your learners in a 360o environment by creating Virtual Reality projects of Adobe Captivate. At the end of the book, you will empower your workflow and projects with the newer and most advanced features of the application, including variables, advanced actions, JavaScript, and using Captivate 2019 with other applications. If you want to produce high quality eLearning content using a wide variety of techniques, implement eLearning in your company, enable eLearning on any device, assess the effectiveness of the learning by using extensive Quizzing features, or are simply interested in eLearning, this book has you covered!
Table of Contents (17 chapters)
7
Working with Quizzes
14
Variables and Advanced Actions

Modifying a custom shape

A Smart Shape is a vector object similar to those you can draw with Adobe Illustrator. To create these shapes, designers use the Pen tool of Illustrator to draw Bezier points and Bezier curves. Even though Captivate is not equipped with a full-fledged pen tool, you can, however, access these Bezier points and modify your shape via the following steps:

  1. Right-click the shape you created and choose the Edit Points item in the contextual menu. This action reveals the points that you defined when you created the polygon.
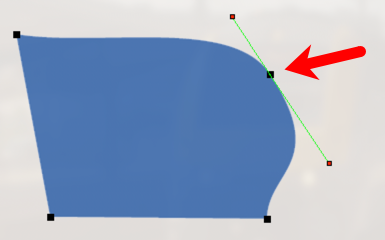
  2. Move those points to modify the shape. You can also move the green handles to modify the curvature of the connecting lines, as shown in the next screenshot.
  3. When you are happy with the shape, hit the Esc key on your keyboard to leave the point-editing mode and to select the shape.

Note that you can only move the existing points or modify their curvature; you cannot add or remove points to or from the shape:

Converting predefined shapes to freeform...