This first recipe is going to start by going over the interface inside Cinema 4D. The idea is to get used to where certain features are, to make it easier to understand recipes later throughout the book.
For most of the recipes in this chapter, we will be using the Obstacle_Course.c4d file. So load it up now and use it to get your feet wet inside Cinema 4D. Open the file by navigating to its location on your computer with the
C4D Content Pack and double-clicking on it—it will automatically launch Cinema 4D. Likewise, you can open Cinema 4D first by double-clicking on its icon inside the folder where it is stored on your system, then going under the File menu and selecting Open, where you can navigate to the Obstacle_Course.c4d file on your system and load it from there.
Tip
Downloading the C4D Content Pack for this book
You can download the C4D Content Pack for this book from your account at http://www.PacktPub.com. If you purchased this book elsewhere, you can visit http://www.PacktPub.com/support and register to have the files e-mailed directly to you.
If this is your first time using Cinema 4D, you are probably unsure as to what all these fancy panels inside this project are for. If you have used Cinema 4D a little bit, you may have a general idea of what the different windows and menus do, but it's a good idea to go through this recipe once, just to make sure we are all on the same page. The following is an image of the Cinema 4D interface with each area of the layout numbered so that we can focus on each part individually:
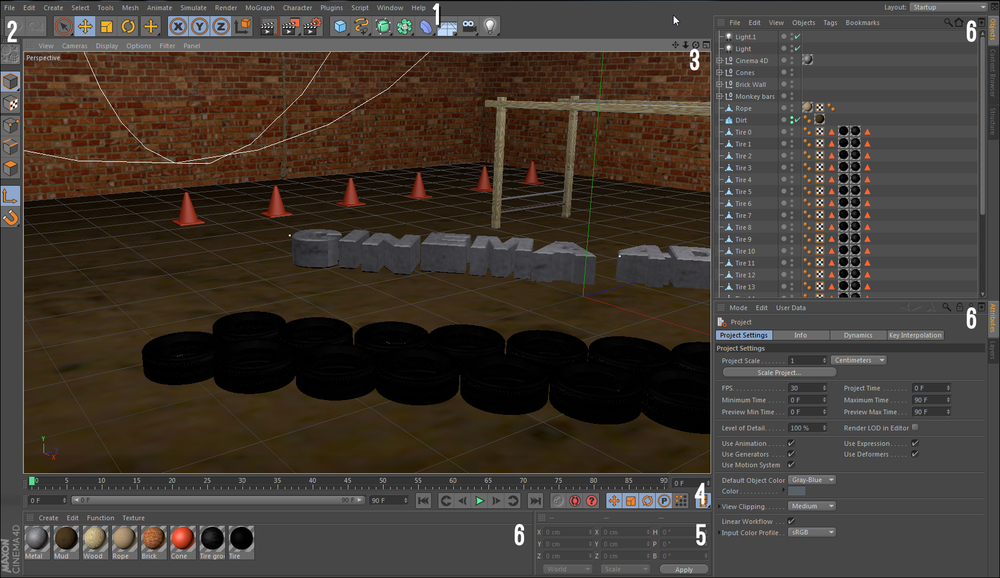
As with about every other software program, Cinema 4D has a menu bar along the top with many application-specific menus; it is labeled as #1 in our image. There are some familiar ones, such as File, Edit, and Help, and there are plenty of other items in between. Many of the options within these menus can be activated in several ways apart from within the actual menus, and we will call upon plenty of them throughout the book.
In the Edit menu, you'll find Cinema 4D's Preferences setting all the way towards the bottom. Most of this stuff doesn't need to be tinkered with very often, or at all, but you may want to examine the first set of options for the Interface. You can set the program to have a dark or light color scheme and adjust font sizes, in case you want to make Cinema 4D look a little different or be more readable.
Take a look at the OpenGL tab, where you can control the quality and speed of your previews based on how sophisticated your computer graphics card is. The settings can be changed to get more detailed previews in the Viewer. If you have a very strong graphics card, you may want to increase these settings, or you may want to decrease or disable the settings if you are dealing with a very heavy and intensive 3D project. For detailed notes on your computer's OpenGL capabilities, click on the Show OpenGL Capabilities button.
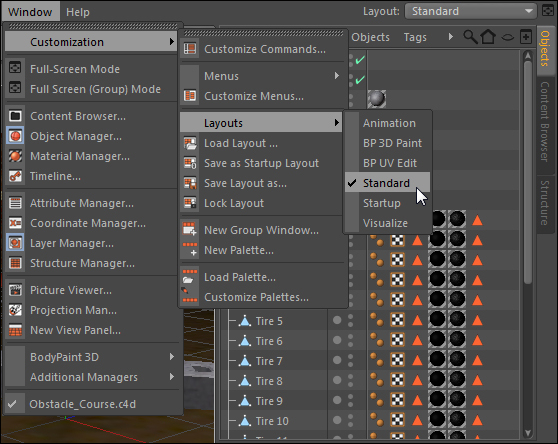
I'd also like to highlight the Window menu, the second to last tab on the right. Look inside and mouse over the Layouts submenu where you'll find all sorts of options for customizing the look of your Cinema 4D interface. As you work in the program and get the hang of it, I suggest you explore this menu to get a layout that you feel comfortable with. For now though, so that your interface looks the same as mine, select the Standard layout option in case your windows are out of place compared to mine. A new feature in Cinema 4D 13 is the Layout drop-down menu at the top right-hand corner of the application window, which allows you to quickly switch between the different layouts:
The blue areas comprise item #2, the Command Palettes, located beneath the application menus and the column along the left-hand side. The buttons are either known as Icons or Icon Palettes if they contain multiple options within, noted by the small black triangle at the bottom right-hand corner of the icon. As indicated in the previous section, these icons are also found within the various menus up top, and they are the most frequently-used tools in the program made easily accessible with these icons. In the upcoming recipes, we will use these palettes to add objects, splines, lights, cameras, and more.
The Viewer is #3, the big green area; it's where you actually see your 3D scene. Whenever you add objects to your scene, like those from the icons in the Command Palette, they appear at the origin. The origin is located at (0,0,0) point inside your 3D space; the numbers correspond to your X, Y, and Z coordinates. The Viewer has a menu bar at its top with helpful tools that apply to only the Viewer. The menu options have a wide variety of features from managing your cameras to adjusting the look of your preview. The X axis moves across the length of your frame, the Y axis corresponds vertically over the height of your frame, and the Z axis is the key to 3D—it represents the depth in your scene from the front of the Viewer all the way to the back towards infinity.
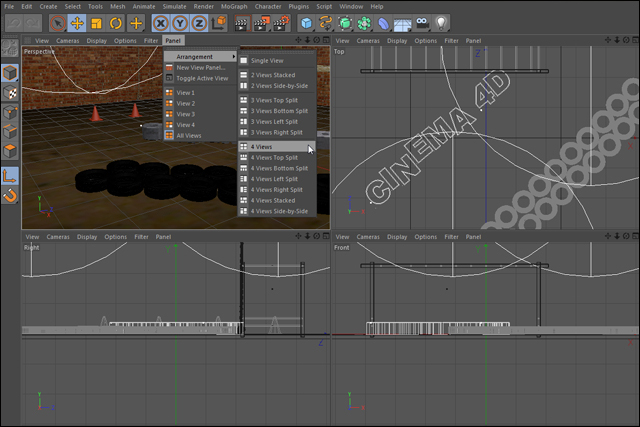
Under the Panel menu, hover over the Arrangement option and you'll see different options for dividing up the Viewer into two, three, and four different windows to see your scene. You can set up different views and cameras in each window to see work from different perspectives and work a little faster at times. Try selecting the 4 Views option and see how the viewer gets divided up. Change the option back to Single View to focus on just one window. Switching between different views can be very useful when modifying objects in your 3D environment; we'll explore this in Chapter 2, Super Modeling:
Towards the bottom of the screen you'll find #4, the purple Animation toolbar, which allows you to control the time of your 3D scene. The timeline bar has small tick marks representing each frame in your project, and you can pull the small green play head by clicking-and-dragging it back and forth. The small set of seven playback buttons give you control much like any video player you've ever used. The buttons have the following functions:
Shift + F: Jumps to the start of the Animation toolbar
Ctrl or command + F: Moves back to the previous key frame
F: Moves back by one frame
F8: Plays the animation
G: Moves forward by one frame
Ctrl or command + G: Moves forward to the next key frame
Shift + G: Jumps to the end of the Animation toolbar
Note
You can adjust the length of your project by opening the Project Settings window inside the Edit menu. Change the number in the field for Maximum Time to shorten or lengthen your timeline. It's a good idea to keep your length as small as you need, so eliminate any extra frames via this setting. When you first open a new project, the Project Settings are available at the bottom right-hand side of the screen in the Attribute Manager.
The Coordinate Manager is #5; it's a panel that displays the position, size, and rotation of a selected object. You can enter adjustments to these parameters in the Coordinate Manager and the changes will appear to your object inside the Viewer.
The other windows that are labeled #6, the Object Manager, Attribute Manager, and Material Manager, are all more important managers, and they require their own recipe to go over all of their features.
Tip
The most useful tip in the book
"Help!" One extremely useful feature of Cinema 4D, which will really help you learn the program more thoroughly is the built-in help browser. You can right-click on any icon or menu option within the program and select Show Help from the menu. Try and use it whenever you come across a feature you are curious about or don't understand. You can also access it by going to the Help menu and selecting Show Help. The built-in help is extensive, helpful, and well written with numerous examples. This, probably more than any other tool in the book, will help you master Cinema 4D if you can get into the habit of using it.
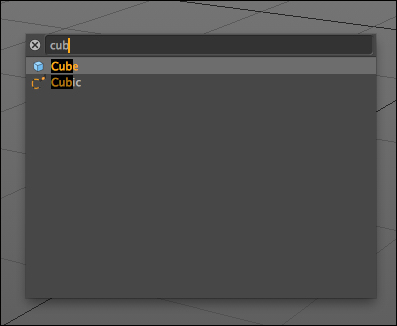
Commander
The Commander is a very useful new feature that helps you to find what you're after, within Cinema 4D. You can press Shift + C and the Commander will appear. Then, begin typing and the Commander will search for the command or object you're looking for. It's kind of like Google for Cinema 4D and will help you find items without having to know where they are in the menus. You can also access the Commander by clicking in the magnifying glass at the very top right of the interface: