
There will be times when we want to knock things down, like a door or a wall. This can be done in many different ways. At the time of writing, to use an avatar for collision we would use an attached dummy for the physics settings. There are many great character developers in the Reallusion Marketplace already developing custom G5 characters with built-in collision mesh. This author will develop future characters with this trait in mind too:
1. Start a new blank project and select the Set tab then click on the Props button.
2. Double-click on the Box_001 prop in the 3D Blocks folder to load it into the workspace.
3. With Box_001 selected, enter the following into the Scale input boxes on the right side menu: X=4.5, Y=457.7, Z=41.6.
4. Click the Reset Transform button.
The following image displays the scale settings to turn our box prop into a board prop, as shown in the bottom half of the image:

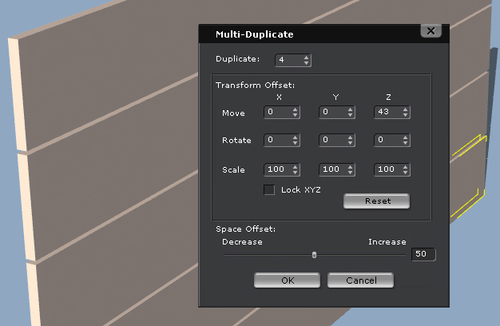
5. With the Box_001 prop still selected, click on the Multi-Duplicate button (Shift + D) and enter the following:
Duplicate: 4
Move: X=0 Y=0, Z=43
Rotate: X=0, Y=0, Z=0
Scale: X=100, Y=100, Z=100
The following image details the settings to create multiple board objects:
7. Double-click on Ball_001 from the 3D Blocks folder to load it into the workspace.
8. Enter the following coordinates into the Ball_001 Move input box on the right side menu:
X=150.0
Y=0.0
Z=50
The following image shows the settings for the Ball_001 prop:

9. With the Ball_001 prop selected, right-click on the prop and select Timeline to open the timeline for the ball prop.
10. In the Current Frame input box on the top toolbar of the timeline, input 50 or move the time scrubber to frame 50.
11. With the Ball_001 prop selected, input the following into the props Move section located on the right side menu:
X= -215.0
Y= 0.0
Z= 50.0
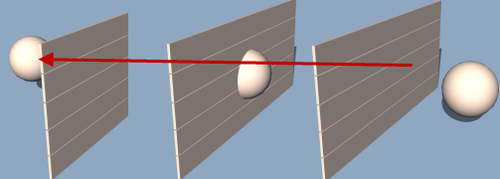
12. Move the time scrubber back to the first frame. Save your project and press the play button to see the ball pass through the "board" props.
The following image shows the ball passing through the boxes:
13. Double-click on the top board to select it.
14. Hold down the Ctrl key and click the other 4 boards until all boards are selected.
Note
Multiple object selection
We could also use the select tool to draw a marquee around the objects while holding our left mouse button down. It is possible to change the physics settings on a group of objects by selecting them and then choosing the physics selection from the Physics Settings dialog box.
15. Click on the Physics Settings button on the top toolbar or use Ctrl + F9.
16. With the board props still selected, click on the Active Physics checkbox and set the boards to Frozen as the state.
17. Select the Ball prop, with the Physics Object Settings panel still open.
18. Click the Active Physics checkbox and select Kinematic as the state.
19. Click on the Rigid Body Simulation button on the top toolbar to turn on the iClone physics engine.
20. Save our project.
Note
It's a good idea to save our project after we set them up and BEFORE we actually run the physics to give a clean project to start over with, should you need to.
To this point, we have set up our simulation with the boxes acting as boards. Think of them as boarding up a passageway or tunnel entrance. Setting the boards to Frozen state holds them in place until our collision object, Ball_001, strikes the boards. The ball prop is our collision object to knock the boards down with.
We are now ready to actually start the physics simulation in the next action section.