
There are times you may need a fluid chain action or possibly chains lining a wall or walkway and you'd like them to sway down naturally. We'll be using primitives for this quick and easy way to create a chain.
1. Open a new blank project and select the Set tab then click on the Props button.
2. Load the Box_001 prop from the 3D Blocks folder into the workspace.
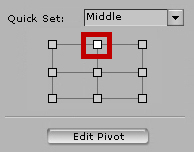
3. With the Box_001 prop selected, click on the top center icon, in the right side menu, to reset the pivot point to the top center and set its attributes as follows:
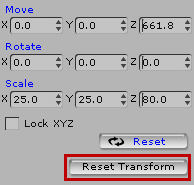
Move: X= 0, Y=0, Z=0
Rotate: X= 0, Y=0, Z=0
Scale: X=25, Y=25, Z=80
The following image shows the Top Middle pivot icon, which when clicked resets the pivot.
4. With the Box_001 prop selected, click the Reset Transform button located in the Transform section on the right side menu.
The following image displays the Reset Transform button for the box prop which resets the scale to 100 percent:
5. Open the Multi-Duplicate dialog by clicking the button on the top toolbar or using the Shift + D shortcut and use the following settings:
Duplicate:8
Move: X=0, Y=0, Z=183
Rotate: X=0, Y=0, Z=0
Scale: X=100, Y=100, Z=100
The following image shows the newly created chain of boxes with the Multi-Duplicate dialog:

6. Select all of the boxes and open the Physics Object Settings dialog by clicking the button on the top toolbar or using the Shift + F9 shortcut.
7. Click the Active Physics checkbox and set the state to Dynamic.
8. Set the Bound Type to Capsule with the Z axis.
9. Click on the first box at the top of the chain and set its state to Kinematic as it is our anchor object.
10. Use Shift + Alt + R to bring up the additional physics dialog as shown in the following image. Your dialog may look different as this was in beta testing at the time.
11. Click on the Rigid Body button in the top middle of the dialog.
12. Make sure the Active checkbox is checked.
13. With all the boxes selected, choose Point To Point as the type of constraint. Input the following attributes:
Rotate X: Min: -30, Max: 30
Rotate Y: Min: -30, Max: 30
Note
What is a constraint?
A simplified way to view it would be that a constraint holds (limits) or, otherwise, binds one object to another upon one or more of the axes. These constraints can be further constrained (limited) on each individual axis. If we need an object to move within a certain axis or limit the amount of movement on all axes we constrain it.
14. Select the bottom box and click the Pick Target button in the dialog then select the box directly above it.
15. Select the second box from the bottom and with the Pick Target button select the box directly above it.
16. Repeat this process until each box is constrained to the box above it, all the way to the second from top box. The top box has no object to be constrained to.
17. Save the project.
18. Move the time scrubber down to around frame 50.
19. Select the top block and move it a short distance to the right of the screen.
20. Make sure the Rigid Body Simulation button is on, located on the top toolbar.
21. Move the time scrubber back to the start and run the simulation.
We used several box dummies to simulate a chain, which can be used to attach props to including links from to form an actual chain! We reset the pivot point to top center initially so that all of the boxes move cleanly on their restraints. The bounding mesh capsules allow for more movement between boxes with the rounded corners.
Point To Point constraints also allow for more movement as a hinge constraint will only allow one axis to move. If you want some twist in the chain, then add some parameters to the Z axis of the constraints, which were set at zero for our example.
The most tedious part of the process was actually picking each individual box constraint, which was the box directly above it, in the order that we worked. It would have worked if we had started top down also.
Note
Horizontal chains
While writing this appendix, stuckon3d, an advanced 3D artist in his own right with television and movie experience, authored a chain tutorial for the beta testers and it was much like the one in this book, except that he reminded us that you can turn the chain horizontal and set the first and last boxes as kinematic to produce a hanging chain that sags when the simulation is run! Look for stuckon3d in the Reallusion forum.
The following image shows our chain with the animation removed, rotated, the first and last boxes set to kinematic and re-simulated:
 |
Note
Applying physics to props that have been scaled, instead of resized, can produce unexpected results. Since, you can only rescale in iClone the Reset Transform button has been provided to reset the scale to 100 percent after rescaling an object, eliminating or reducing problems when working with physics.
An earlier action section prepared us for using characters for collision. At the time of writing, there was no collision detection built into the avatars, but Reallusion and several other developers including this author are working on characters with built-in collision mesh. Until fully developed physics enabled characters are released, we must rely on this technique of attaching dummies to characters for collision with items such as a car or a wall.