
Understanding project settings
These technical settings lay the foundation for your project. It’s crucial to identify the scope of your project in the early stages to set the appropriate settings. The type of project you’re working on – whether it’s for still rendering, animation, computer VR, or mobile VR – has an impact on your workflow and project settings. It’s essential to understand that your choice of project type will shape your workflow, although this distinction may become less significant in the future.
If you’re focused on learning animation and still image creation, you can skip the next few sections as the default project settings, when using the architectural visualization templates, are optimized for these specific purposes. However, it’s still important to understand how to modify certain settings if needed as there may be other scenarios where customization is required.
Essentially, Unreal Engine was created as a game engine with the frame rate (also known as frames per second (FPS)) as a crucial factor to consider. Over time, it has evolved and now allows you to produce various outputs with varying minimum frame rates, which affects the fluidity of the scene. A smooth gaming experience requires a minimum of 30 FPS (ideally 60 FPS), which is also necessary for interactive experiences. VR outputs, on the other hand, are more demanding and require a minimum of 90 FPS. Fortunately, architectural visualization stills and animations do not pose major performance issues. A fluid scene is preferred, but there are not strict performance requirements, and the best approach is to use your judgment to prevent a slow, heavy scene. Running a scene at 20 FPS is not ideal, but it will not impact the final output for architectural visualization.
Why is this important? By default, Unreal Engine 5 has some features enabled (such as Lumen and Nanite), which are innovative but not suitable for all purposes and may slow down performance in some cases. For example, VR experiences on mobile headsets (not PC VR) will benefit from traditional techniques such as baked lights. Thus, these types of projects will require different features and project settings.
On the contrary, if you’re aiming for maximum photorealism and have a powerful machine, you might want to enable all the best features available. The Archvis templates have almost all of these features enabled by default, but if you started with a different template, you’ll need to go to Project Settings and enable the following settings in the Rendering section:
- Dynamic Global Illumination Method: Lumen
- Software Ray Tracing Mode: Detail Tracing (or choose Global to save on performance)
- Support Hardware Ray Tracing and Path Tracing: Check these boxes
Figure 1.9 shows where you can find the settings that enable maximum graphics quality:
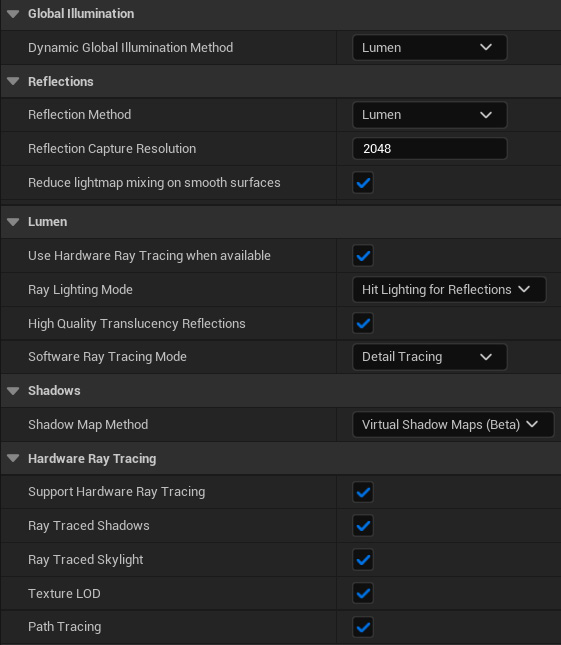
Figure 1.9: Project settings for maximum quality
Don’t activate all these settings immediately; the default settings from the Archviz template are sufficient initially. In general, a good rule of thumb would be “don’t kill flies with a cannon,” or rather start slowly and add settings and functionalities as you need them.
For our purposes, we won’t be modifying any settings. However, if you’re creating other things such as a VR experience, you may opt for a workflow with baked lighting,which would require a different approach to modeling and scene preparation. This would involve disabling lumen and possibly nanite from the Project Settings area.