
Navigating the interface
The Inkscape user interface is broken up into panels that are organized like shelves for all the stuff you’ll be using throughout this book. We will provide plenty of screenshots so that you don’t have to memorize all the parts at this point. Think of this more as a guided tour than something to memorize and a reference for when you can’t quite remember what that thing was called. You know... that thing. The thingy with the buttons... Yeah, that one.
But before we dive into the parts of Inkscape, it will help a little to make sure we’re looking at the same Inkscape. I’ve opted to use light mode for the figures in this book, because it looks better in print, it saves ink (which is also eco-friendly), and smaller print tends to be easier to read.
By default, Inkscape’s got a brand-new, sexy dark mode. It’s fine to leave it that way if you like it – just be aware that the icons will be slightly different than the ones in this book. For those keen on having things look the same, you can switch out of Dark mode in the Startup dialog area (also known as the Welcome Screen area) by flipping the Dark mode switch, as shown in Figure 1.1:
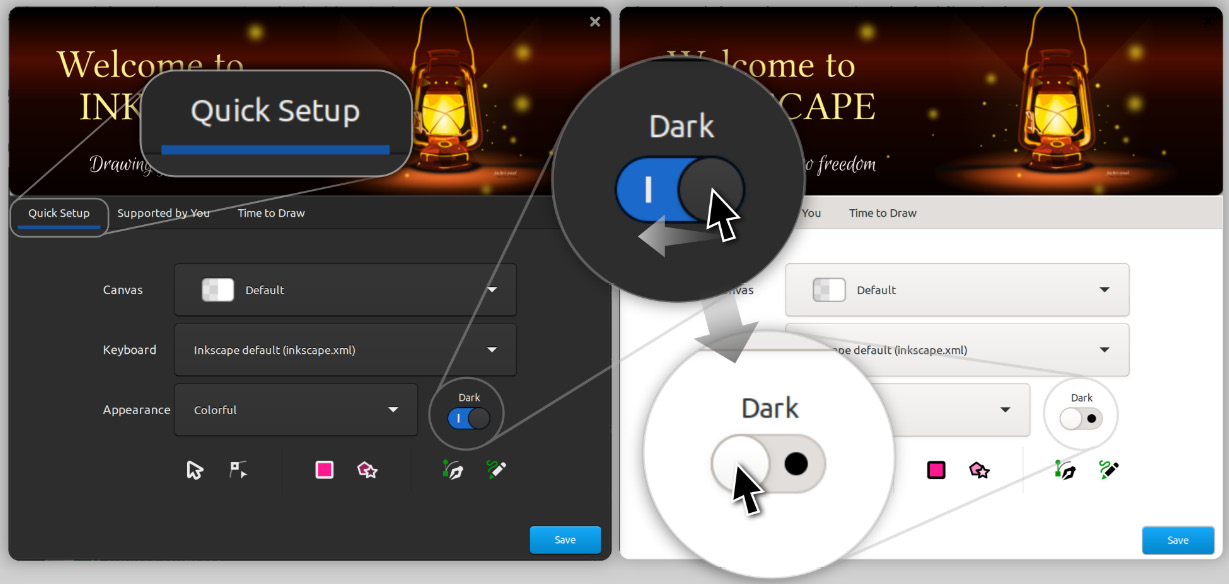
Figure 1.1 – Switching out of dark mode in the Startup dialog (Welcome Screen)
I’ve also opted to use the classic Inkscape icons because they are easier to see and also make this book usable for legacy versions of Inkscape that predate the new icon themes. You can get them looking the same as they are in this book by using the Appearance dropdown beside the Dark mode switch, as shown in Figure 1.2:
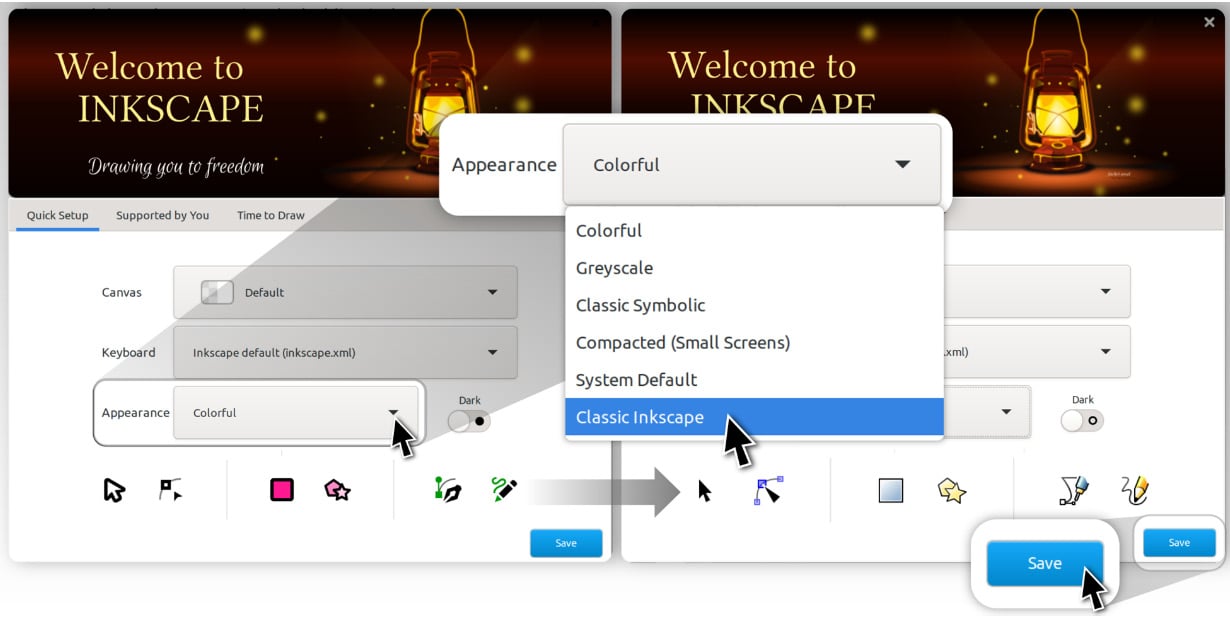
Figure 1.2 – Changing the icon theme to Classic Inkscape
That certainly looks more like it! However, there’s one more gotcha; depending on how wide your screen is, Inkscape may look slightly different than in some of the screenshots in this book. For example, the laptop that I’m using to write this book is 3,840 x 2,160px, meaning it’s a widescreen format of ratio 16:9. The main difference between this and Inkscape’s default view is that the Commands bar is on the side of the screen rather than taking up space at the top.
Inkscape is smart enough to recognize my screen type and give me a wider view instead. Your view may be a bit different, so for consistency, you might want to switch the view to Wide instead. You can do this by clicking the View menu at the top of the screen and choosing Wide, as shown in Figure 1.3:
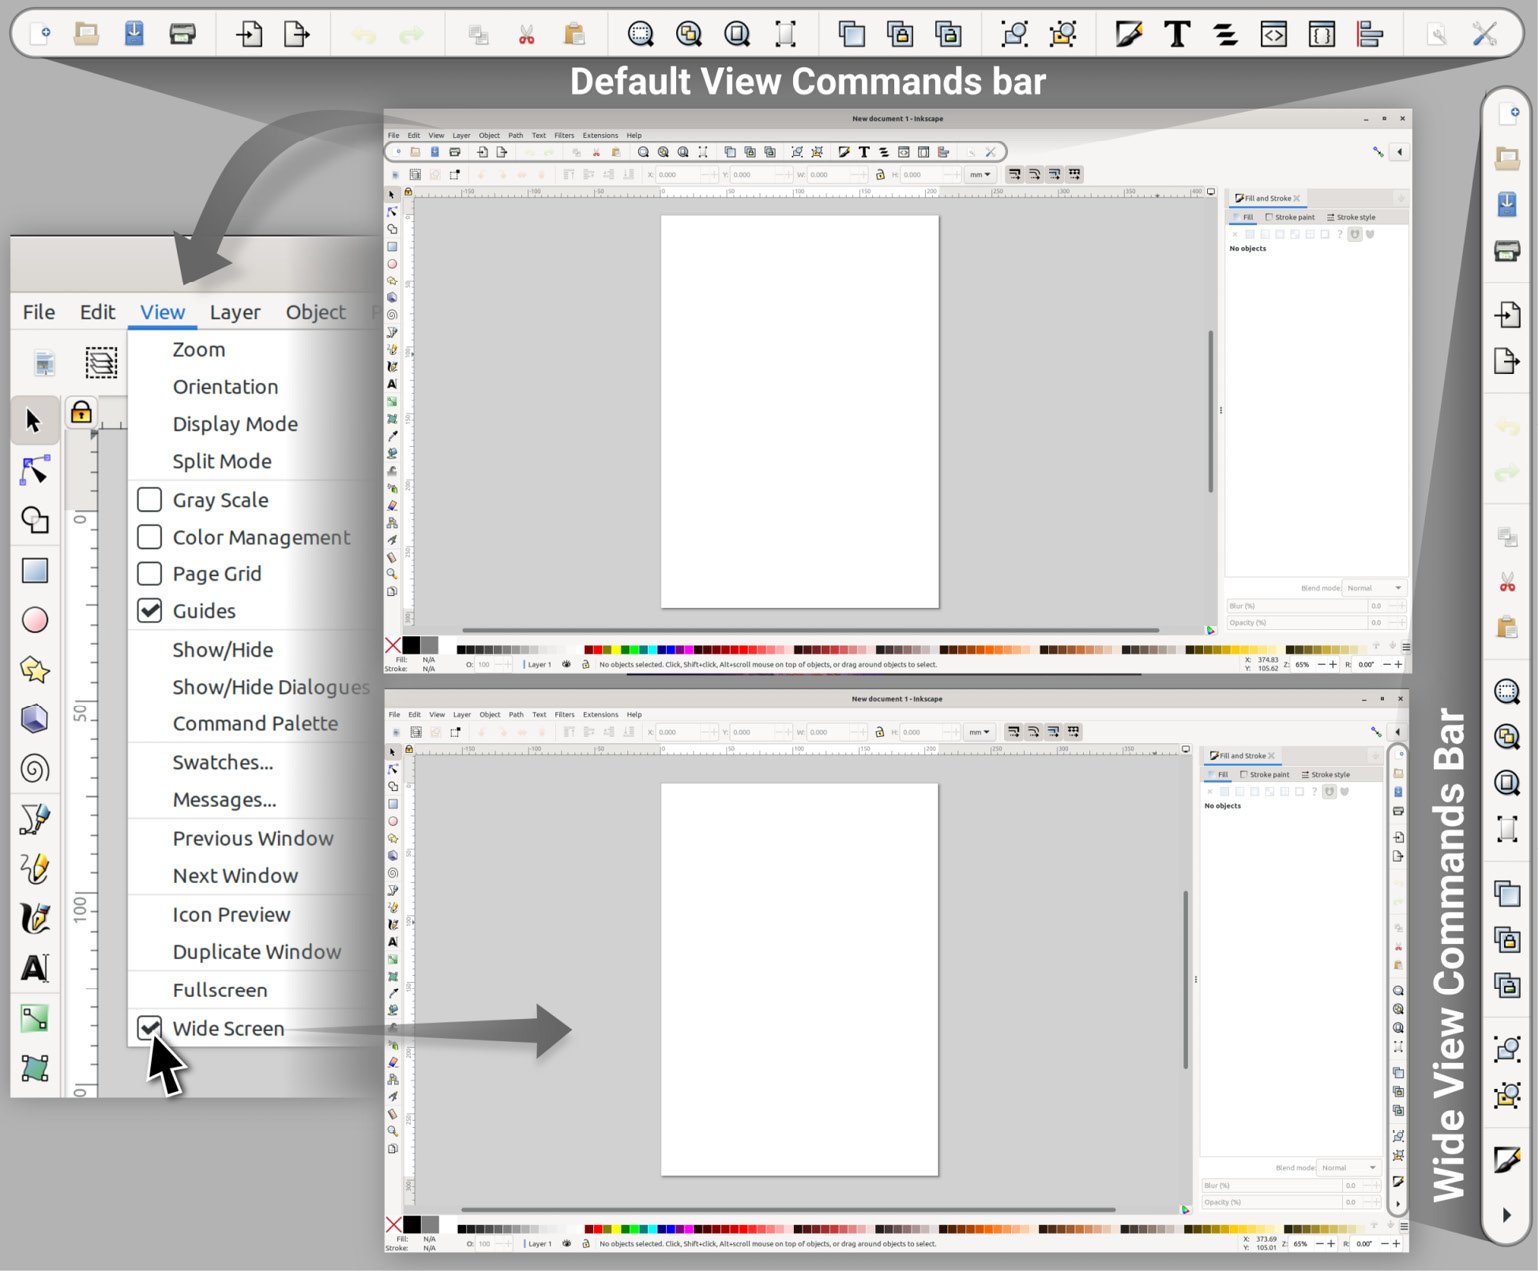
Figure 1.3 – Switching from the default view to the Wide view
Switching views is entirely optional and will not affect anything except the location of the Commands bar, which we will go over but not use very much as it’s far more efficient to use hotkeys for most of the items in this menu.
It also gets in the way of the much more useful Tool control bar, which we will use extensively, so I recommend pushing it to the side to preserve your vertical screen space for drawing and reduce clutter.
Have a look at Figure 1.4 for a breakdown of the parts. Here, I’ve cut up the Wide Screen interface into bits, spaced out so that you can see the different areas we’ll be discussing in this section better:
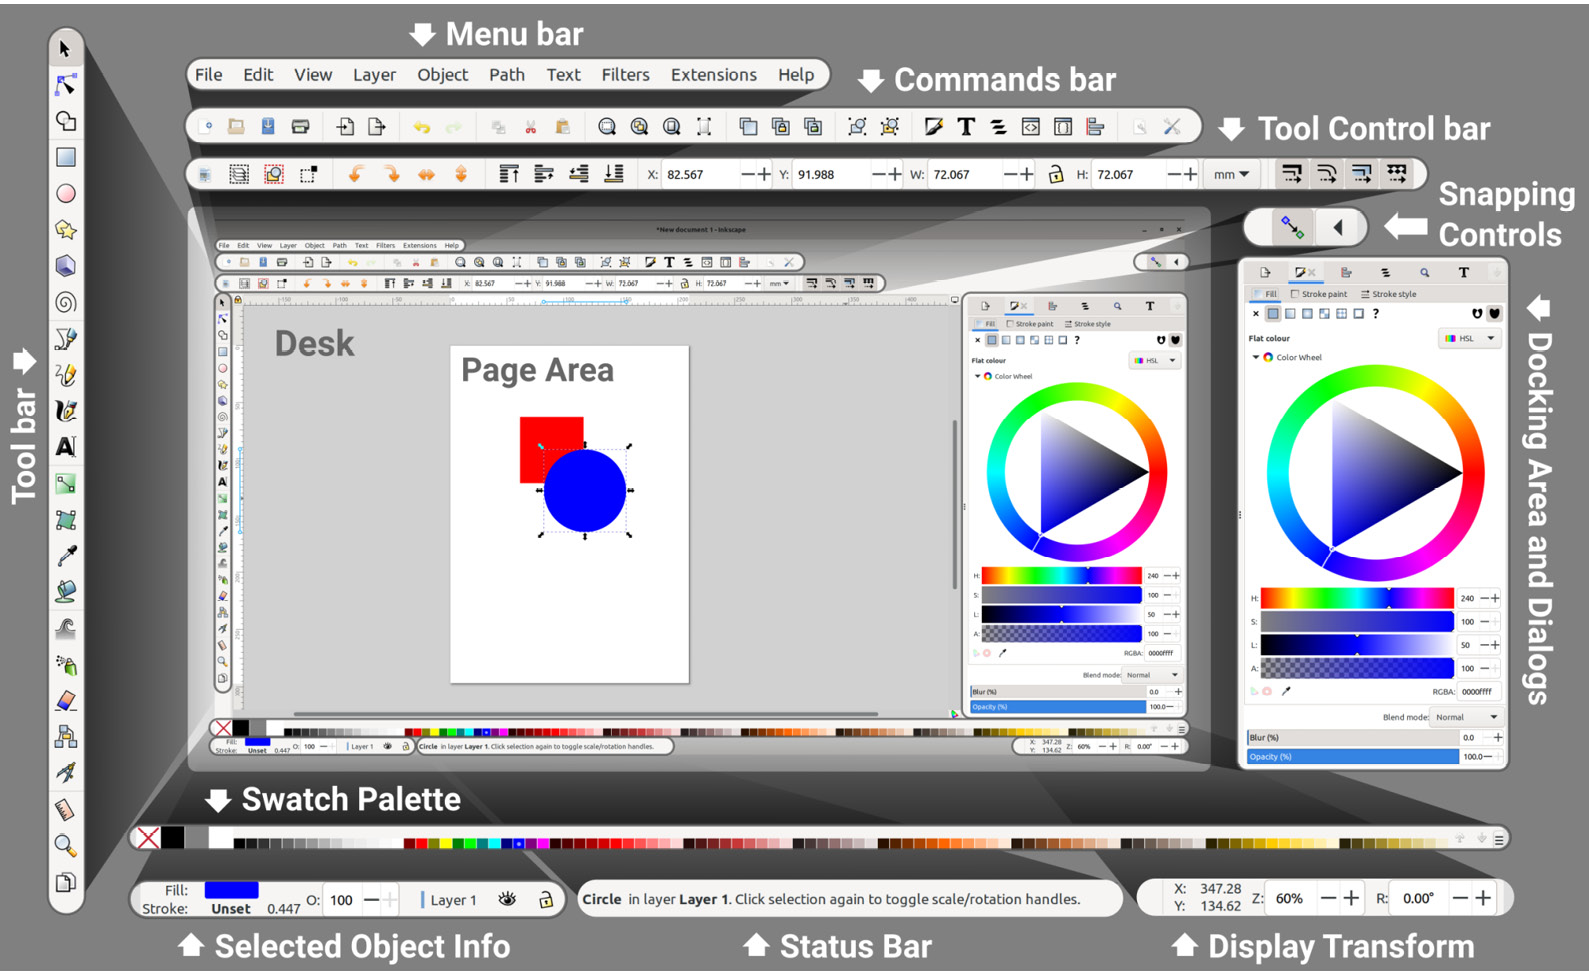
Figure 1.4 – Inkscape interface
Before we dive into the specifics of the various parts of the interface, it’s worthwhile going over some conventions that Inkscape uses to assist you in finding your way around:
- Hover to discover: Hover your mouse cursor over an icon or box for a moment to see what it does (see Figure 1.5 for an example of hovering to discover more information):
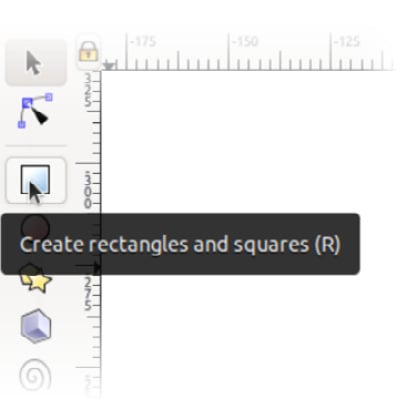
Figure 1.5 – Hovering over a button shows its function
- Hotkeys: A hotkey is a keyboard key (or a combination of them) that you can use to do something instantly rather than clicking through menus or looking through the icon bar. Inkscape will generally list the hotkey associated with the item, be it in the Menu bar or the hover information (Hover to discover, as mentioned in the previous bullet point).
The more you memorize these hotkeys, the faster you can work and the less time you will need to spend clicking around. Eventually, you’ll be able to think about doing something and do it simultaneously via hotkeys. A little time invested in doing this during your projects will save you untold amounts of time forever after.
- Instant Search: As of Inkscape 1.1, there is a new Command Palette that can be called up with the Shift + ? hotkey. This is a search bar where you can type in what you want, and Inkscape will show you the results right away. This is a great way to find things quickly, and well worth remembering the hotkey. Got a question? Tap the Shift + ? hotkey, as shown in Figure 1.6:

Figure 1.6 – The Command Palette in action
- Buttons: These require only a single click to perform the action. Some examples of these are the Save and Load buttons contained in the Command Palette, and the + and – keys located inside the Spin Boxes, which allow you to increment the value in the box.
- Toggles: These have the same appearance as buttons, but instead of performing a one-time function, they activate or deactivate something. They appear often in the Tool control bar, where you can see which tool or snapping options are active at a glance. They have two states – on and off.
When toggled on, the background of the icon will go a few shades darker to indicate that the button is depressed. Pressing it again when it’s in this state toggles it off again, and the dark background will disappear. See Figure 1.7 for examples of toggles and buttons in Inkscape:

Figure 1.7 – Toggles versus buttons
- Spin Boxes: These are boxes that contain numeric values that can be incremented or decremented using the + and – buttons contained in them. Pressing the + button increments, while – decrements. You can also click inside the box to edit the value manually.
Here are a few neat tricks to use with Spin Boxes:
- Double-click inside the Spin Box to highlight the integer part or the decimal part of the number. You can then start typing a new value and it will overwrite the highlighted part of the number.
- Triple-click inside the Spin Box to highlight the entire number. As before, you can type in a new value. You can also copy and paste the value by using the Ctrl + C and Ctrl + V hotkeys.
- Calculate by using math operators in the Spin Box. That’s right! You can add, subtract, multiply, and divide right in the Spin Box and Inkscape will change your math into a number once you hit the Enter key. No calculator is required! Some examples can be seen in Figure 1.8:
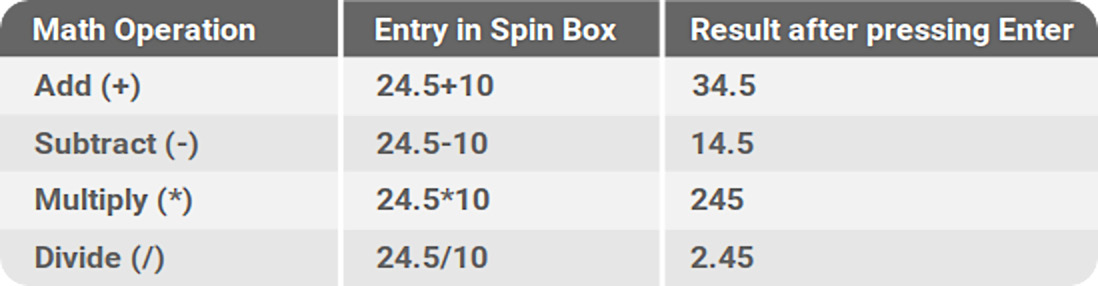
Figure 1.8 – Spin Box math operations table
- Convert from one measurement into another by adding the units to the number. For example, if you are working in centimeters (cm) and are making something that needs to be 24 inches, you can convert it into cm just by typing 24in into the Spin Box and tapping the Enter key when you’re done:

Figure 1.9 – Spin Box converting inches into centimeters
Figure 1.10 – Right-clicking a Spin Box pops up useful default options
So, with all these little tips and tricks for getting around, are we ready for the grand tour? Great! Let’s start with an old familiar friend, the Menu bar.