
The Snap control bar
When you move your objects around the page or draw new shapes, the cursor can automatically snap to various parts of the drawing area or other shapes that you have already drawn. This can be handy for alignment, as we will see in later chapters.
Figure 1.23 shows typical snapping behavior – while you are dragging an object to a new location, Inkscape takes the closest point (or line) on your shape to your cursor and suggests places to align or snap it to a nearby shape. You can then simply release the mouse button and the shape will be perfectly aligned:
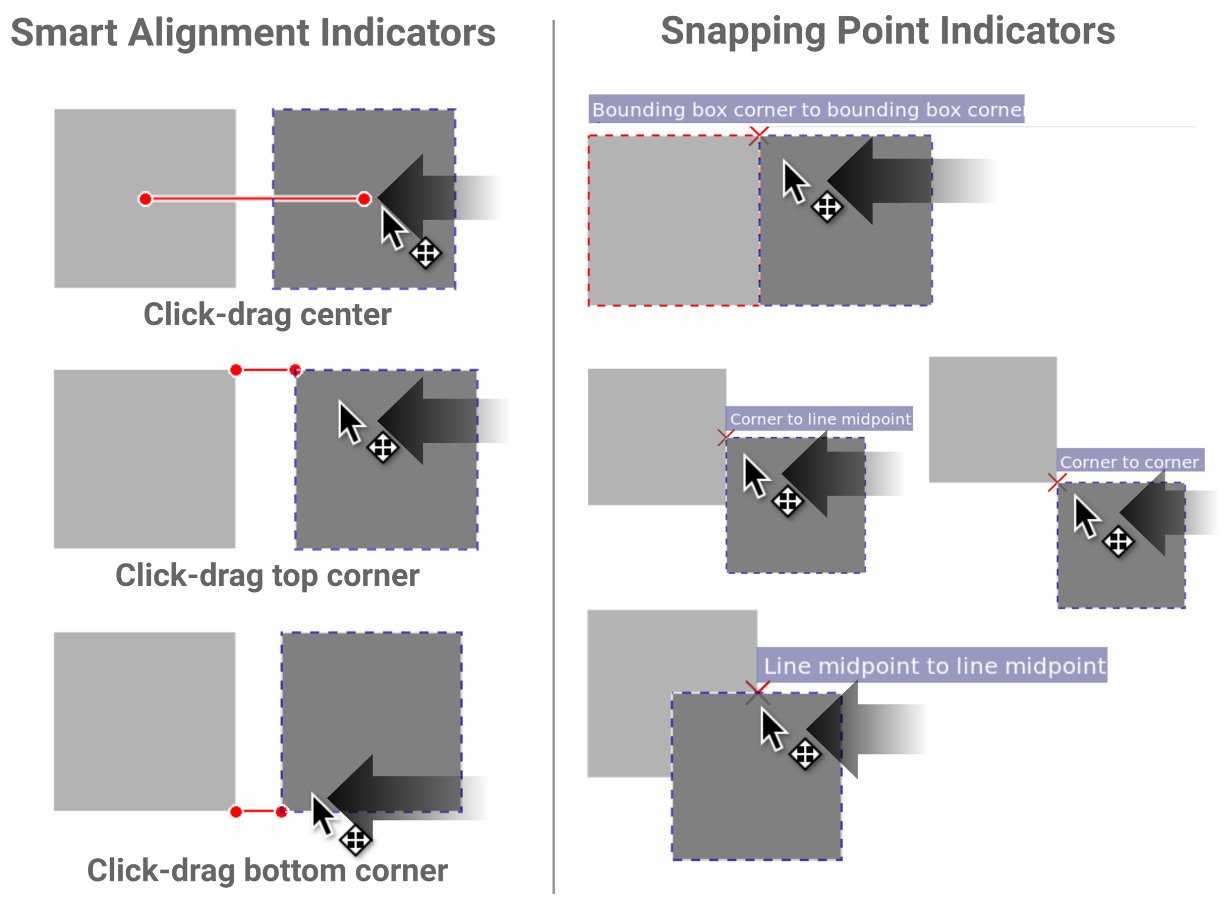
Figure 1.23 – When you move one object close to another, a snapping point appears
A snapping indicator will appear when an object snaps to another so that you can see what Inkscape is snapping to before you release the mouse button. You can control what Inkscape uses to snap using the Snapping Controls toggle.
Clicking the Snapping Controls toggle enables and disables snapping, while the arrow beside it pops up the Simple Snapping options by default. Clicking the Advanced Options link at the bottom shows a full list of all snapping options in Inkscape, as shown in Figure 1.24:
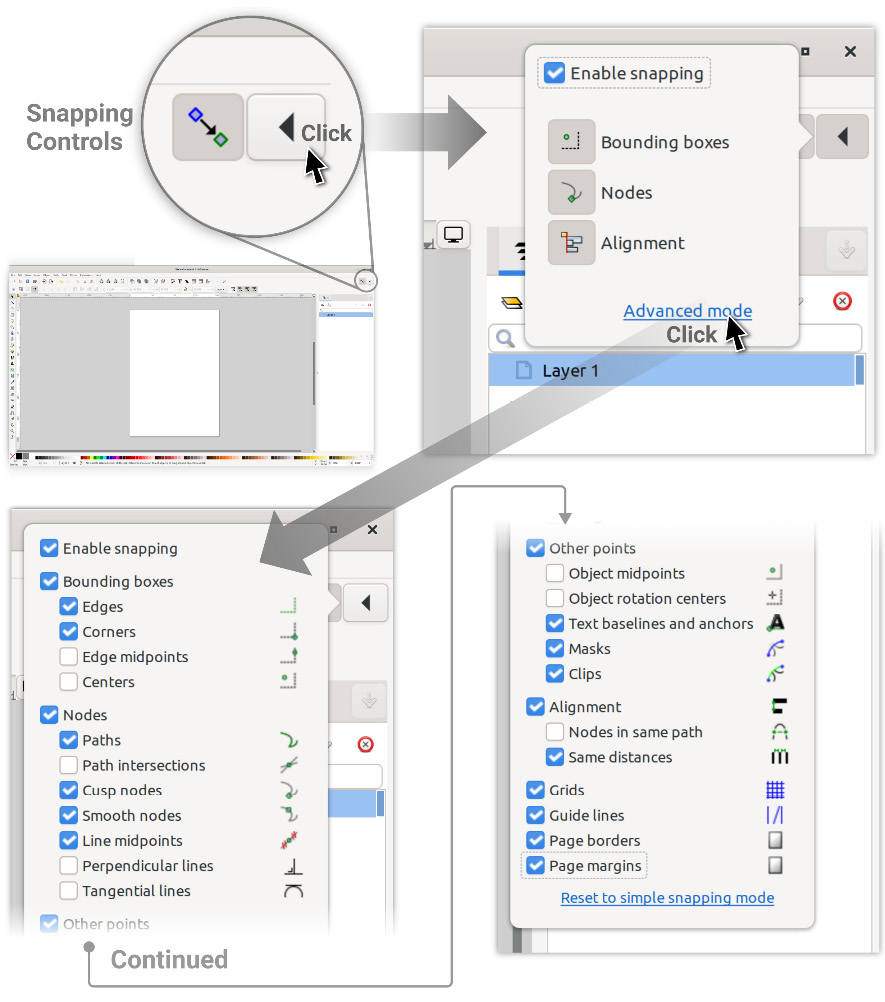
Figure 1.24 – Expanding the Snapping controls to Advanced mode for all snapping options
The following summarizes what these checkboxes do:
- Enable Snapping: This button will toggle all snapping on and off so that you can activate or deactivate snapping easily. You can also use the % key to toggle this on and off.
- Bounding Boxes: When you select an object, a dashed rectangle appears around it. This is called the bounding box, and this checkbox turns snapping on/off to this invisible boundary. The indented checkboxes in this section allow you to control which parts of the bounding box Inkscape snaps to.
- Nodes: Nodes are the points between each line of your shape. If you’ve converted your object into a path, this section allows you to snap one object to another by one of its nodes. We will cover more about nodes and paths in Chapter 5, Node Editing – Modifying Your Shapes with Nodes and Curves. Like the Bounding Box section, the indented checkboxes let you tell Inkscape what kinds of nodes you want to snap to.
- Other Points: This is a catch-all for those snapping options that don’t fit nicely into one of the other groups – for example, snapping to the baseline of a line of text and anchors, or an object’s rotational center or midpoint. We will learn more about them later when we talk about rotating and transforming shapes.
- Snap to Grid: By default, the grid doesn’t show up in Inkscape, so turning this option on will snap objects that you are moving to the invisible grid. If you want to see the grid, simply tap the # key (which looks a little like a grid), or toggle it by selecting View > Page Grid.
- Guide Lines: You can create snapping lines by clicking on a ruler and dragging it outward onto the Desk or Page. Click and drag from the top ruler to make horizontal lines, and from the top-left ruler to make vertical lines. You can also click and drag from the top-left corner, where the rulers converge to drag out a 45-degree snapping line.
Then, all you need to do is use this snapping toggle to snap your objects to your newly created guides. Use the > key to toggle these lines on and off or select View > Guides. You can also remove a guide by dragging them back to the ruler, or simply hovering your cursor over one and hitting the Delete key.
- Page Borders: Yep, you can even snap your shapes to the border of the page using this toggle.
- Page Margins: If you’ve set page margins with the Pages Tool property, you can snap objects to them.
In the final section of this chapter, we’ll look at Display Transform Control.